
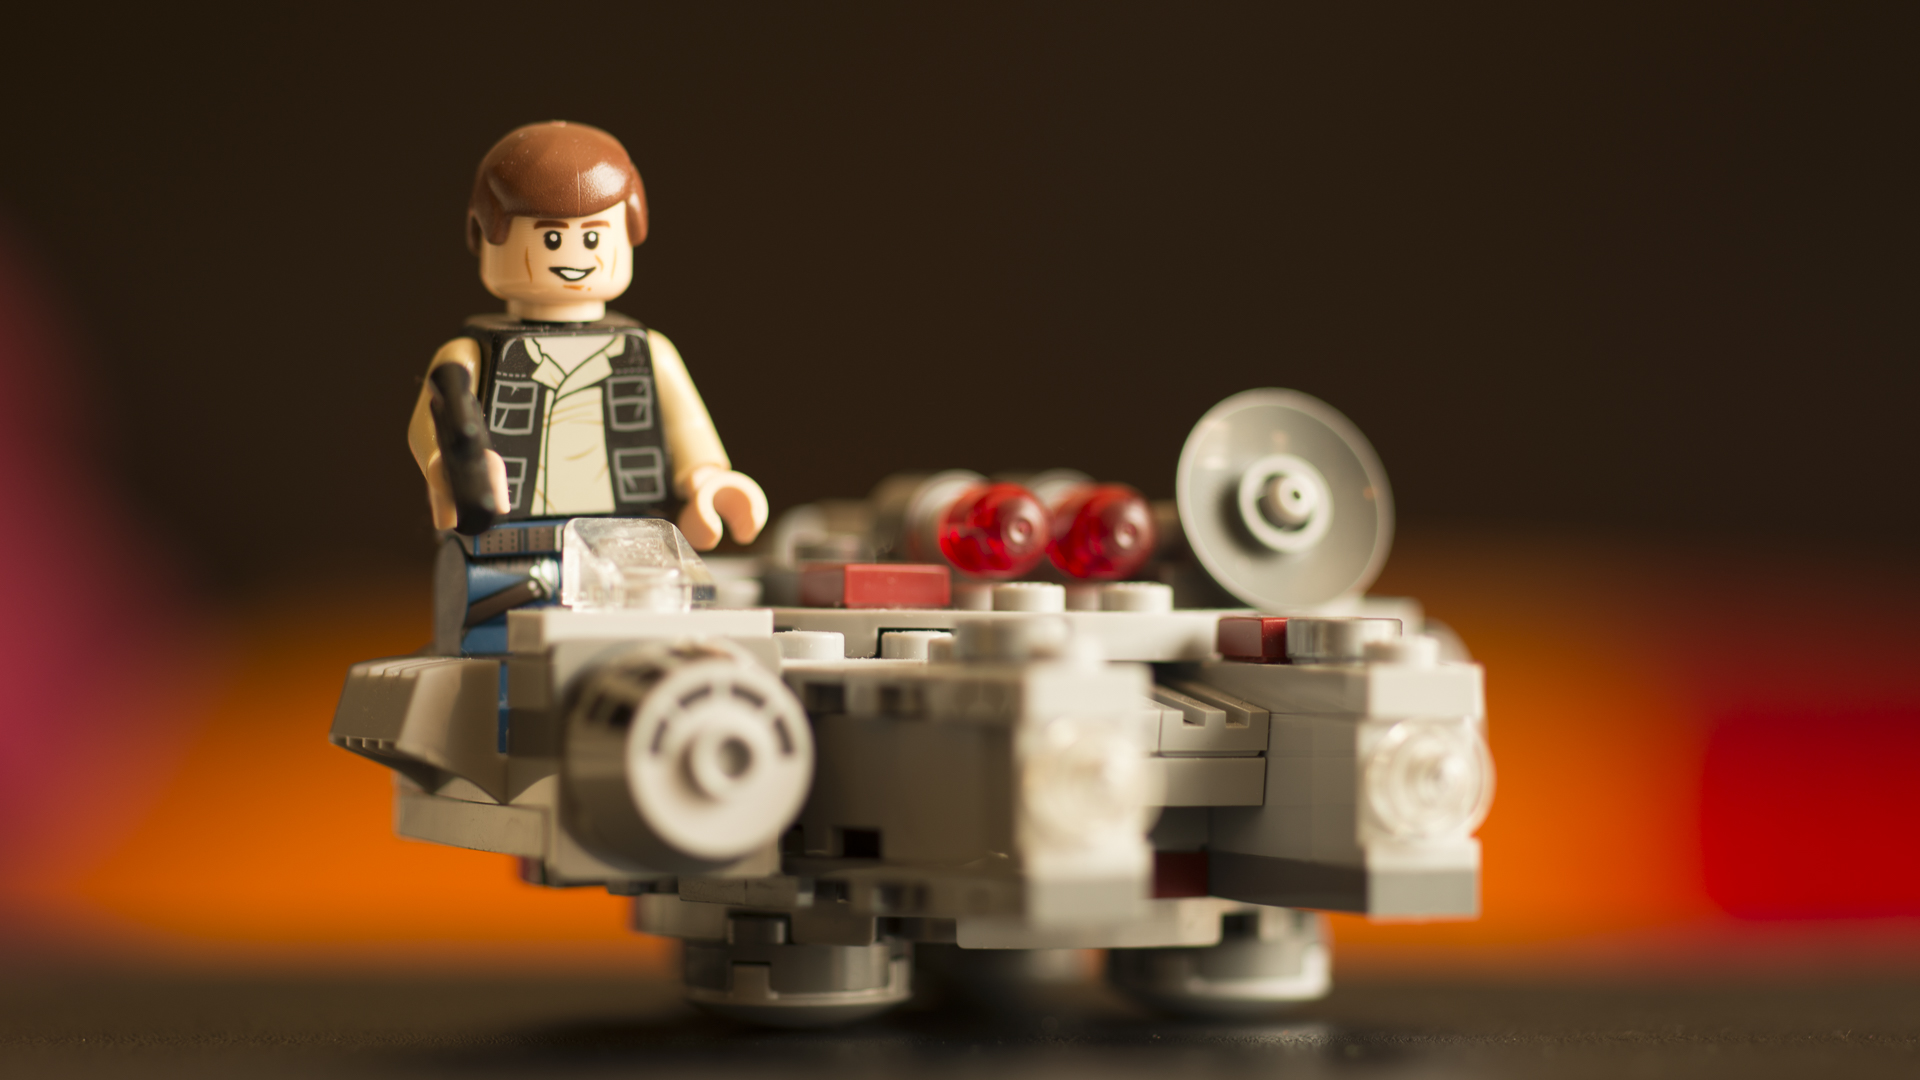
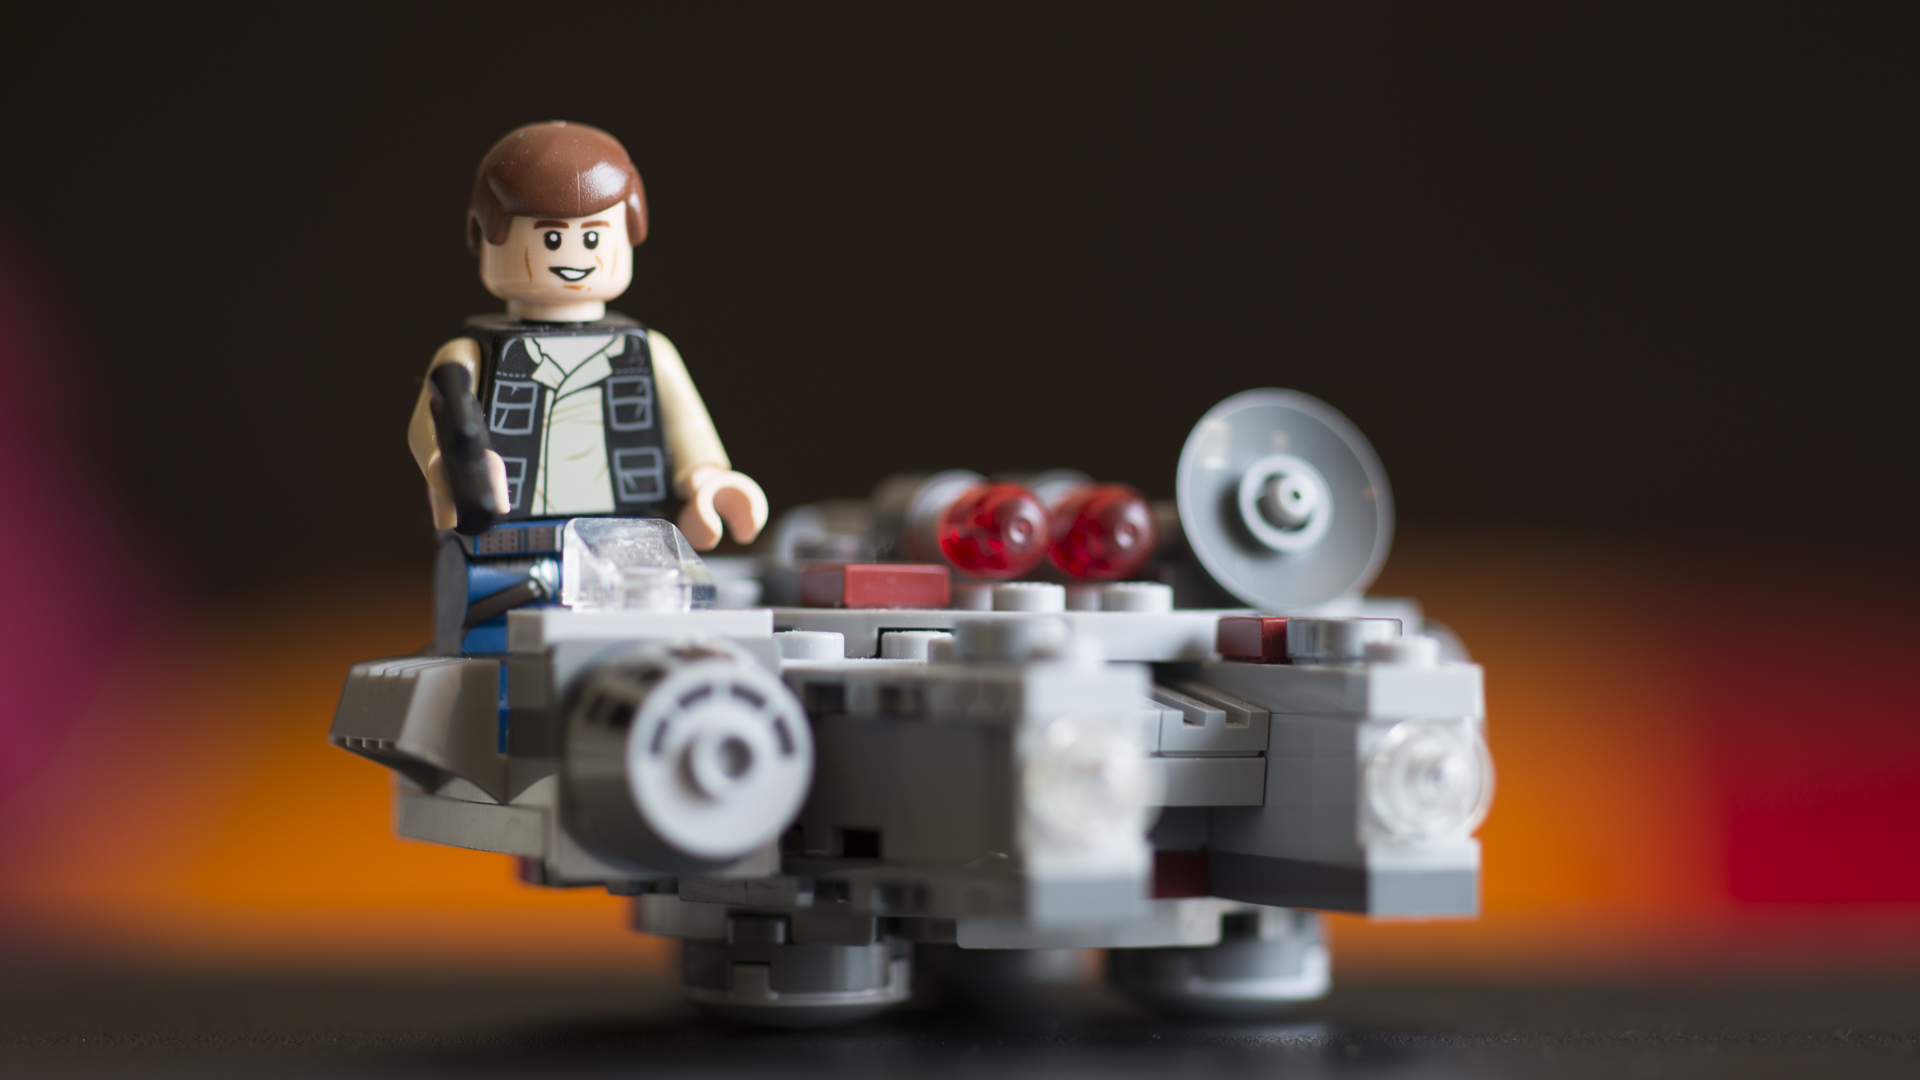
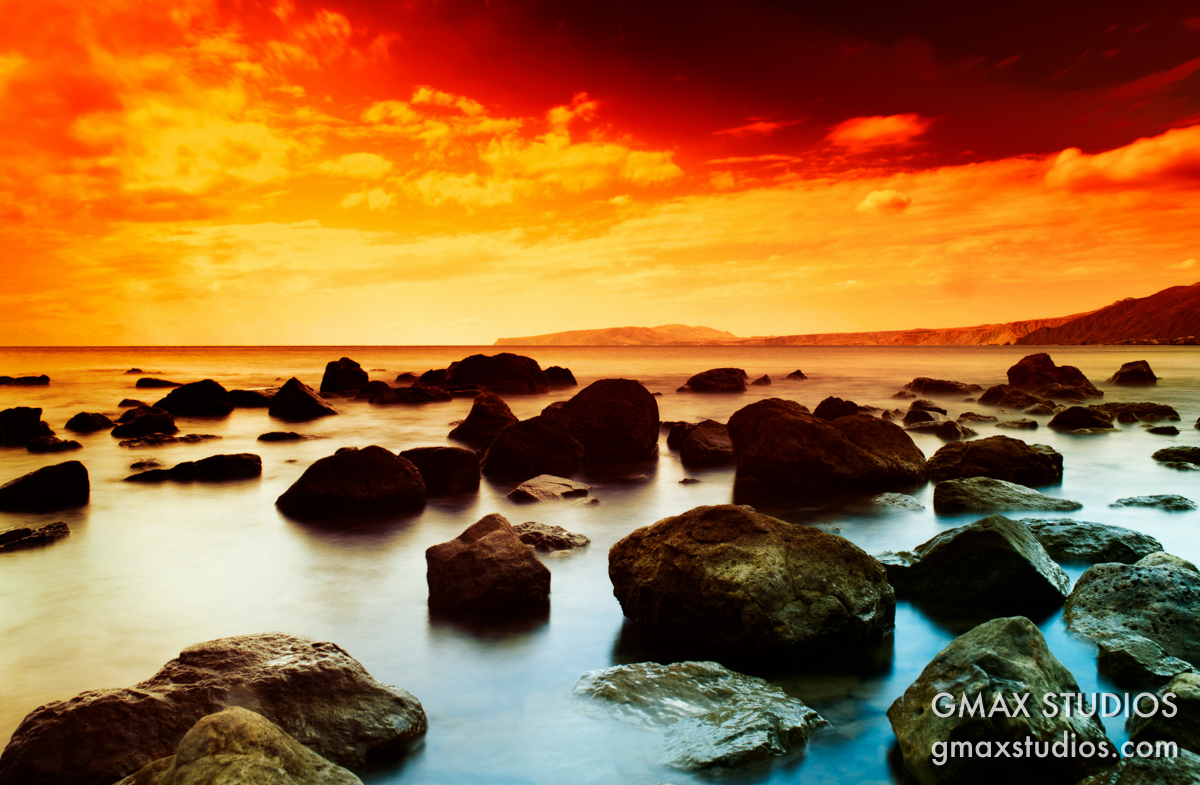
Photography Inspiration - Part 1 - Going to the movies

Photography Inspiration! Ah, you elusive woman. always in the mood for a game of hide and seek. You elude me most of the time and yet when I give up all hope - you stare me in the face.
When you learn photography, it is easy to get bored of shooting the stuff that you usually do. You find that you have shot almost everything around you - at least, you think so!
I often look at movies as a source of inspiration or ideas to create a new photograph or explore a new style of photography.
Looking at the work of masters on top of their game is a great way to learn photography. I am not saying that all of us have access to spaceships and elaborate sets and lights.

But looking at movies and analysing their shots and frames can teach us a great deal about learning photography.
We can learn about composition

We can learn about contrasting colour

We can learn about taking close shots of everyday objects

We can learn about the use of dominant colours

We can learn about using coloured light to create a mood

Learn about putting friends in awkward poses to create an image

WARNING:
I do know the importance of inspiration when you learn photography but please don't go setting fire to people's houses in the quest for a good photograph.

Note:The images in this article have been taken from an article that originally appeared on Buzzfeed and was titled 129 of The Most Beautiful shots in Movie History by Daniel Dalton. Take a look at the original article if you want to see all the 129 frames. Clicking on any of the images will take you to the original article as well.
Please leave a comment below as to where do you get stuck and what would you like to see in the next part of our Photography Inspiration series and please don't forget to share this article with your friends if you liked it.
Learn photography now:
THE ULTIMATE BEGINNER'S GUIDE TO PHOTOGRAPHY
You can learn photography by subscribing to the GMax Studios YouTube channel. We really have some great videos there.

Subscribe to GMax Studios YouTube channel

How to prevent photos from being stolen online
There is a short answer to this question of how to prevent photos from being stolen online. The answer is - nothing! This is not some random sensational statement but a fact as I have discovered from personal experience.
Once a picture is out there on the Internet - there is nothing you can do to prevent them from being stolen from a person who is determined to do so. Watermarks can be erased, the picture can be cropped etc. You can subscribe to services like Digimarc Digimarc Guardian for Images to keep track of your stolen images but the question is, do you have the time, money and resources to do this? If you find out someone has stolen your images do you have the additional time and resources to go all Liam Neeson on them - hunt them down and make them pay?
Nobody steals Liam Neeson's photographs and gets away with it!

How to prevent photos from being stolen online
Who "steals" photographs on the internet?
In my opinion, there are two kinds of people who "steal" photographs from others.
PEOPLE WITH NO MALICIOUS INTENT: People who just find your photograph interesting and want to share it for others to see. They feel an emotional connection to it and hence share it. A lot of my photographs from my hometown Lucknow, get posted in this manner. Perhaps, they have never seen my hometown shot like this and perhaps (I hope!) those were some of the best pictures they stumbled upon.

Lucknow, Uttar Pradesh, Bada Imabara
The second reason why they might do this is the joy of discovery. When they post these pictures, they say to their peers,"Hey, have you seen this? I discovered this first!"

How to prevent photos from being stolen online GMAX STUDIOS
The photograph above is perhaps one of my most "stolen" photographs. It is a photograph of an actress from one of our very popular shows. It went straight from my Facebook page to a thousand other pages, forums and websites. I was angry at first but then I realised that that no one meant any harm. They were just avid watchers of my TV show and they just loved the picture. I messaged some of the biggest groups and fan pages and told them,"A credit would be have been nice!" or "You could have just shared it!" You will be surprised to know how many people responded with a credit in a repost or just re-shared the photo again from my page. My website which was already showing a spike, just went nuts!
PEOPLE WITH MALICIOUS INTENT OR WHO DON'T GIVE A DAMN: These are people who try to pass of your work as their own to gain a better standing in their peer group or try to get assignments based on your work since they are not capable of achieving the standards your photographs have. There are also a large number of websites which use your work depicting your picture as a representation of the content they are creating. A lot of them, use your photographs on commercial websites including international news websites. Hell, some people have even won contests, using photographs belonging to others.
These are the people you should go after but there is no reason for you to all ballastic. Try to be civil and start a reasonable dicussion. You might be outraged but be cool. You might be surprised by the results. As far as news outlets go, you might not get anything but an apology because news outlets are covered by "Fair Use " and they use it to their advantage.
Fair use as defined by Wikipedia is:
Fair use is a limitation and exception to the exclusive right granted by copyright law to the author of a creative work. In United States copyright law, fair use is a doctrine that permits limited use of copyrighted material without acquiring permission from the rights holders. Examples of fair use include commentary, search engines, criticism, parody, news reporting, research, teaching, library archiving and scholarship. It provides for the legal, unlicensed citation or incorporation of copyrighted material in another author's work under a four-factor balancing test.
Different kinds of stealing
Stealing photos from social networks
Most of the content that is stolen, is stolen from social networks and posted to a social network and according to the Digitial Millenium Copyright Act, this is illegal. While most of the poular networks have a facility where you can report stolen images, I have a sneaky feeling that this is somehow counter productive to their core business. This is the reason perhaps, that over the years they have made it more difficult to report stolen images.
The Twitter page for reporting violations is here.
The Facebook page for reporting violation or infringement of your rights is here.
The Instagram page for reporting violations is here.
With that having been said, I have found both Facebook and Twitter to be quite responsive when you submit a complaint. They take action pretty fast and they are, in most cases, pretty fair. I have lodged about 5 complaints with Facebook, so far (in about 6 years) and in all of them, I have been successful in getting the photographs removed.
STEALING FROM or TO WEBSITES
This is where it gets slightly tricky. Since each website is unique and might be hosted anywhere in the world, getting your photograph down might be a bit of a problem. There are of course, paid websites that offer to do all the work for you but I have never tested one (including the one I linked to) therefore, cannot vouch for how effective they are. Here is what you can do on your own.
Track the owner/webmaster of the concerned website by using the contact form or contact us page.
If you can find the contact on the website, use a service like WHOIS to see who the domain is registered to.
Send an email to the adress mentioned there, marking it to the hosting company as well and report that your images have been stolen and request a removal. The email should have all the deatils that you can gather - both to establish that the work/image in question actually belongs to you (yes, you have to prove that beyond doubt) as well as details about the infringement. In this email, you may ask them to take down the image or give you credit or link back to your website - whatever makes you happy. Please be civil in all your communication. State things as facts, though you might be angry. "How dare you steal my picture? IT IS MINE!" - is not really going to work.
Here again, I would like to say that a lot of people don't even know that reproducing your image amounts to stealing, so give them a chance to explain and remove the photo or photographs or link back to your website, if you want.
Usually, this works, more so if you have marked the mail to the domain hosting provider.
If there is no response or the response is not what you wanted, the next step is to issue a DCMA Takedown Notice to the search engines like Google, Yahoo and Bing asking them to delink the offending website from their searches. You can read more about this here.
MY PERSONAL APPROACH
Watermark your images in a way that it does not take away from the beauty of the photograph. Also, make sure that it includes your website - so that people who really like your photograph can go to your website to check out your work.
Most people don't want to steal - they just want to share. Make it easier for them to share, so that you and your work becomes known to more people.
Every once in a while, upload a really good photograph in high resolution for the people to enjoy and use as wallpapers if they wish to - for personal use. Tell people to that it is alright to use your photographs for personal/non commercial uses as long as they link back to your website/Flick page etc and give you credit.
Make sure that people who want to use your photographs for some other use can easily contact you by creating a website or About me page.
Be generous - I have had many students ask me for hi-res photos to use for their project/presentation. I usually give it to them and when the presentation/project is a hit, they will usually mention you in a social media post. I have also made a few friends this way.
With reference to the above points, I think Trey Ratcliffe has it pretty much nailed down. He says that photos/art is meant to be shared - not hoarded and his terms of use put it down pretty well. Licensing | Stuck in Customs
Build a community around the people who love your photography and see how much you gain from it - both in terms of positive energy and exposure.
Go only after the people who you think have caused you monetary loss or stolen from you as if it was their right to do so or they have made money while reproducing your work.
THE POINT IS to try in your own way, to educate internet users to ask before using someone's work and give due credit while sharing. Ask people to share on Facebook, rather than downloading and reposting. Encourage them to use apps like
on Instagram.
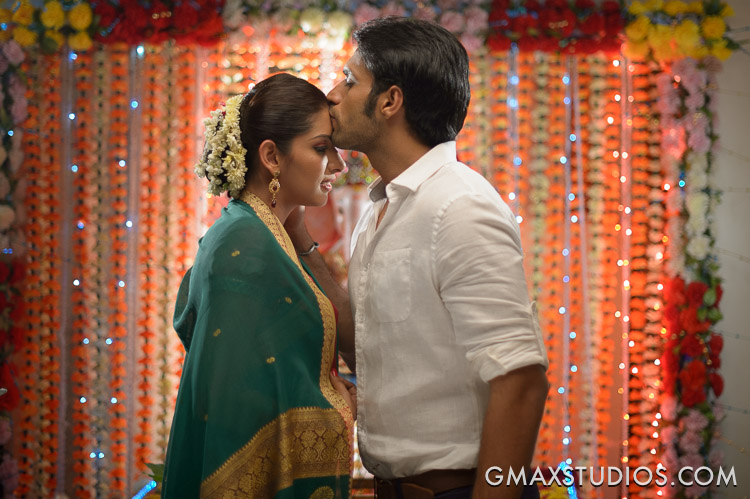
A photo that I took of a coffee cup got shared by a friend. Her friend shared it and so on until it reached the feed of someone working at a big online publication and guess what - they were doing an article on coffee. They contacted me for permission and I gave it to them for a small price - understanding that it would get me good exposure. They ran it as the cover image for their article. That particular morning when I took that shot - I never imagined the journey that photograph would make.
#coffee #love #kiss #cinderellamax #lovestory #romance
A photo posted by Gorky M (@gorky) on Dec 7, 2014 at 5:45am PST
Conclusion
Somehow, I have seen, people who are just starting out with photography are more concerned with their images being stolen than the established photographers. I have gone done that route and found out that it is almost always, a waste of my time trying to hunt down all the people who are stealing your images.
Stop fretting too much about people stealing your photos.
Take the basic precautions like watermarking with your name and website.
Upload files you don't want stolen in small dimensions. (500px should be fine)
If there are photographs that you really don't want stolen and want a 100% guarantee - do not upload them.
Once in a while use a tool like Tiny Eye or Google Image Search to see where your photographs are being shared.
As I said earlier - establish intent first and then go after the real offenders. With the others, it just pays to establish communication.
Spend most of your time on improving your skills and craft.
Develop your own unique style and make it known to people. So any one who tries to pass off your work as their own gets caught and called out. Trey Ratcliffe and Joel Grimes are perfect examples of this.
Try to get to a point where people even start thinking that your photographs are worth sharing. No seriously! This was one of the first benchmarks that I created for myself.
Hope and pray someone worthwhile steals your images and you can sue them for a million dollars. I have been doing this for years but no luck so far! I promise to keep you updated.
The case of Noam Galai's "Stolen Scream" is one of the most interesting stories and case studies about a stolen photograph. You have to see how it got stolen and what happened to it. See all about it here
and leave us a comment as to what do you think of it. What would you do if something like this happened to your photograph?
Subscribe to GMax Studios YouTube channel
If you managed to reach here, to the end of this really long post and found it helpful, please share it with your friends.

How to shoot in program mode
How to shoot in program mode? The question that is more likely be asked is - why shoot in program mode? What is the big deal? The P mode is for beginners, right? Well, nothing could be farther from the truth. The Program or P mode is a very powerful mode that can really make the difference between a good picture and bad - or not getting a photograph at all.
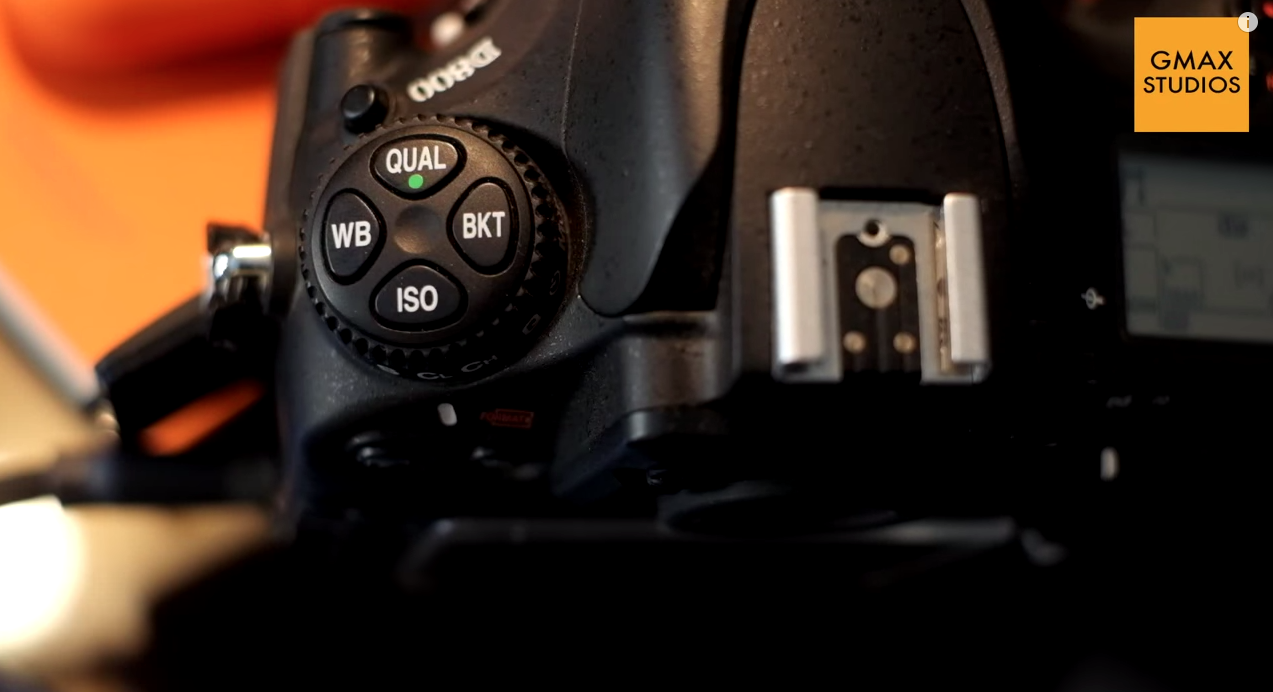
Well let's sort this out first - Nikon calls this the Programmed Auto mode while Canon calls it the Program Mode. So all of us Nikon users have been all saying it wrong all these years and now that we have admitted it - let us move on.
The program mode is denoted by the letter P and you have to press the mode button on a Nikon and turn the command dial until the P appears on the screen like in the photograph below.

Some cameras have a dial (like most of the Canon cameras) which are marked for different modes so it is just a matter of turning the dial to P as shown in the photograph below.

Now let's see what happens when we switch to the P Mode. According to the Canon website:
The camera takes a meter reading from the scene, assigns an exposure value, and then uses internal algorithms to select a suitable shutter speed and aperture.
In simple terms, the camera itself chooses the best setting for the scene, in terms of shutter speed, and aperture while you do nothing! Yes. That's true. You do nothing and that is why most people think that shooting in the Program Mode is just for beginners - which is just a polite way of saying "idiots"! But as we shall discover in a while, nothing can be farther from the truth.
In fact, the Program Mode, is a very powerful Mode in which the camera takes all the decisions related to aperture and shutter speed and you, as photographer, focus on the two most important things in photography. One which is
focus
and the other one which is your
composition
.
Now it might sound easy but to hand over the controls of the two most important settings, that is aperture and shutter speed to the camera is a very scary thought. Changing either one could have a big impact on the final photograph. Enter - The Flexible Program Mode! Tada!!!
What is the Flexible Program Mode?
The Program Mode also has an extremely powerful setting called the Flexible Program Mode. Canon calls it the Program Shift mode. Since I am a Nikon user and I do cherish my sanity and yours - I will continue to refer to this mode as the flexible program mode but the explanation will (hopefully) apply to both Nikon and Canon.
According to the Nikon website:
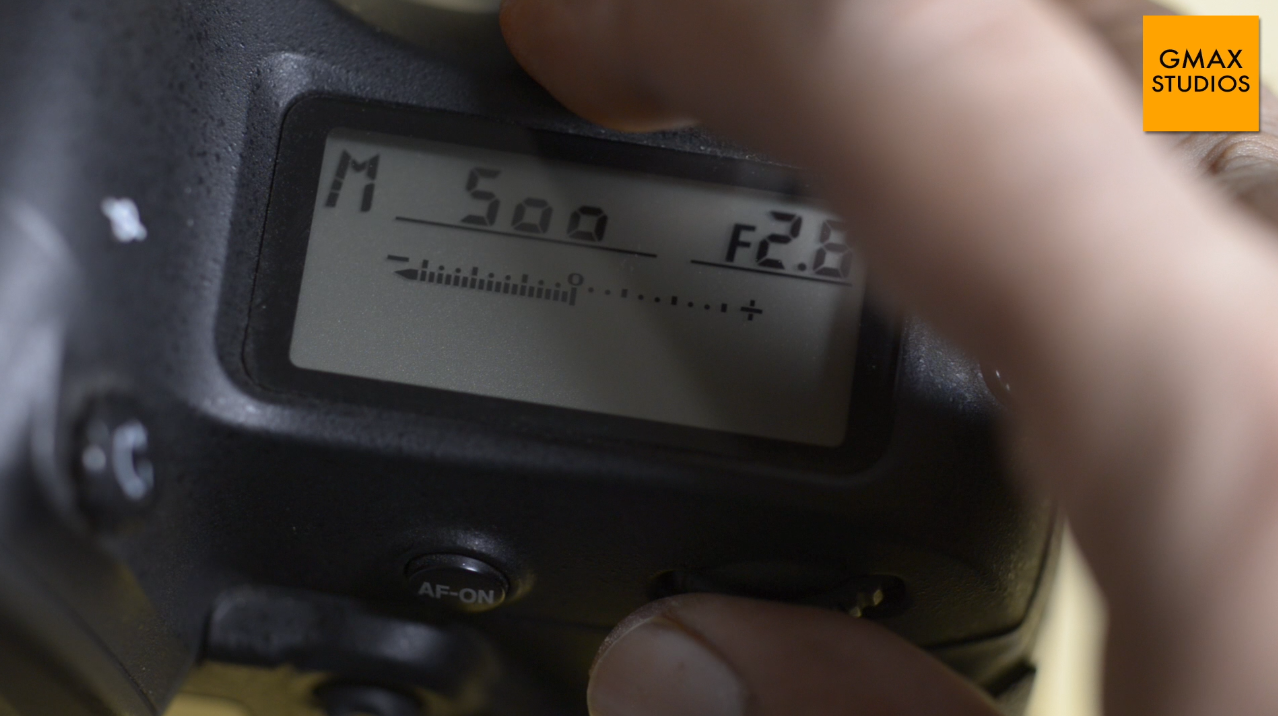
In mode P, the camera automatically adjusts shutter speed and aperture for optimal exposure. You can, however, choose other aperture and shutter speed combinations that will produce the same exposure: this is called "flexible program".
To get into the Flexible Program Mode all you have to do is turn the command dial while in the program Mode on a Nikon. On a Canon you have to turn the wheel at the back of your camera.
You will see a star sign * appear next to the P when you are in the Flexible Program mode.

What the Flexible Program Mode does that it locks the exposure value of the scene. This means that you are free to change your aperture or your shutter speed and your exposure value will not change. Now that is an extremely powerful thing to have at tip of your fingertips because you can decidein an instant, whether you want to shoot the scene at a wider aperture or at a faster shutter speed.
To change either the aperture or shutter speed you turn the respective dial either clockwise or counter clockwise.
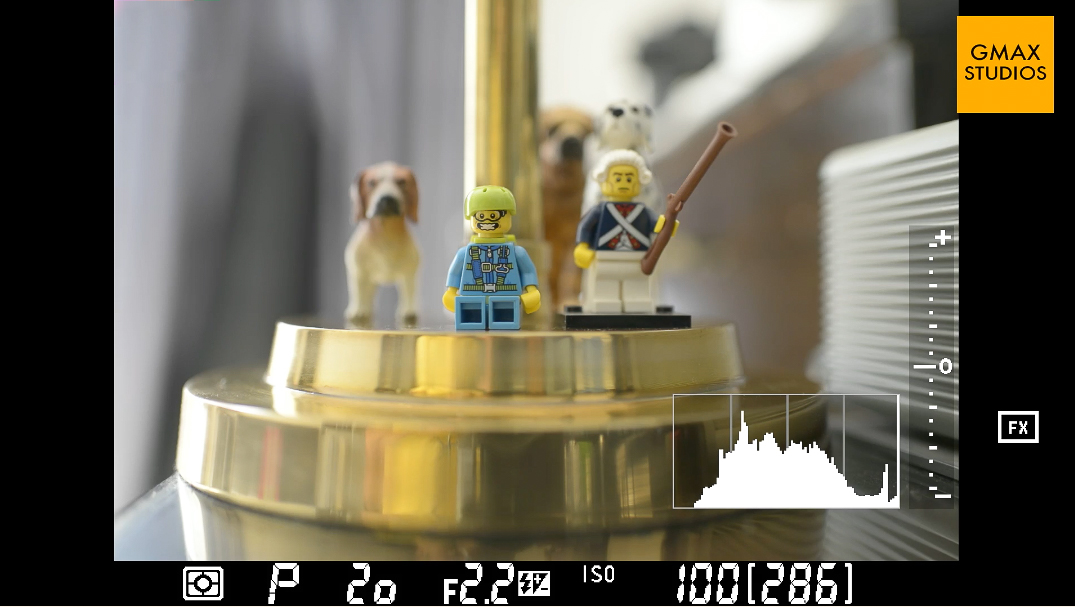
Given below are the two extremes of shooting in flexible program mode.(See the * next to the P?) The first photograph is at f1.4, resulting in a shutter speed of 1/40 of a second.
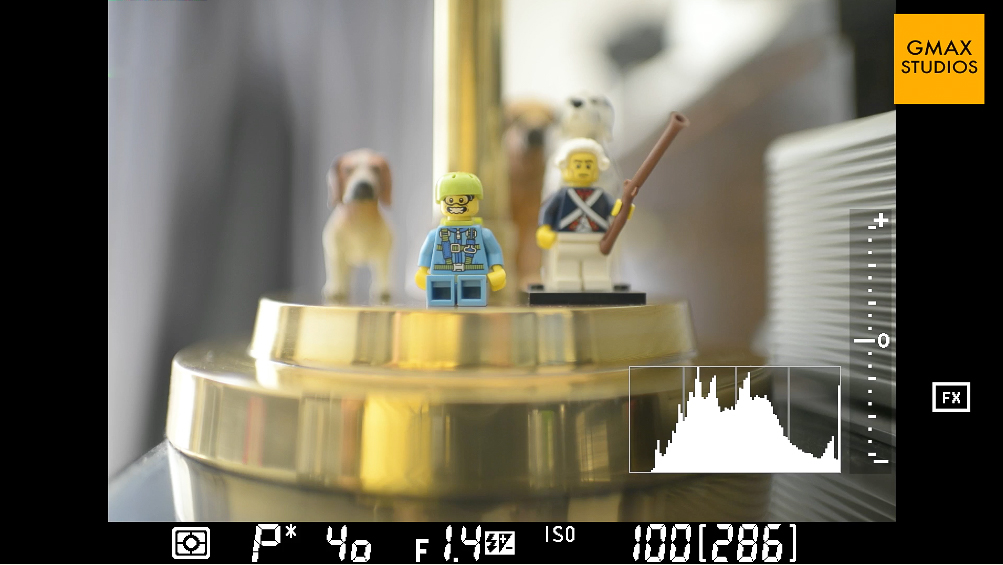
The second photograph is at f11, resulting in a shutter speed of 1.3 seconds. As you will notice, the settings have changed drastically but the exposure is still correct. Both the photographs are neither underexposed nor overexposed.

When to use the Program or Flexible Program Mode?
The Program Mode or Flexible Program Mode is usually used when we don't have time to mess around with the settings and to take decisions regarding whether to shoot in the Aperture Priority Mode or on Shutter Priority Mode.
For instance, I know a lot of wedding shooters who shoot in this mode because very often they want to decide in a second what they want to give priority to - the shutter or the aperture.
So that moment when the bride throws the bouquet of flowers in the air? You want a high shutter speed to freeze the action. Similarly, you don't want the father of the bride to be completely out of focus if he is standing slightly in the background. This time you will want to control your aperture.
Also read:
How aperture affects your photographs
and
How shutter speed affects your photographs
I even know some sports shooters who shoot from the sidelines, who are more comfortable in the Program Mode than in Shutter Priority, as you and I would like to think.
Tip
I usually don't shoot in situations that require me to shoot in the Program Mode, but what I do is when I keep my camera in the bag, I switch it to the Program Mode. I do this in case I need to take my camera out and shoot something at a moment's notice. It has never happened so far but it makes me feel like a cowboy with his gun cocked and ready to fire! Yeah baby!
If after all this reading, you have still not managed to understand the P Mode, here is a short video to help you out.
Please share this article with your friends if you found it useful. Also, please leave us a comment if you have a comment or just want to show your appreciation.

ISO shutter speed and aperture relationship explained
The Exposure Triangle - that is the relationship between ISO, shutter speed and aperture explained.
I remember the time when I had just picked up a camera with a serious intent to start shooting. It was all so confusing. "So many settings!" I used to keep thinking and then one day I realised that while photographing I could only control the aperture or the shutter speed. I was shooting film, so I had little control over ISO - once the film was inside the camera, it was pretty much fixed at what ISO I was shooting.
So now, while shooting digital, in spite of all the confusion there are just three things you need to control to create a good photograph - ISO shutter speed and aperture (Ok four, if you want to count in white balance too!)
What is the relationship between ISO, shutter speed and aperture?
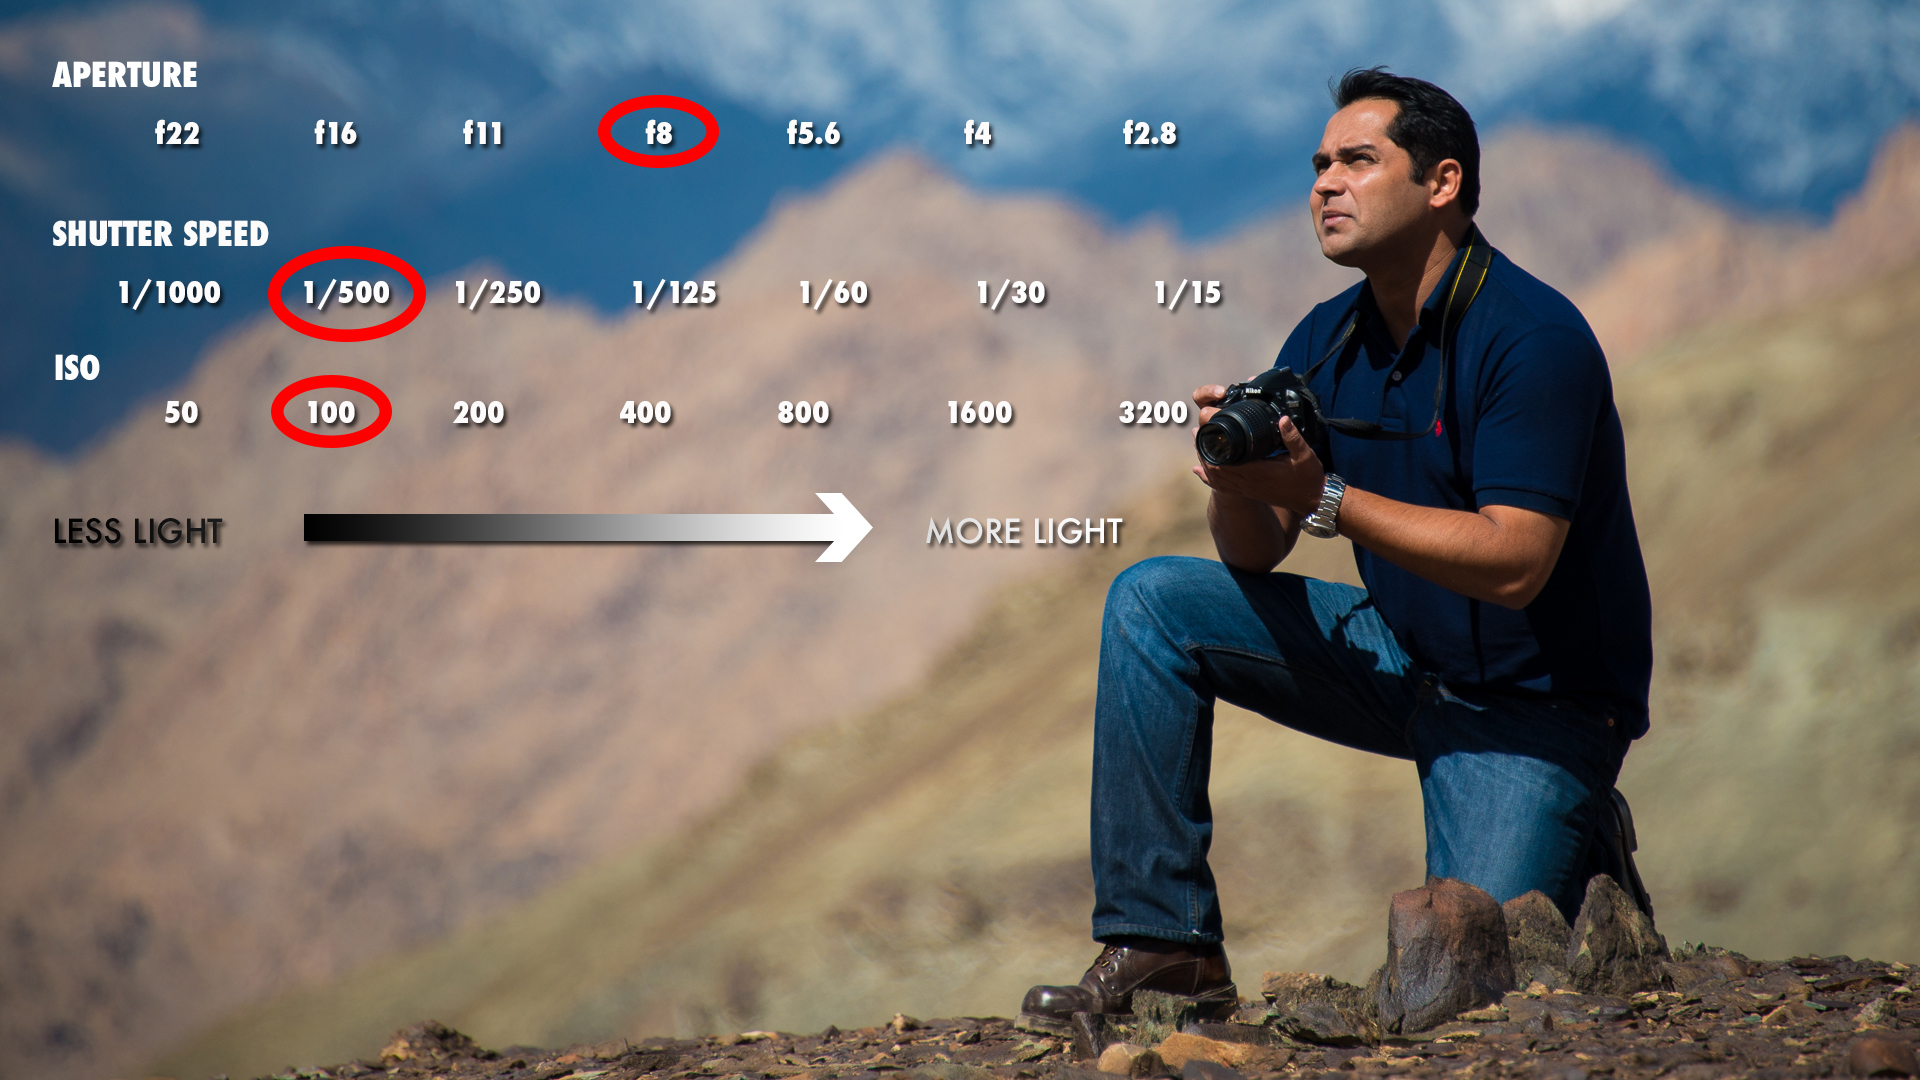
The relationship between ISO, shutter speed and aperture is also known as the exposure triangle.

EXPOSURE TRIANGLE
These three settings define what the exposure value of a photograph. It means that the exposure value of any photograph can be expressed as a combination of these three settings or values. For example the photograph below was taken at an exposure value of f11, 1/250th at ISO 100 - where f11 is the aperture, 1/250th(of a second) is shutter speed and the ISO is 100.

iso shutter speed and aperture relationship
So now if I increase the amount of light entering the camera by opening the aperture by 1 stop to f8, the photograph becomes slightly overexposed as seen in the photograph below.

ISO shutter speed and aperture relationship - overexposed
In order to compensate for this, I will have to increase my shutter speed to 1/500 in order to get a properly exposed photograph again. This because I have used another setting (shutter speed) to decrease the amount of light by the same value that I increased the amount of light.
EV valueok500
So, what this relationship primarily boils down to is this:
If you you increase or decrease one of the values in the exposure triangle - you will have to increase or decrease another value BY THE SAME value in order to get the same Exposure Value.
Sounds confusing? Well it kind of does when you put it in words but the good news is that once you see the video below it will become perfectly clear. Please subscribe to our channel by clicking here if you like the video and would like to see more of these.
Subscribe to GMax Studios YouTube channel
Please share this video with your friends if you liked it. Ask your questions in the comments below and also let us know what other videos or articles you would like to see in the future.


How to set custom white balance on Canon cameras
What is custom white balance?
Please read: What is white balance if you need to understand the concept of white balance in detail.
In this article, we will see how to set custom white balance on Canon cameras. If you need to see how to white balance Nikon cameras, please click here. balance Every camera has various settings to shoot photographs under different kinds of lighting conditions. If this was not the case, the colour of the light falling on the subject would influence the colour tones of the subject. You might have noticed a warm tone to some of your photographs like the one below.
Sometimes there appears to be a bluish or cold tone to the photographs that you take - like the one below. These two differences (warm and cold)are most evident when you shoot photographs indoors under lights of the bulbs or in the evening.

The bulb casts its's warm light on the subject making it warm and the evening light renders a blue tone on the subject due to its "cool" nature. In order to get absolutely neutral or true colours under any lighting situation we have to set custom white balance so everything appears neutral - neither warm, nor cool like the photograph shown below.
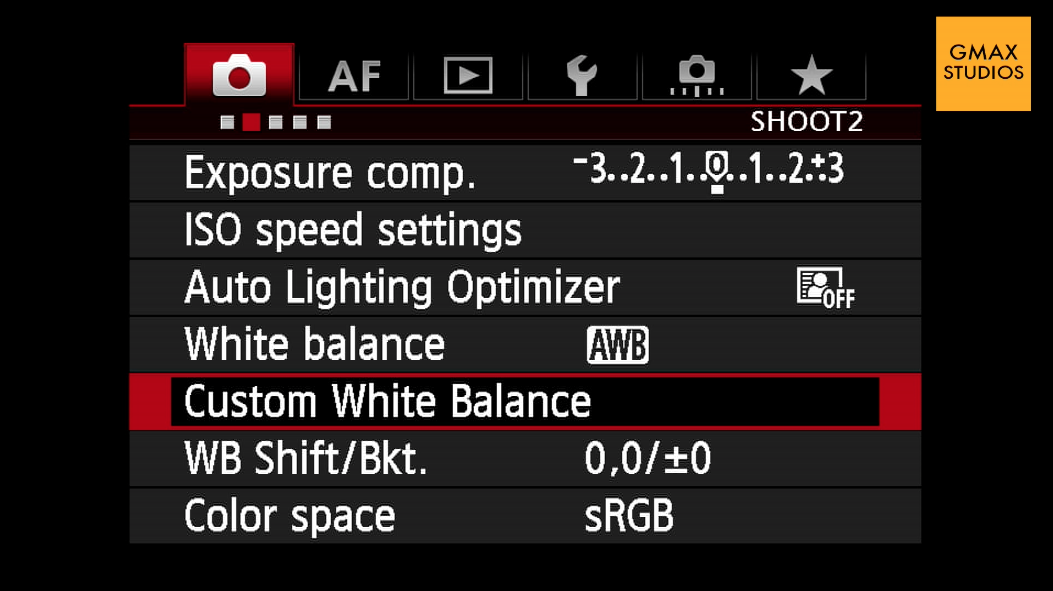
How to set custom white balance on Canon cameras?
When you set custom white balance on your camera, it means that you tell the camera what is white and the camera makes adjustments accordingly to all the colours, making them appear neutral - without any tone or cast. This is done by showing the camera a simple white sheet of paper under the same lighting conditions that you are taking your photograph and then you take a photograph of the white paper. The white paper should fill the frame fully. You then go to the menu and choose the custom white balance setting and press ok. The camera will show you the photograph that you have just taken and ask you whether it should use this photograph for the custom white balance setting. Confirm this by pressing ok again. Then go to the white balance setting and choose the custom white balance setting which is denoted by the symbol of two triangles and and a square. This symbol is shown in the photograph below.

You have just successfully set custom white balance for your camera and now when you take a photograph all the colour cast will be gone and your colours will appear true and neutral. This whole process is explained in this short video below. If you like it please do not forget to subscribe to our channel for more photography tips and techniques. You can subscribe to the channel by clicking here. Please feel free ask any questions in the comments below.
https://youtu.be/x6BgZFxZG6k
Important
- The white paper should fill the entire frame – it should be all that you can see in your viewfinder/monitor.
- If you are shooting a wide shot, zoom in to the white paper or move closer to the paper.
- Do not get the paper close to the camera as the light falling on the paper has to match the light falling on your subject. Get the camera closer to the paper instead.
- If the camera is having a problem focusing on the white paper, switch to manual focus. It does not matter even if the photograph is out of focus for taking a white balance reading.
- Sometimes the will NOT display the photograph of the paper that you have just taken which means that the photograph was not suitable for taking a white balance reading. Check if your exposure is correct and take another photograph of the white paper. Underexposure or over exposure might cause a bad reading.
Please leave a comment if there is a question that you would like to ask or would like us to make a video on a specific photography topic.

How to white balance Nikon cameras

Why do a preset white balance?
The cameras made today are extremely sophisticated and they can judge pretty accurately what kind of photograph is being shot under what lighting conditions. But sometimes, you need to give them a little push so that they are able to serve you better. If you feel that your photographs are too warm or too cool for your taste, maybe it is time for you to do a custom white balance or as Nikon calls it - preset white balance. We are going to take a look at the easiest, cheapest and fastest way to white balance Nikon cameras. If you want to know about custom white balance on Canon cameras, please read this article here.
White balance is nothing but getting rid of the colour casts on your photographs by telling the camera, "Hey! This is white! Please make other adjustments accordingly!" So logically, the easiest way of doing this is by showing the camera a piece of white paper and telling it that this is white. Different cameras have different ways of measuring white under different lighting conditions, though internally the process remains the same.
How to white balance Nikon cameras
Nikon calls this adjusting the PRESET white balance and it is done by pressing the WB(white balance) button on the camera and turning the command dial until the display show "PRE". You then release the WB button and press it again. The PRE now begins to flash. This means that the camera is in ready mode to take the new white balance setting. Now all you need to to do is put a white paper in front of the camera and press the shutter button while the PRE is still flashing. The display should read "GOOD" which means your preset white balance was successful.
Important
- The white paper should fill the entire frame - nothing else should be visible.
- If you are shooting a wide shot, zoom in to the white paper or move closer to the paper.
- Do not get the paper close to the camera as the light falling on the paper has to match the light falling on your subject. Get the camera closer to the paper instead.
- If the camera is hunting for focus, switch to manual focus. It will not make a difference if the paper is out of focus to take the white balance reading.
- If the camera displays "NO GOOD" that means that the camera was unable to get a proper reading. Check if your exposure is correct. Underexposure or over exposure might cause a bad reading.
- Make sure that the PRE is flashing when you press the shutter button.
Please watch the short video below to understand this process better. If you have any questions, please ask them in the comments and if you like the video, please subscribe to our channel by clicking here.
https://youtu.be/CL_WPm13zI0

Please ask any questions that you might have in the comments section below.

Photography | Shooting in manual mode
Shooting in manual mode
Shooting in manual mode is made out to be something really, really BIG. It's as if you are not a true photographer until you shoot in manual mode. Nothing could be further from the truth. Each mode on the camera whether it is aperture priority, shutter priority, program mode or manual mode has got a specific use and a smart and good photographer knows when to use them.
Why shoot in manual mode?
The question that many people ask is - why shoot in manual mode at all when the average camera has such sophisticated technology built into it that it is almost guaranteed that you will get a perfect exposure every time? Shooting in manual mode has it's benefits. One very basic thought behind shooting in manual mode is that it really helps you understand the process of taking a photograph. In that sense, it makes you a better photographer.
Once you are familiar with the way a photograph is made and you understand the reason why a photograph turns out the way it does, it will be easier for you to shoot in other modes as well. Also, it has the benefit of being able to replicate the look and feel of the photographs that you like. A great example of this is people who shoot portfolios in the studio. Once they have figured out the look they want, they know exactly what settings to shoot on rather than mess with them each time a new client walks in.
I personally use the manual mode when I don't want the camera making too many decisions on my behalf. This usually happens when I come to a setting where I am happy with the exposure - both on my subject and the foreground (if any) and the background and I am not expecting the light to change too much. This might happen while shooting with flash or in natural light. In natural light though, you will have to keep checking the exposure at certain intervals to ensure that the moving sun has not caused any change in the desired exposure.
Usually the camera tries to act smart and changes the exposure value if you recompose - like move the subject to one side of the frame or zoom in etc. This is what I don't want happening. Once I am happy with the exposure, I am happy with it. That is why I use the manual mode to lock it down.
How to shoot in manual mode?
In manual mode, you take over all the controls from the camera, which is aperture, shutter speed and ISO. You do this my switching to the M mode on the camera.
- You define your starting point by deciding what is more important to you - the aperture or shutter speed.
- The ISO obviously is at the lowest setting when you start off and this will be the last thing that you increase.
Watch the video below to understand how to nail and lock down shooting in manual mode. It is no rocket science - I can definitely assure you of that. Subscribe to our channel if you feel like it by clicking here.
http://youtu.be/Hv3UXdxSxrM

Colour grading video in Lightroom

Colour grading is a slow and tedious process. With the huge amount of software at our disposal, we can go spend hours and hours trying out various options and looks with the video before we can decide what look to finally go with. As described in our post here, there are quite a few stages to colour correct your footage and get it to the final look that you want. But what if you want to do some quick colour grading and are short of time and don't want to jump through all the hoops? Or what if you just want to quickly see a number of options before you decide the final look of your video or film?

Enter Adobe Lightroom which is primarily a photo post-processing software but can come in very handy if you are in one of the situations described above and are looking at colour grading video in Lightroom. It is even better if you have one of your favourite looks saved as a "preset" in Lightroom. One click is all you need. Take a look at the video below to see how it is done and leave us a comment if you found this useful or have some questions.
http://youtu.be/ScLaTzbm_xk
Colour correction and colour grading in video

To give a professional look to your shot footage, some amount of colour (color for Americans) correction and colour grading is important. Though quite a few people use both the terms, colour correction and colour grading interchangeably - they are in fact, two different processes altogether. So what is the difference between colour correction and colour grading in video, film or photography?

Image 1: Footage as captured. Flat and raw. Notice the low contrast and saturation.
Colour correction is the process by which you ensure that all the shots in your film or video have the right white balance, contrast and tone in every scene so that there is no major visual jump in between shots and scenes and they look like a part of the same production and not different shots assembled from different sources. The final outcome of the colour correction process is to often make the shot footage look as natural or real as possible - more so because more and more people and cameras shoot in a "flat" picture style which might not look very pleasing to the eye. In one sense, colour correction is an essential part of preparing your footage for colour grading.
Image 2: Colour corrected footage. Nice punchy contrast and saturation.
Colour grading is applied after colour correction and is referred to the process of giving different colour tones and hues to your footage so that it creatively conveys the theme on which the film or video is based. It is largely a creative process where the creator of the piece decides that his film will look better with such a tonality. Colour grading is more about conveying a mood that suits the film and it involves manipulation of highlights, midtones and shadows to give the entire footage a different tone altogether.
Image 3: Colour graded. Faded out the colours and diffused the highlights. Since this was a part of a scene where the protagonist is remembering his dead wife the grading helped give the footage a dreamy feel.
Correction before grading is a nice way to remember the difference between the two and while on the subject, take a look at out video below that is perhaps the easiest, quickest and cheapest way to colour correct and grade your footage. Take a look and leave a comment if you have further questions. Also, please subscribe to our YouTube Channel by clicking here.
http://youtu.be/ScLaTzbm_xk

Using Black Rapid Camera Strap with Arca Swiss plate
How to use Black Rapid Camera Strap with Arca Swiss base plate
The problem
Using Black Rapid Strap with Arca Swiss plate.
If you are a fan of Black Rapid camera straps like me and use an Arca Swiss compatible ball head as well - then you might think that you have a problem. I really wanted to use the Black Rapid strap with my Arca Swiss plate without going though the trouble of removing the plate each time. I never though it would be possibleAt least, until I came across the Acratech Swift Clamp, which lets me use both together.

using the black rapid strap with arca swiss plate
The solution
It is a beautifully crafted clamp that lets you use your Black Rapid camera strap with any Arca Swiss compatible ball head without changing the plate. The link being the Arca Swiss camera plate that fits on both.

using the black rapid strap with arca swiss plate
So I can use my Black Rapid strap with my Arcatech ball head as well. It was making me very uneasy to think that I would have to give up using either one of them because changing the camera base plate in the middle of a shoot just does not make sense.
The Acratech Swift Clamp is so wonderfully crafted that one almost does not feel like using it. It is true craftsmanship but it comes with a price and I mean literally. At about 150 USD it is not a cheap buy but I am very happy with my purchase.

The Acratech swift clamp
Following is a short video to demonstrate how both of them work together. I hope to put up a video of it in the field pretty soon. Take a look.
Please share this article with your friends if you found it useful.
Subscribe to GMax Studios YouTube channel


What is white balance in photography and how to master it?

What is white balance?
Most of the time, most of the people set their cameras to automatic white balance and forget about it and sure enough, for most of the people this seems to suffice and they get decent enough pictures to suit their purpose. This is due to the great advances in technology that we seem to have made over the past few years. If you want real control over the kind of pictures that you take, you have to stop relying on technology and what the camera asks you to do. To take pictures where the colour is finely controlled by you and nobody else you have to master some basic techniques. White balance is one of them.
White balance (WB) is the process of balancing the colour in your photographs, so that objects which appear white in person are also white in your photographs. Our eyes are very good at judging what is white under different lighting conditions - like the yellow light emitted from our bulbs at home or the white light emitted from the tube lights we use, but digital cameras often have difficulty in "seeing" under these lighting conditions. Even daylight for that matter changes its colour at different times of the day. You definitely must have noticed that sunlight has a warm glow in the morning and evening which is missing during the day. The sunlight appears quite bright, harsh and white during midday. To understand this better let us figure out what is the difference between warm, cool and neutral tones.
Understanding tones
WARM TONE IN A PHOTOGRAPH
Any photograph that has red or orange tones on it is said to be "warm". This is usually due do some warm light - like a bulb or the evening sunlight falling on the subject.
COOL TONE IN A PHOTOGRAPH
If a photograph has a bluish tint to it, it is said to be "cool". This usually happens if you photograph subjects in shade, away from the sun or after sunset during the evening.
NEUTRAL TONE IN A PHOTOGRAPH
If a photograph is neither warm nor cool, it is said to be neutral. An important point about neutral photographs is that the colours in it are true. They appear to exactly the way they are, in real life.
The color temperature of a light source is the temperature of an ideal black-body radiator that radiates light of comparable hue to that of the light source. Color temperature is a characteristic of visible light that has important applications in lighting, photography, videography, publishing, manufacturing,astrophysics, horticulture, and other fields. In practice, color temperature is only meaningful for light sources that do in fact correspond somewhat closely to the radiation of some black body, i.e., those on a line from reddish/orange via yellow and more or less white to blueish white; it does not make sense to speak of the color temperature of, e.g., a green or a purple light. Color temperature is conventionally stated in the unit of absolute temperature, the Kelvin, having the unit symbol K.
- Most DSLRs have a colour temperature range of between 2500k and 10000K
- In your camera, the lesser the number (closer to 2500K) the cooler your photograph will be and the larger the number (closer to 10000K), the warmer your photograph will be. Absolutely white light is measured at 5600K.
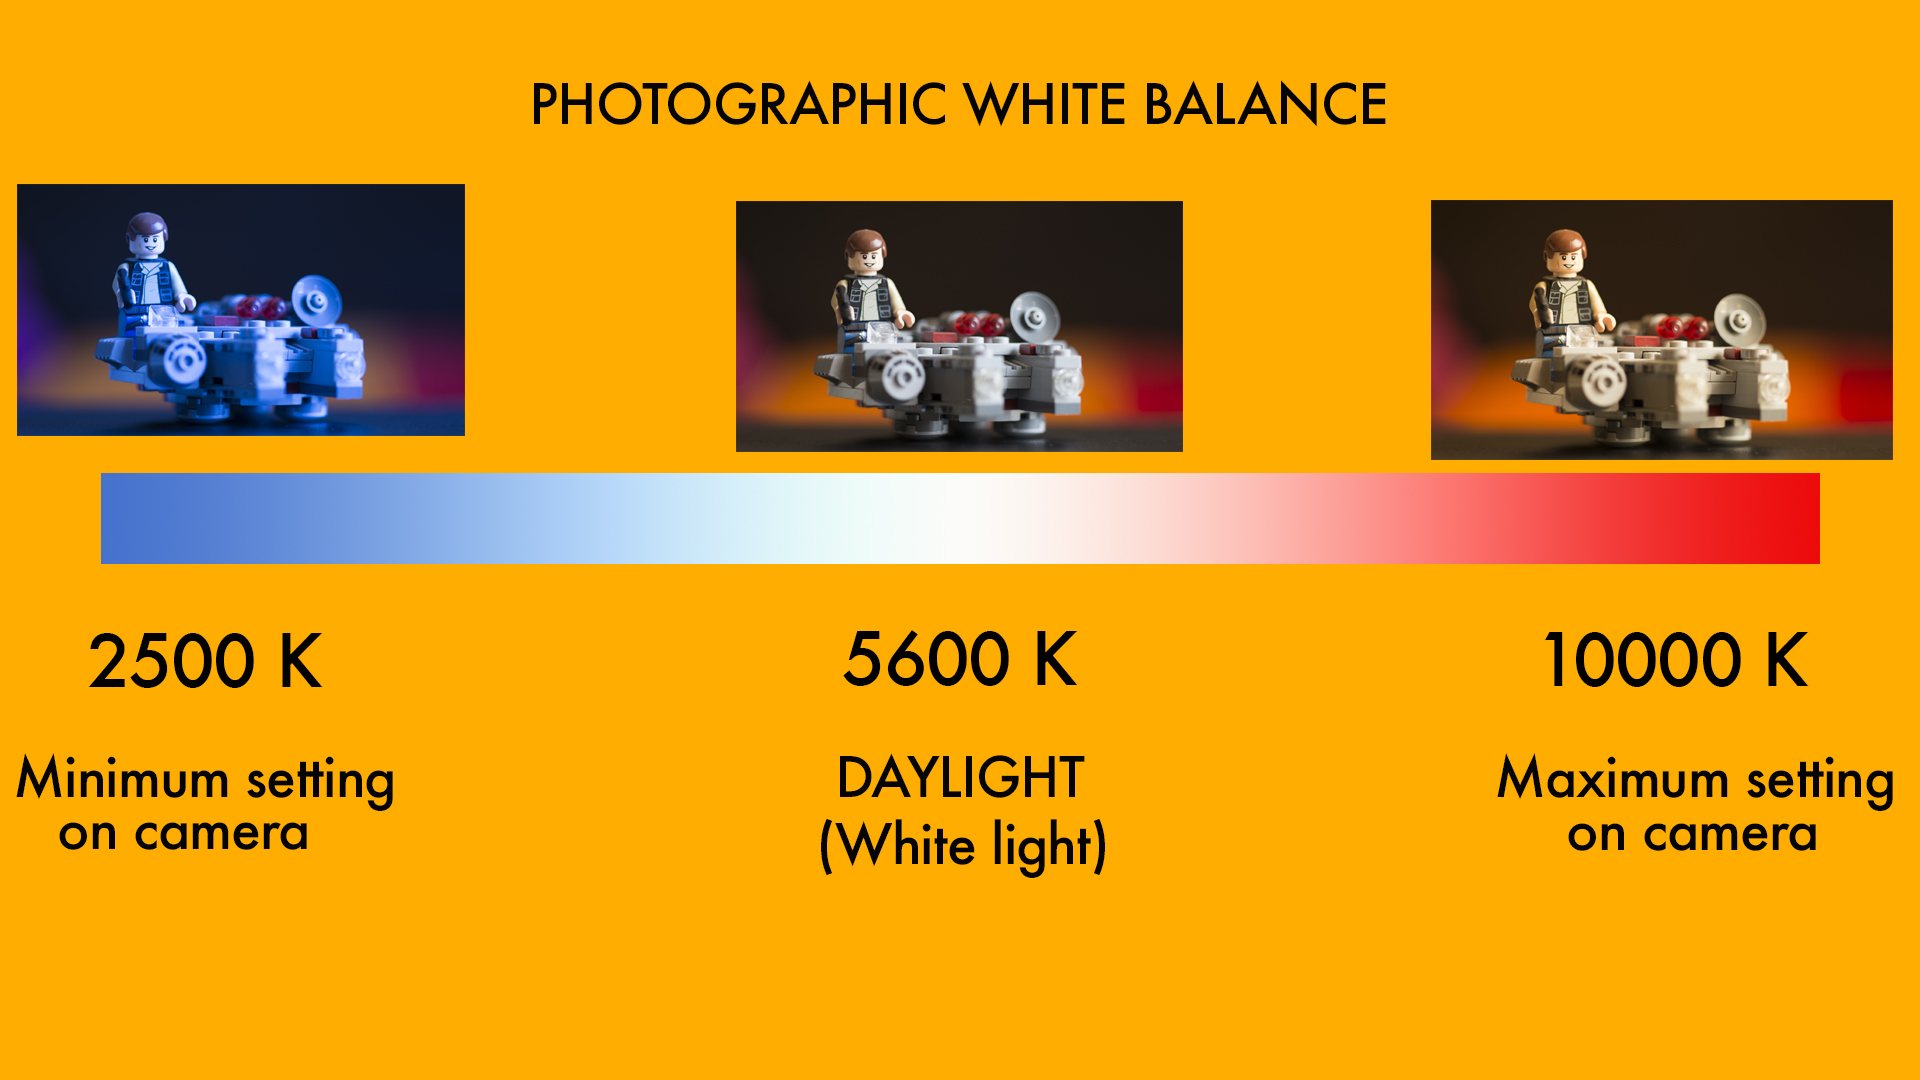
In my opinion, pure white light does not exist naturally. It can only be seen from man made light sources like professionally made HMI lights like they use on film sets or from flash(strobes) used in photography or LEDs. Natural light sources always have a tone to them.
How to set white balance on your camera?
There are three ways that you can set white balance on your camera.
- Auto white balance: As said earlier, auto white balance or AWB gets the job done 90% of the time and in the newer cameras it is pretty accurate or even amazing at times but with the camera set to auto white balance (or AWB) — your photographs can end up looking slightly blue, orange, or even green.
- Using the built-in settings: This involves figuring out what kind of light your are shooting under and matching it with the appropriate setting in the camera. So if you are shooting in sunlight, you choose the "sunlight" white balance setting on the camera (symbolised by a "sun") and if you are shooting in cloudy lighting conditions, then you use the cloudy settings and so on. This method too works well - but just barely. It is not very accurate and differs between camera brands and models.
- Using a custom white balance or preset white balance: This is the most accurate method of making sure that you get an absolutely neutral photograph and true colours.White balance or setting colour temperature is you telling the camera that under these lighting circumstances which colour it is to assume is “true white". Once you tell the camera that under these lighting circumstances, THIS is white- the camera is smart enough to make the necessary adjustments to render all other colours the way they are.The easiest way of doing this usually involves putting the camera in custom white balance mode and "showing" the camera a white sheet of paper and then taking a picture with it. What this does, is that it tells the camera that - "this is white" under these lighting conditions. Once the camera understands that, it makes all the other adjustments accordingly and all your colours come out looking just the way they should. You can use a device like Expodisc too, instead of the paper which will make the results more accurate.
If you shoot RAW, you can also, take your photographs to Adobe Lightroom or Photoshop and make corrections to the colour temperature in these programs. You can watch the video below to understand more about white balance and how to set it correctly. You can also read the articles (links under the video) on how to white your Nikon or Canon specifically.
Important
While understanding white balance can help you avoid these unnatural tones and improve your photos under any lighting condition. It is not a rule that you must have absolutely neutral tones for each and every photograph you take. You might prefer a warm or cool tone and that is perfectly alright. In fact, skin does look better in a slightly warm tone and many photographers deliberately "warm up" their photographs to make their subjects look better.
https://youtu.be/buex57O_Q5U
Also see:
How to set custom white balance on Canon DSLRs
and
How to set preset white balance on Nikon DSLRs

How is a photograph made

How is a photograph made?
When taking a picture, you press the shutter release and there are two things that happen:
- The shutter opens for a fraction of time to let light from the scene to be focused onto the image sensor. The fraction of time for which the shutter opens is called shutter speed.
- The light coming in comes through a hole in the lens. This hole is called an aperture - an adjustable opening that regulates how much light passes through the lens.
So, to get the ideal exposure, just the right amount of light must strike the image sensor. If there is too much light - your picture will be overexposed and if there or too little light, your picture will underexposed. In either case you need to adjust the amount of light coming into the camera. So we can do this one of two ways:
- Change the shutter speed. Make the shutter speed slower (so that it remains open for a longer time) to allow more light to come in OR make the shutter speed faster to let less light come in - depending upon whether the photograph is under or overrexposed.
- Another way to change the amount of light coming into the camera is by opening or closing the lens's aperture. 'Stopping down' the aperture makes it smaller so that it lets in less light. Opening it up lets in more light.
http://youtu.be/vZ-_zMSqnKk
Once the right amount of light hits the sensor or film - you will have the perfectly exposed picture.
Please subscribe to our channel if you like the video by clicking here or click on the image below to watch all our episodes on photography.

Also please don't forget to leave us a comment if you have a question or would like to leave a request as to which video would you like to see next.
What is ISO in photography?

What is ISO in photography? In times when people used film cameras to take photographs, ISO sensitivity expressed the speed of photographic negative materials and it used to be expressed as ASA. But now, since digital cameras do not use film but use image sensors instead, the ISO equivalent is usually used.
What ISO denotes is how sensitive the image sensor is to the amount of light present. The higher the ISO, the more sensitive the image sensor is to the available light. So if you are shooting in low light conditions, you need to increase the ISO. Most cameras have 100 ISO as their lowest setting.
When people used film, they usually had to change the roll of film to change their ISO. It was not uncommon for people to carry two different cameras with two different rolls of film - each with a different ISO in order to shoot under different situations. The lower ISO 100 film would be used for shooting in daylight and the higher ISO, 400 and above would be used to capture night scenes.
Now you just need to change your ISO within your camera from a lower to higher setting to be able to take night shots.
Caution
Having this great feature in your camera can be quite powerful but be careful, shooting at high ISO can cause noise to appear in your photographs. This can be seen in the photographs below.
ISO in photography
The above image was shot at ISO 100 and as you can see there is hardly or no noise. The image below was shot at ISO 3200 to illustrate how noise can appear at higher ISO settings. Each camera has it's own noise threshold, so make sure you test your own camera before you increase the ISO levels.
What is ISO in photography
Watch this video to understand more about ISO and please remember to subscribe to our channel by clicking here.
Please share this post with your friends if you found it helpful.

Understanding shutter speed in photography
Understand shutter speed in photography
The shutter speed, is essentially the time or the amount of time that the shutter remains open to allow light in. It is usually expressed in fractions like 1/60, 1/120, 1/250 etc which basically means that the shutter remains open for the 60th of the second, 128 of the second or 250 of a second.
The longer the shutter remains open, the more the light enters the camera and hits the film or the sensor and the shorter the duration of the shutter the lesser the light which enters the camera. It is almost like turning a tap on or off. The longer the tap remains open the more the water in the bucket.
An important point to note in this, is that, as fractions go 1/120 is actually a longer period of time than 1/250. If you are as hopeless with fractions as I am, just remember–the higher the number, the faster the shutter speed. By this logic, 1/1000 is faster than 1/500 which is faster than 1/250 and so on.
shutter speed
Also, what needs to be remembered is that once the shutter speed goes below one second, you will begin to see a quotation mark in front of the number which actually means “second". So the shutter speed of one second will be expressed as 1" and a speed of two seconds will be expressed as 2".
A " next to the shutter speed denotes that that speed is in seconds instead of a fraction. 2"
means that the shutter speed is 2 seconds and not 1/2 second.
Using slow or fast shutter speed
If we assume that the aperture is constant, when you slow down the shutter speed, you are letting in more light because your shutter stays open for a longer time. The opposite happens when you increase your shutter speed. Both, a slower shutter speed and a faster shutter speed have different uses and can be used creatively to capture different kins of photographs.
Using slow shutter speed
As said earlier, slowing down the shutter for a longer period lets in more light but there is another thing that happens.
Slow shutter speed also gives time for the object you are shooting - the time to move, thereby inducing a "movement blur" in the photograph.
While nobody wants blurry photographs, if you can control the blur it gives a lot of opportunity to explore your surroundings creatively.
A classic example of this is the photograph below. The camera is on a tripod and a long shutter speed has been used.

slow shutter speed in photography
The camera has been put on a tripod to ensure that there is no camera shake. Hand holding the camera when the shutter speed is slow might cause your hand to shake and the whole photograph will turn out to be blurry.
Since the rocks are stationary, they appear sharp.
Since the water is moving, the slower shutter speed causes a blur in the water - giving it a milky feel.
During the day, you might not be able to slow down the shutter speed enough to achieve this effect and you might need a Neutral Density filter to slow down the shutter speed.
Here is another example of using a slow shutter speed.

Slow shutter speed in photography causes objects to blur
Using a fast shutter speed
Using fast shutter speed allows you you to freeze motion. Usually, you don't need a tripod to shoot at very fast speeds because there is very little possibility of your hand shaking. All those sports photographers you see on the sidelines? They are mostly shooting at very high shutter speeds to freeze the action - and their tripods are usually there to support the heavy "mother of all zoom lenses" that they are using.

Fast shutter speed
The photograph above is a complete contrast to the photograph of the waterfall that we saw earlier. Here, due to the fast shutter speed, the water appears to be frozen in time. We can almost see each droplet with clarity.
Here is another example.
Using fast shutter speed in photography
The graphic below sums up how this all works.

shutter speed photography definition
Also watch the video below to understand this better.
Also read:
How aperture affects the look of your photographs and depth of field
Subscribe to GMax Studios YouTube channel
Please share this article with your friends on Twitter, Facebook and Google Plus if you found it useful and leave us a comment if you have any questions.

Understanding aperture in photography
Understanding aperture in photography
Imagine in your mind, how the camera works. For you to make a good photograph, a certain amount of light needs to hit the sensor. Let us assume this amount of light to be hundred units. If the light hitting the sensor lesser than the amount of light required, the photographs will be dark or “underexposed”. Similarly, if the amount of light hitting the sensor is more than the amount of light required, the picture will be over-bright or “overexposed”.
There are two ways of controlling the amount of light hitting the sensor-via the aperture or with the shutter speed.
What is aperture?
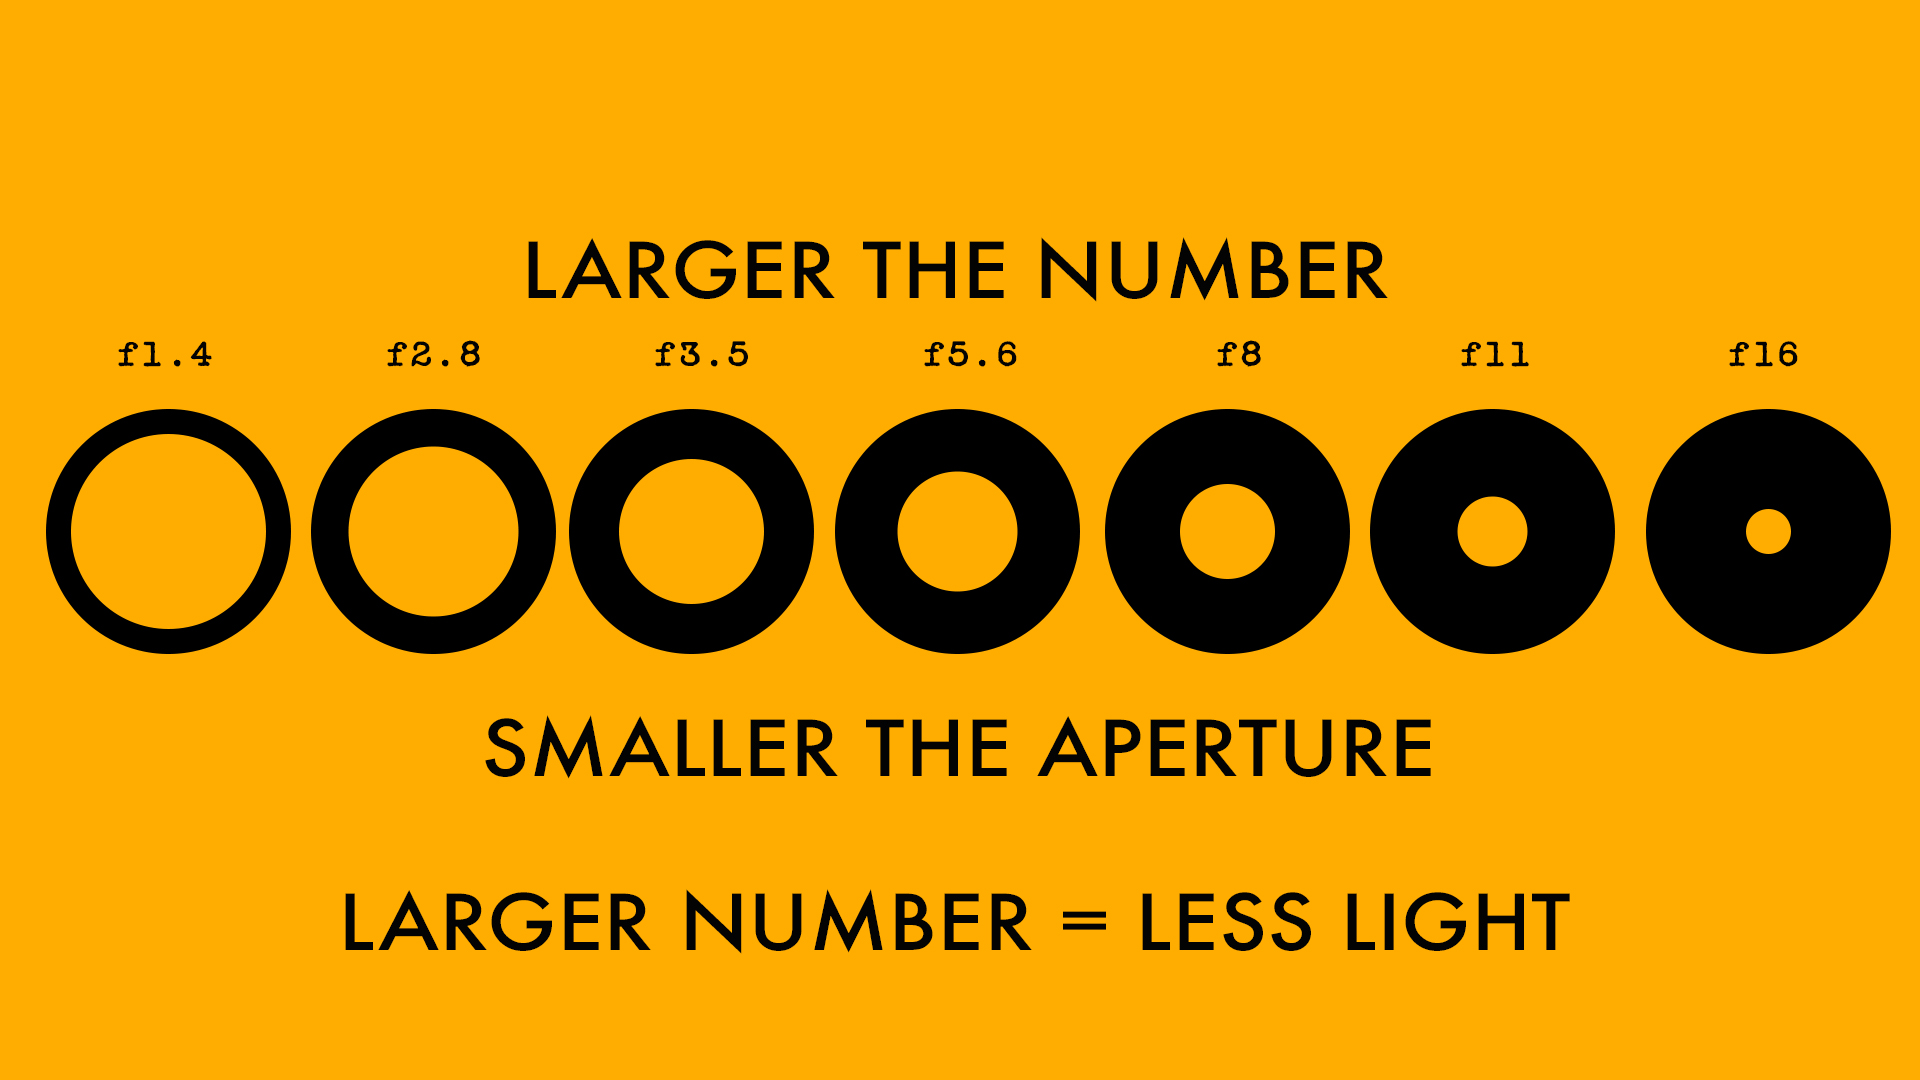
The aperture is nothing but the hole in the lens through which the light enters the camera. For the time being, all you need to know about the aperture is that smaller the number [1.4 or 1.8], the bigger the aperture and similarly, the larger the number will [16 or 22], the smaller the aperture or the size of the hole on the lens.

Understanding aperture in photography
All these numbers are often referred to by using the alphabet F in front of them. So 1.4 is referred to as F1 .4 and 16 is referenced to as F-16. This is just another way of trying to sound cool. There is actually no difference if you say 16 or F-16.

Understanding aperture in photography - Aperture closed down
Just remember, the smaller the number-the bigger the whole AND the bigger the number, the smaller the hole. This is all that you need to remember about the aperture. This will become second nature as time goes by but it is crucial that for the time being, you remembered this!!!

Understanding aperture in photography - Full open aperture
The size of the aperture is measured in f-stops, which control the depth of field. With few exceptions, each f-stop lets in half as much light as the next larger opening and twice as much light as the next smaller one. From the largest opening to smallest, standard f-stops are as follows: f/1, f/1.4, f/2, f/2.8, f/4, f/5.6, f/8, f/11, f/16, f/22, f/32 and f/45. This can be a little confusing because the larger the f-stop, the smaller the amount of light that is let into the camera. The easiest way to think off-stops is in terms of fractions: just as '/i6 is less than l/s, an f-stop of f/16 is smaller than, and lets in less light than, f/8.
You won't find the full range of settings on any one lens. In most cases, the standard lens on a digital camera is in the f/3.5—f/16 range.
The maximum aperture of a lens determines by how much it can be opened. The maximum aperture is also referred to as the maximum iris, or the speed of a lens. Although lenses are referred to by their focal length, the description of a lens also carries a second number, such as 2.0 or 3.5, which indicates the maximum aperture of the lens. Larger maximum apertures, such as f/1.8, let in more light than smaller apertures, such as f/3.2, allowing you to take better shots in low-light situations.
Watch the video below to understand aperture better.
Also read: How aperture affects your photograph - Depth of field
Subscribe to GMax Studios YouTube channel
Please share this post with your friends if you found this useful.
Learn photography by reading: The Ultimate Photography Guide for Beginners

How aperture affects photos |Depth of field
When you learn photography, it is easy to get confused between the various modes on the camera.
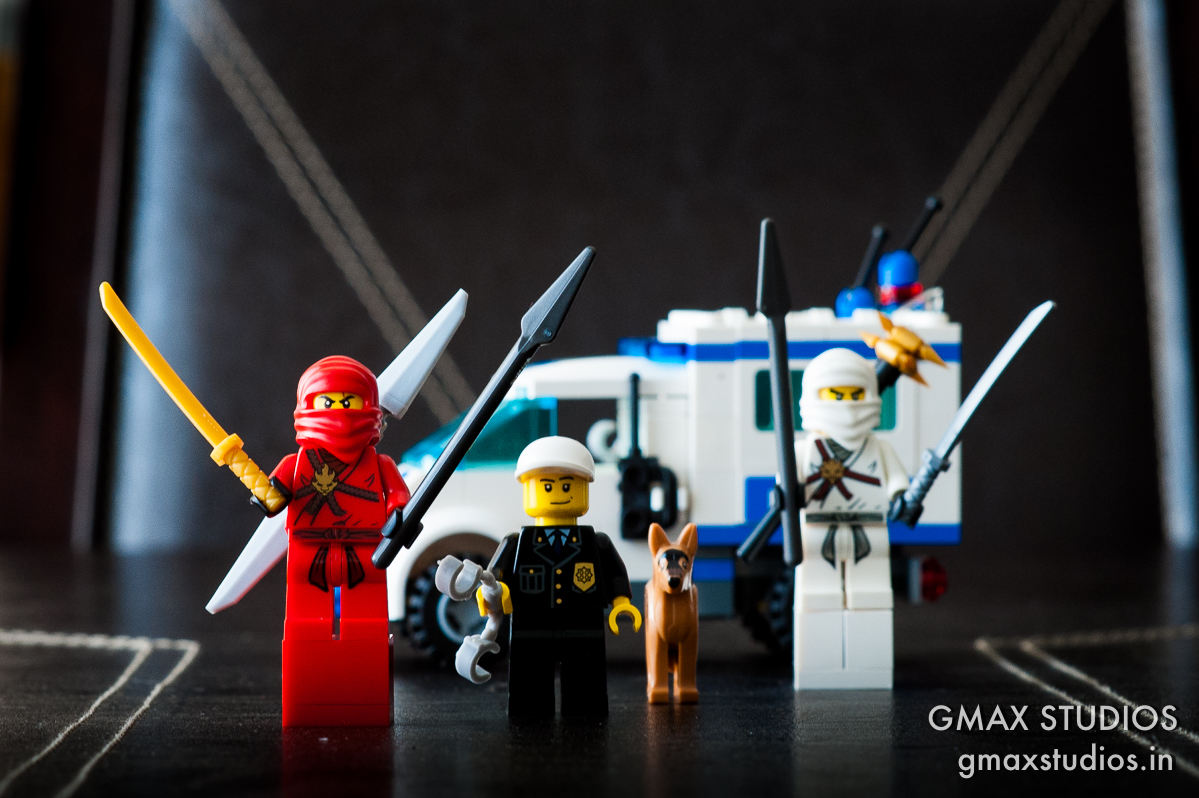
I shoot on A aperture priority mode on my camera 99% of the time (see Aperture).The main reason I do this is because I don't shoot too much of action and sports and thus find no reason to switch to S, shutter priority mode. I also like to control my depth of field or DoF as it is known. In easy terms, depth of field refers to how blurred out your background is, compared to the focus point. This is controlled by the aperture.
How aperture affects photos - Depth of field
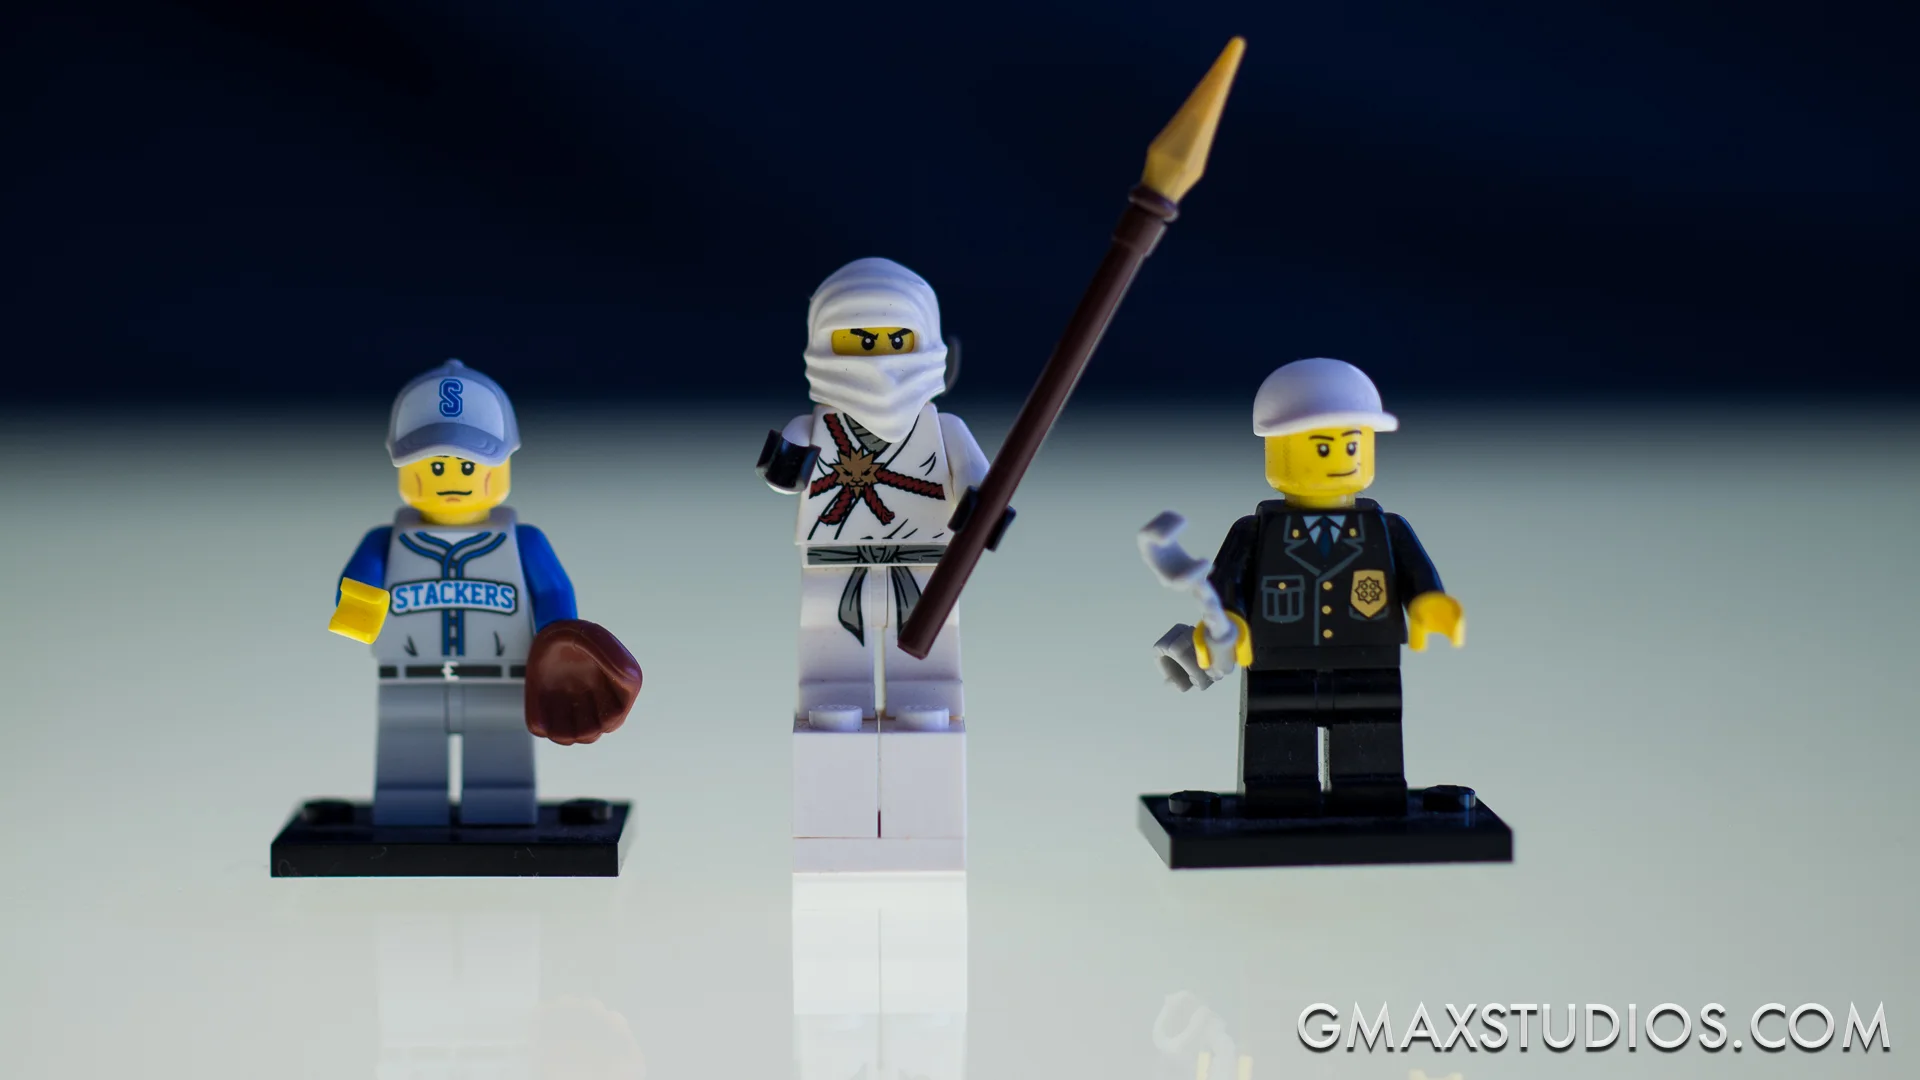
To demonstrate this point, enter "The GMAX Team":
I shot the image below on an aperture setting of 1.8 on my camera. The camera automatically set the shutter speed to 1/160th of a sec.
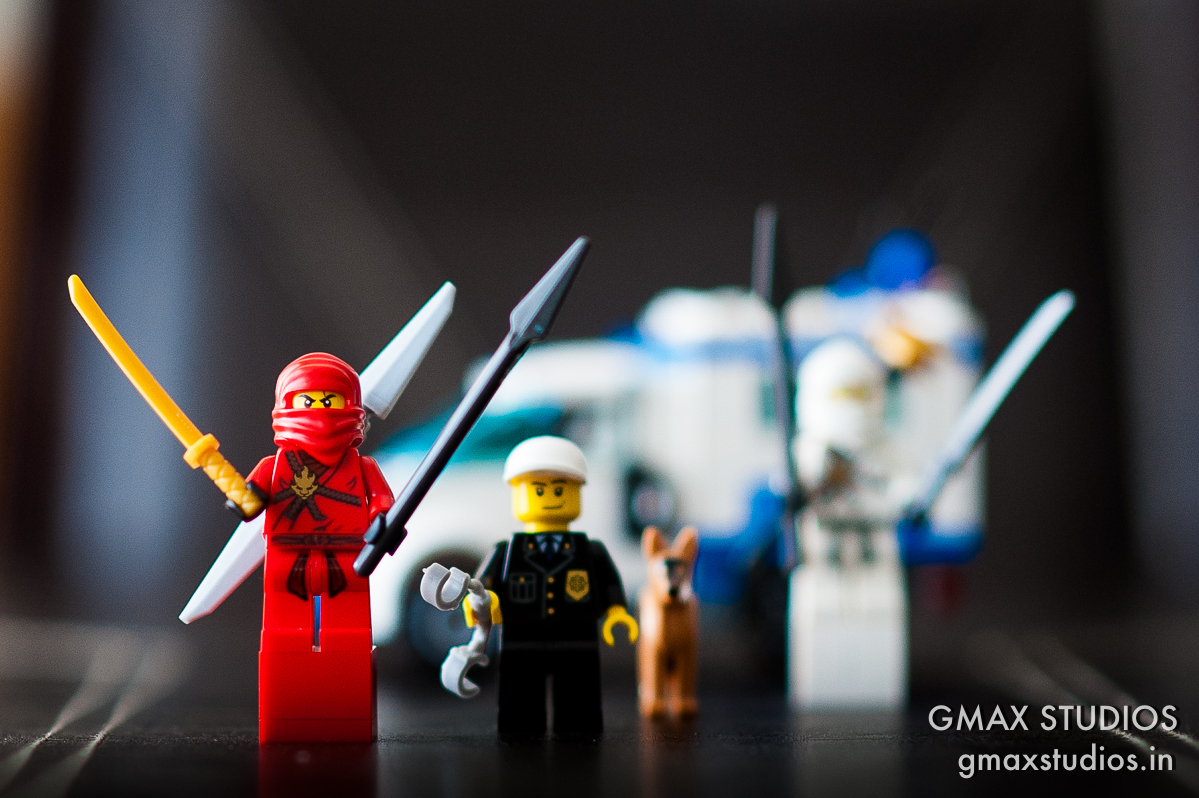
The focus is on Kai, the red Ninja. Notice, that though the difference between the team members is only inches - they have been arranged slightly one behind the other - the policeman, appears to be blurred. The focus gently blurs from Kai, to the policeman's handcuffs and the dog Tommy and Zane, the white Ninja are completely blurred.
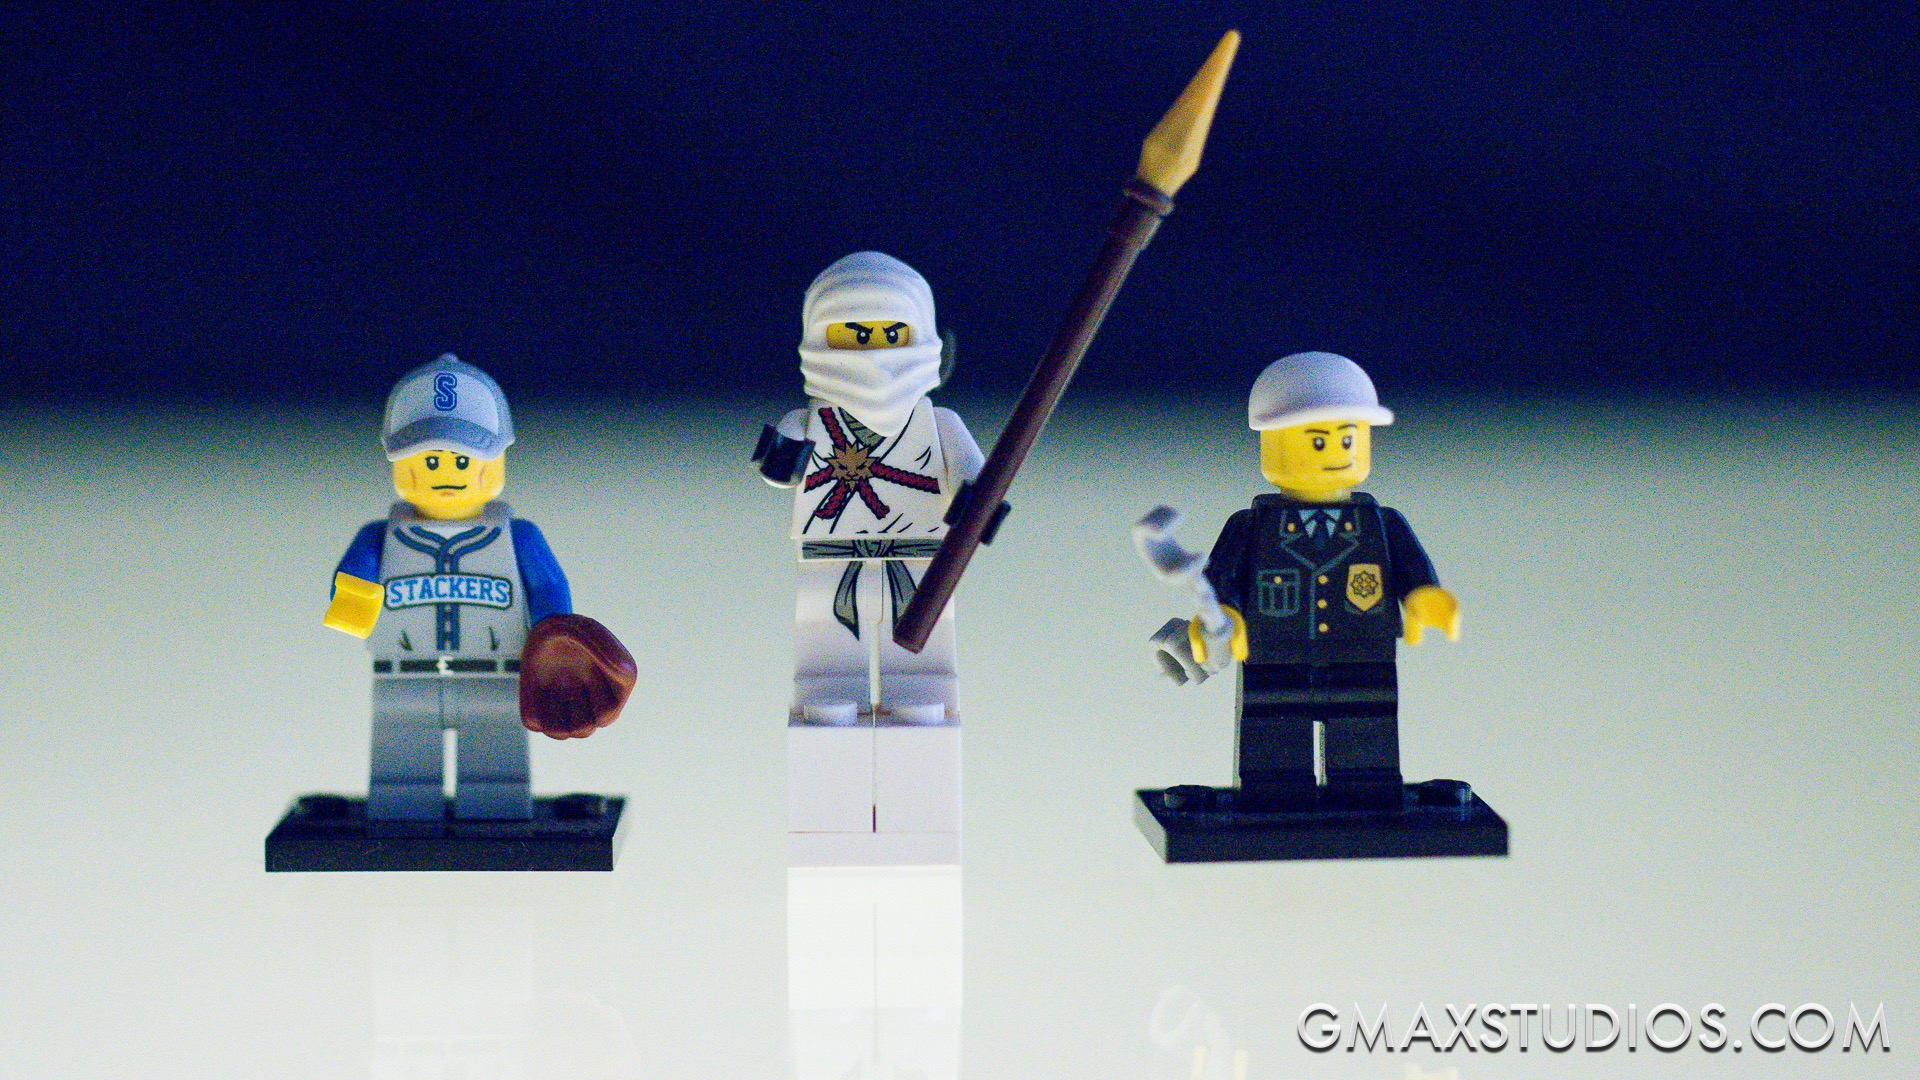
For the next shot I changed the aperture setting to f4. The background is gradually beginning to come in focus. The policeman is happy now.
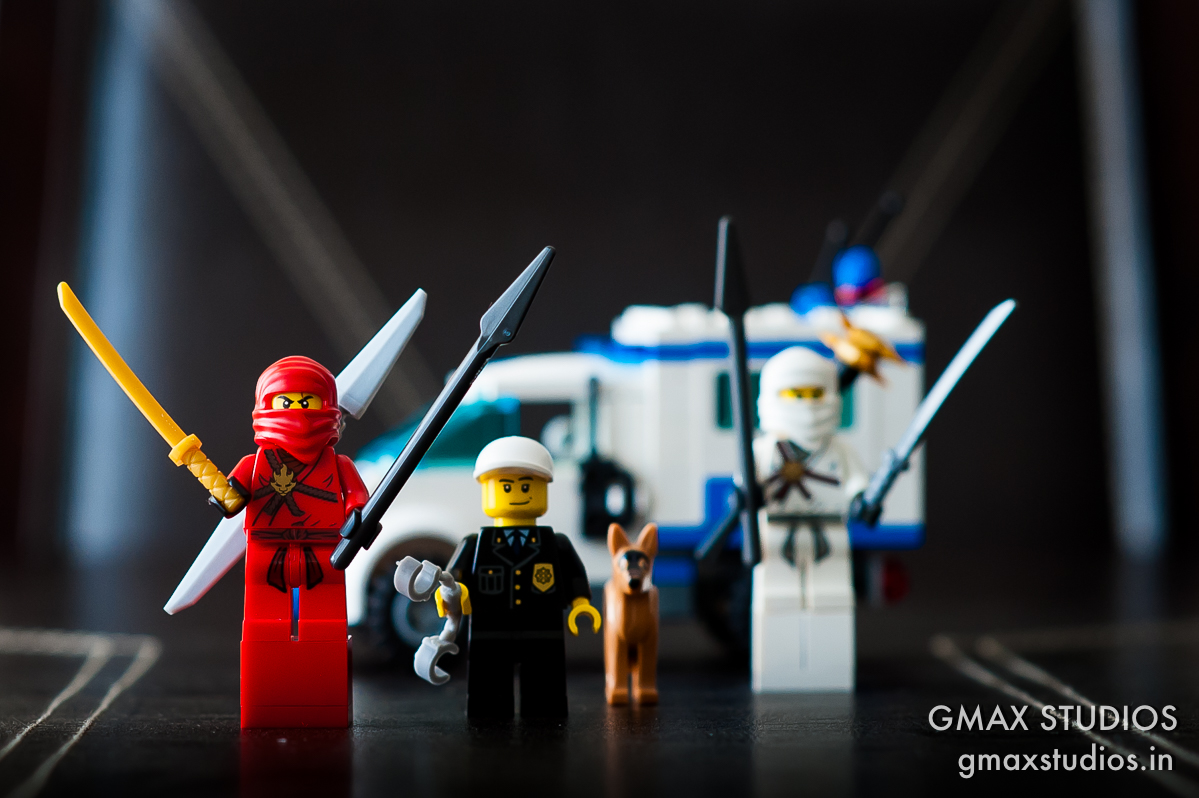
If we make the aperture even smaller by closing it down to f11, the background is almost completely in focus. The eyes of the white Ninja are almost sharp too. You can also make out the form of the chair at the dining table. which was not the case at all when we were shooting at f1.8. Also notice how the stitching on the dining table is in focus BEFORE and AFTER the focus point.
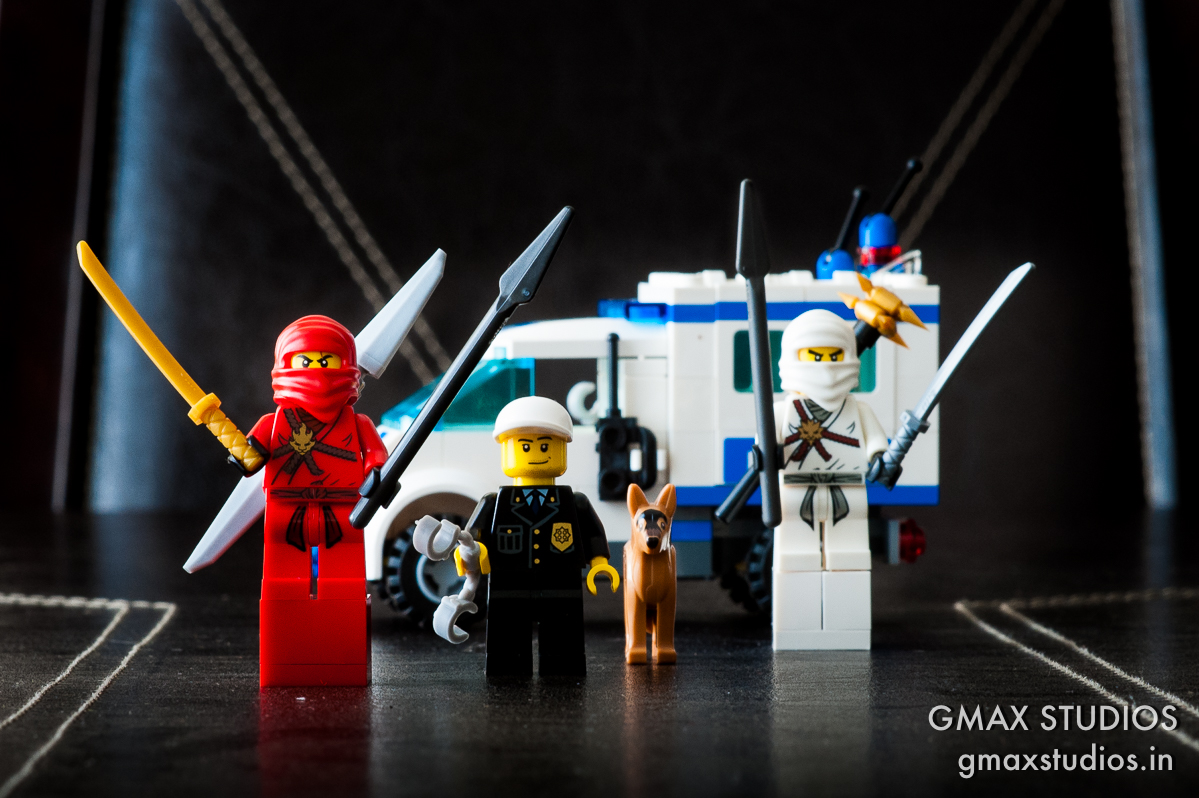
For comparison, here is the first image shot at f1.8 again:
Thumb Rule:
The higher the number of the aperture, more of the background will be in focus. This can be summarised by the graphic below.
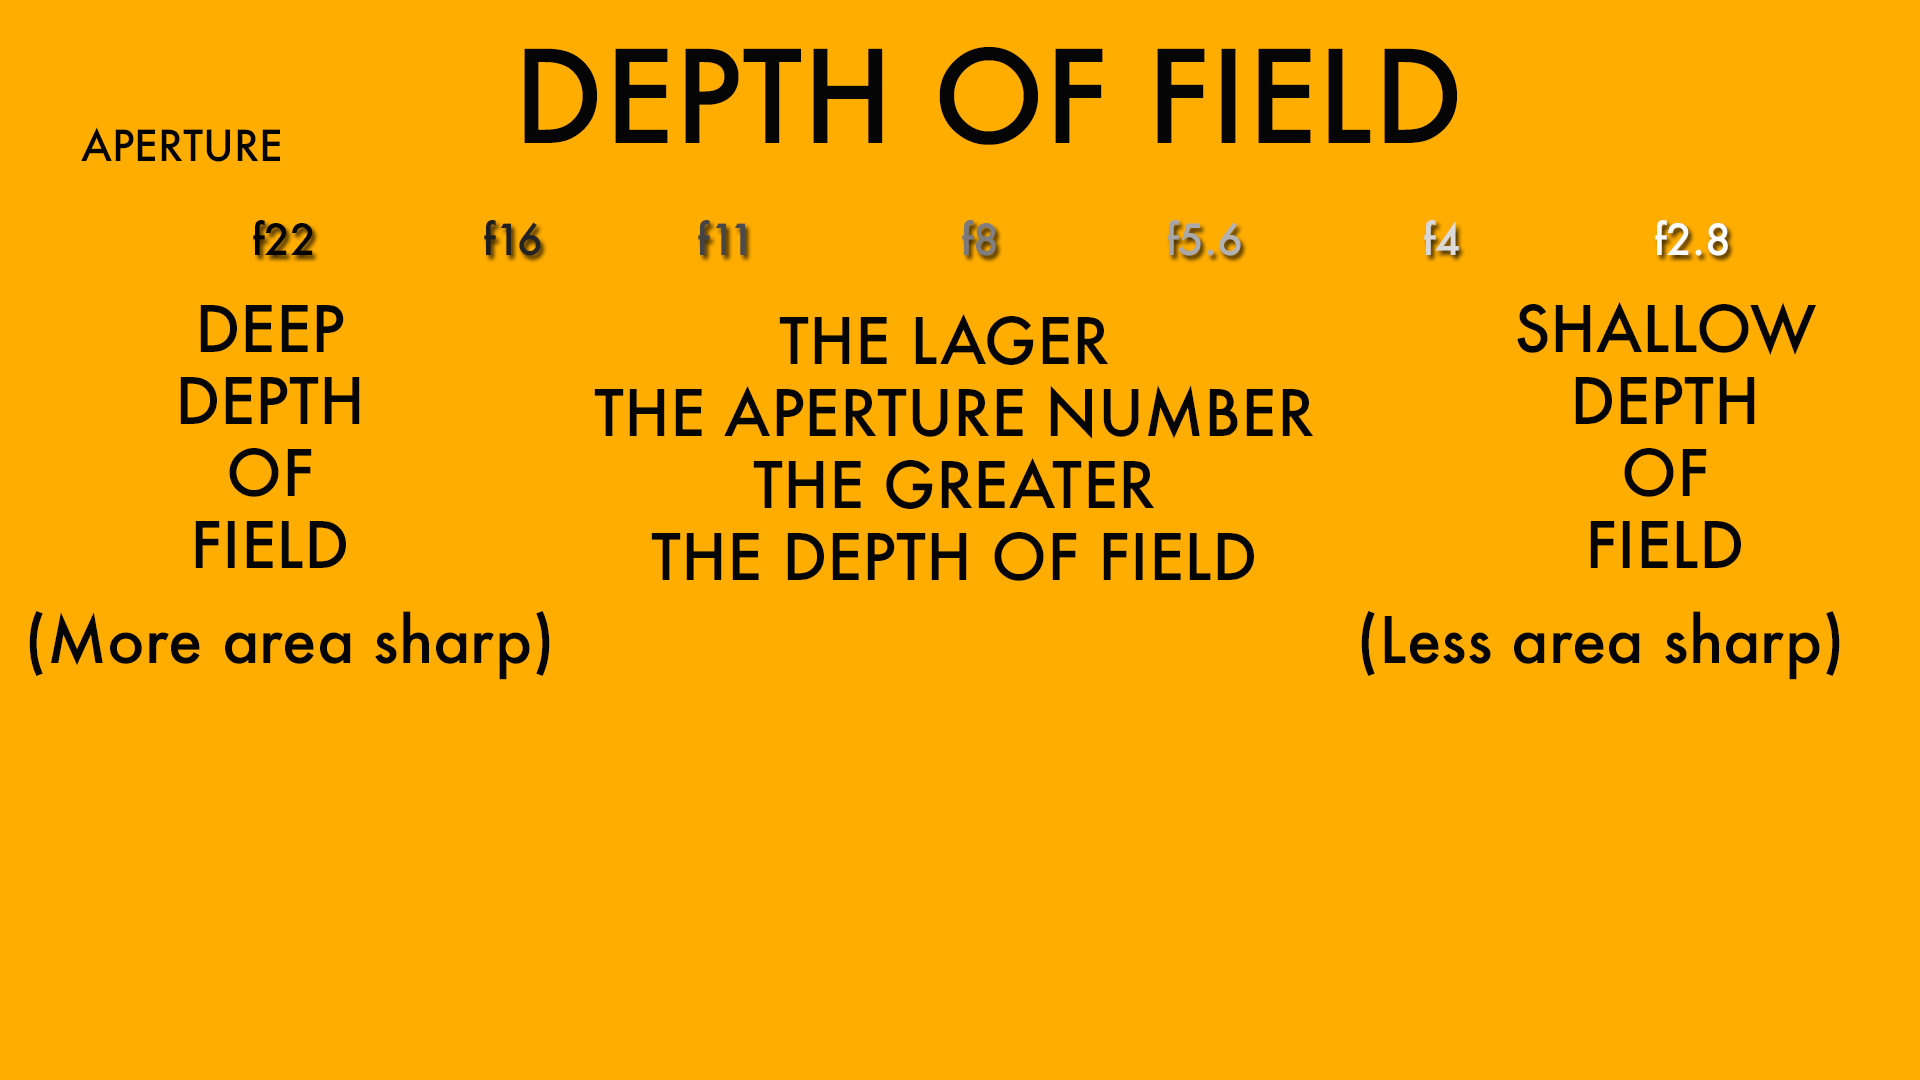
You can download a hi-res version of this graphic to your computer or smartphone by adding us to your Google Plus circles. Also watch the video below to understand this concept better and see a practical demonstration of how aperture affects photos and depth of field. If you like the video, please consider subscribing to our channel by clicking here.
https://youtu.be/q3SvCAlgFLw
Shoot me your questions in the comments or leave your suggestions as to what articles or videos would you like to see next.
Learn photography in one hour

Shooting a TV pilot with Canon 5D Mark II
Shooting a television pilot with Canon 5D

We had bounced off an idea to Channel V (India)but things looked kind of shaky because we could not get the feel of the story across. Girl who wants to be a boxer... high school romance... song and dance... boxing ring... We decided to shoot this in order to get the feel across. Shot in a day on one location with minimal budget. The only things that we put up were the exhaust fan and boxing ring and bag.
I decided to shoot this on Canon 5D Mark II because I wanted to. But the question was how to shoot a professional video with a DSLR. I had never shot any video professionally on a DSLR (this was in 2010)and was itching to do so and this was my opportunity. The footage is straight out of camera as we did not have a budget for colour correction. Each setting we tweaked the picture controls, shot a bit of footage, transferred it to the laptop and reconfigured the picture control if needed. Everything was totally on the fly.
Take a look at the video below and tell us what you think. Please subscribe to our channel by clicking here.
Subscribe to GMax Studios YouTube channel
Sony F35 Cinealta test
Testing the Sony Cinealta F35
Sony F35 Cinealta test - Not much to this except that this was a test designed and lit to see the low-light performance of the Sony F35, which I was planning to use in one of my TV productions.
Learn photography
The camera performed exceptionally well and the final pilot of the show was actually shot on this.

How to restore old photos with 1 click

There are many ways to restore old photos and many complicated ways to do them. Most of them require a lot of patience and understanding of various post-processing techniques and software. In fact, most of them are so complicated that we end up never using them and restoring the old photographs that we want to. But anyway, what I usually do to my pictures is as follows and though "one click" will get you there but it will be almost! Feel free to tweak the settings and sliders as you wish. I have used a normal flatbed scanner which is used to scan documents to scan this photograph. If you use a higher end scanner, your results will be much better. You will need:
- A scanner
- A copy of Adobe Lightroom
If you don't have Lightroom, download it. It comes with a 30 day free trial, so you can use it free and 30 days should be enough for you to correct all your old pictures. But anyway, this is my primary software for all my processing needs so I highly recommend it. Anyway, import your scanned photograph into Lightroom.
Scanned photograph

Now that magic one click that I was talking about is the one on the top right hand corner.
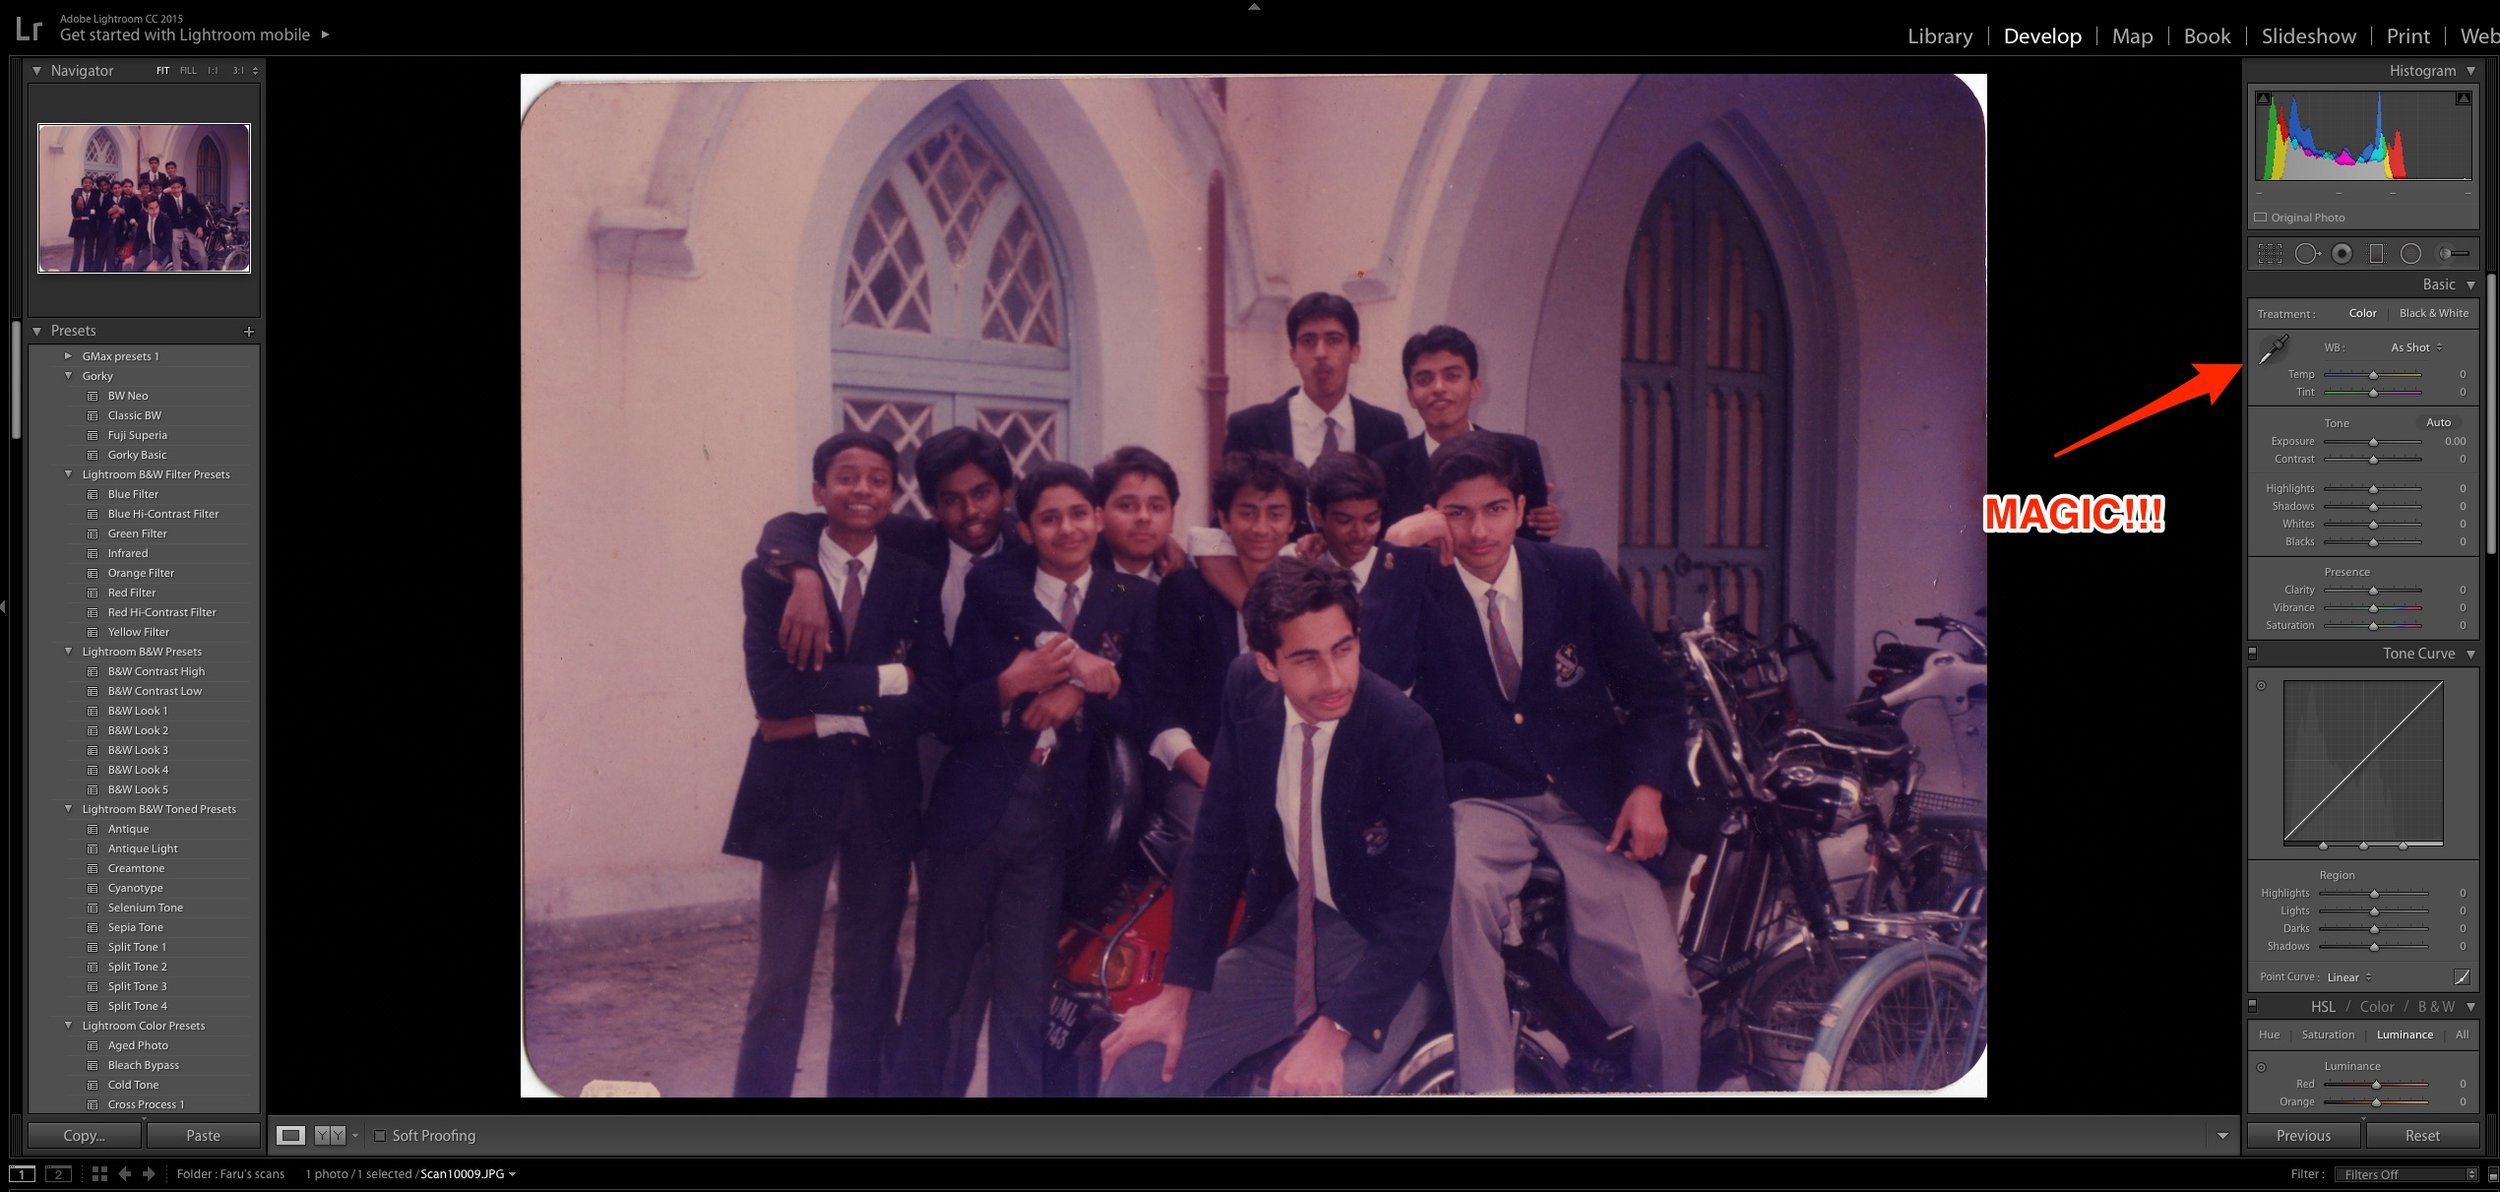
Select the eyedropper and click on any neutral colour in the photograph. I was lucky that this was a school photo so I could click on the grey trousers that my friends were wearing. Bingo! The software knows which is a neutral colour in the picture and removes the magenta/green cast automatically!
Processed picture

Add some contrast and sharpness and maybe increase the exposure a bit to make the old picture pop. That's it! You are done! Give it a shot! This is what I do to restore my pictures quickly. Here is the comparison.
Also read: How to create a professional white background on any photo in Adobe Lightroom

Do share the pictures that you have restored using this technique. Take look at the video below. Subscribe to our channel by clicking here.

Aperture
Aperture - Learn photography
Imagine in your mind, how the camera works. For you to make a good photograph, a certain amount of light needs to hit the sensor. Let us assume this amount of light to be hundred units. If the light hitting the sensor lesser than the amount of light required, the photographs will be dark or “underexposed”. Similarly, if the amount of light hitting the sensor is more than the amount of light required, the picture will be over-bright or “overexposed”.
There are two ways of controlling the amount of light hitting the sensor-via the aperture or with the shutter speed.
The aperture is nothing but the hole in the lens through which the light enters the camera. For the time being, all you need to know about the aperture is that smaller the number [1.4 or 1.8], the bigger the aperture and similarly, the larger the number will [16 or 22], the smaller the aperture or the size of the hole on the lens. All these numbers are often referred to by using the alphabet F in front of them. So 1.4 is referred to as F1 .4 and 16 is referenced to as F-16. This is just another way of trying to sound cool. There is actually no difference if you say 16 or F-16. Just remember, the smaller the number-the bigger the whole AND the bigger the number, the smaller the pool. This is all that you need to remember about the aperture. This will become second nature as time goes by but it is crucial that for the time being, you remembered this!!!