
5 Amazing Documentaries on Photography
Watch these photography documentaries to get inspired.
Photographers play a major role in documenting the everyday life. Whether its war, vanity or wildlife, the frozen frame defines the moment and the expression of the subject which gives you an escape from your reality. Here are some documentaries we would like to recommend that release the same emotion.
FINDING VIVIAN MAIER
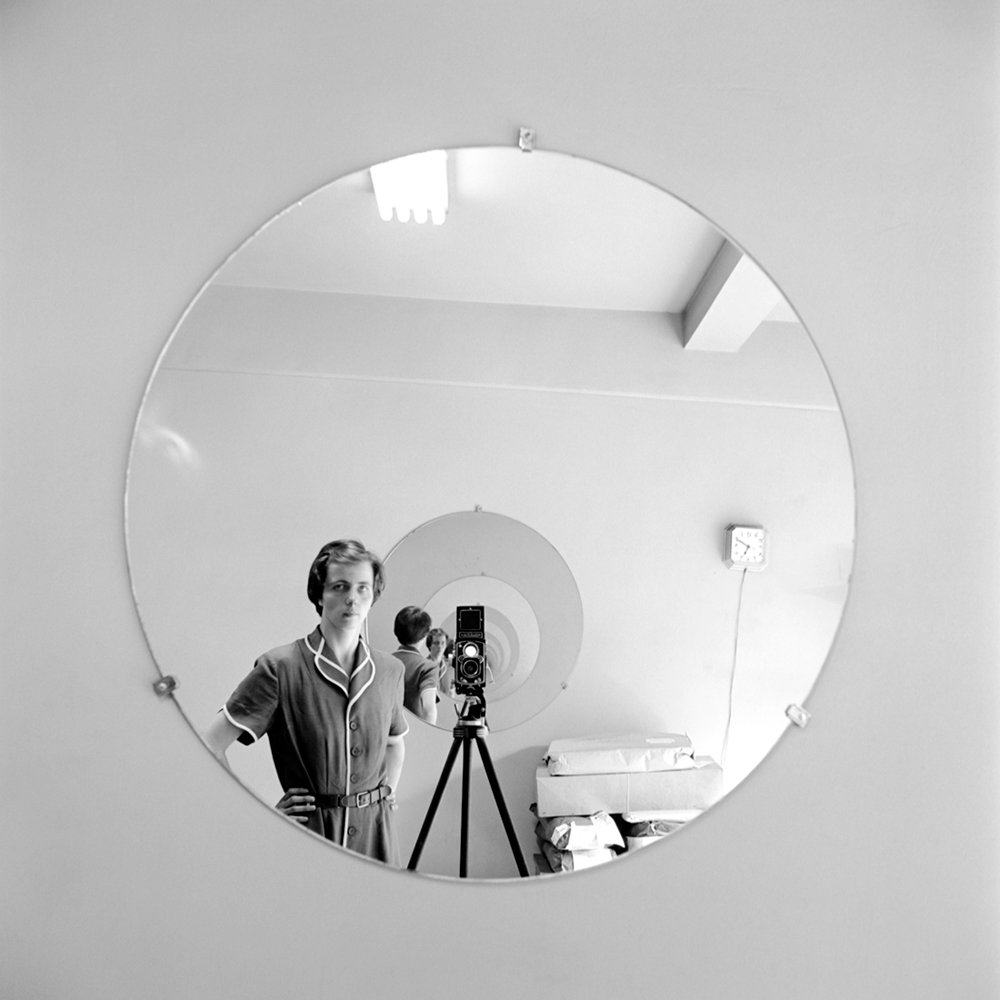
This Oscar nominated, critically acclaimed documentary is about a nanny, who was a part-time nanny as well as a ghost street photographer who took almost 100,000 photographs which were hidden away in a storage locker and were discovered decades later. The negatives that were found later were developed and processed and what came after that was broadcasted around the world were some never before seen photographs that broke the 20th century.
From directors John Maloof and Charlie Siskel, Vivian Maier is reborn and how her work has made an impact on the world and changed the life of a man who championed her work and showcased it to the public eye.
CHASING ICE

Q. What else can you expect from a national geographic photographer risking his life to capture images to help tell the story of the Earth’s changing climate?
A. Absolutely mind-awakening images that will change your perspective about life itself.
Photographer Jason Balog, is on a mission to change the tide of history by gathering undeniable evidence of our changing planet. It all started in the North Atlantic, in a small island named Iceland. Jason Balog wants to document to unfold a powerful piece of history. The initial goal was to put out 25 cameras for three years and shoot every hour as long as it was daylight which would show how the landscape would change.
MCCULLIN

Don McCullin is considered to be the best war photographer and cited as an inspiration for today’s generation of photojournalists. McCullin speaks about his career and how he covered wars and humanitarian disasters all over the globe, photographing what is now defined a historic moments. McCullin became what the French call a baroudeur, a man obsessively drawn to combat, but not in an exploitative, sensationalist way.
Annie Leibovitz - A Life Through A Lens
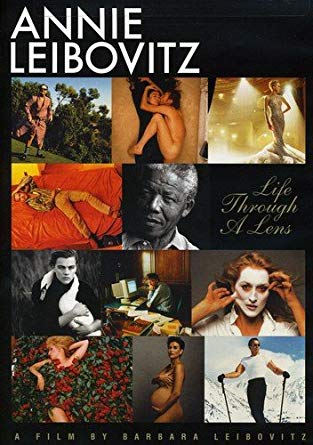
This documentary will definitely help you understand her. This film basically defines the arc of Annie’s photography career, her aspirations to artistry and how she grew as a artist, photographer and a human being. Barbara Leibovitz's attempt to portray her elder sister doesn’t only just pay off but it defines Annie as more than a person behind a camera. It closes with her reflections on life, children, and the the wake of her relationship with Susan Sontag. The archival material presented here is invaluable for framing an understanding of this immeasurably influential visual artist.
THE MEXICAN SUITCASE

In 1997 a Mexican filmmaker by the name of Benjamin Tarver discovered, in the possessions of his late aunt, three battered boxes of negatives. They had once belonged to her friend General Francisco Aguilar González, the Mexican ambassador to the Vichy government in 1941–42 and they would turn out to be one of the most exciting photographic rediscoveries of the 21st century, containing 4,500 negatives by Spanish Civil War photographers Robert Capa, Gerda Taro and David Seymour (better known as "Chim").
You can know more or get the documentaries use the links given below.
Finding Vivian Maier
Chasing Ice
McCullin
Annie Leibovitz - A Life Through A Lens
The Mexican Suitcase
__________________________


Shooting on mobile phones takes more effort | Auditya Venkatesh Answers | In Frame with Gorky M, Episode 5
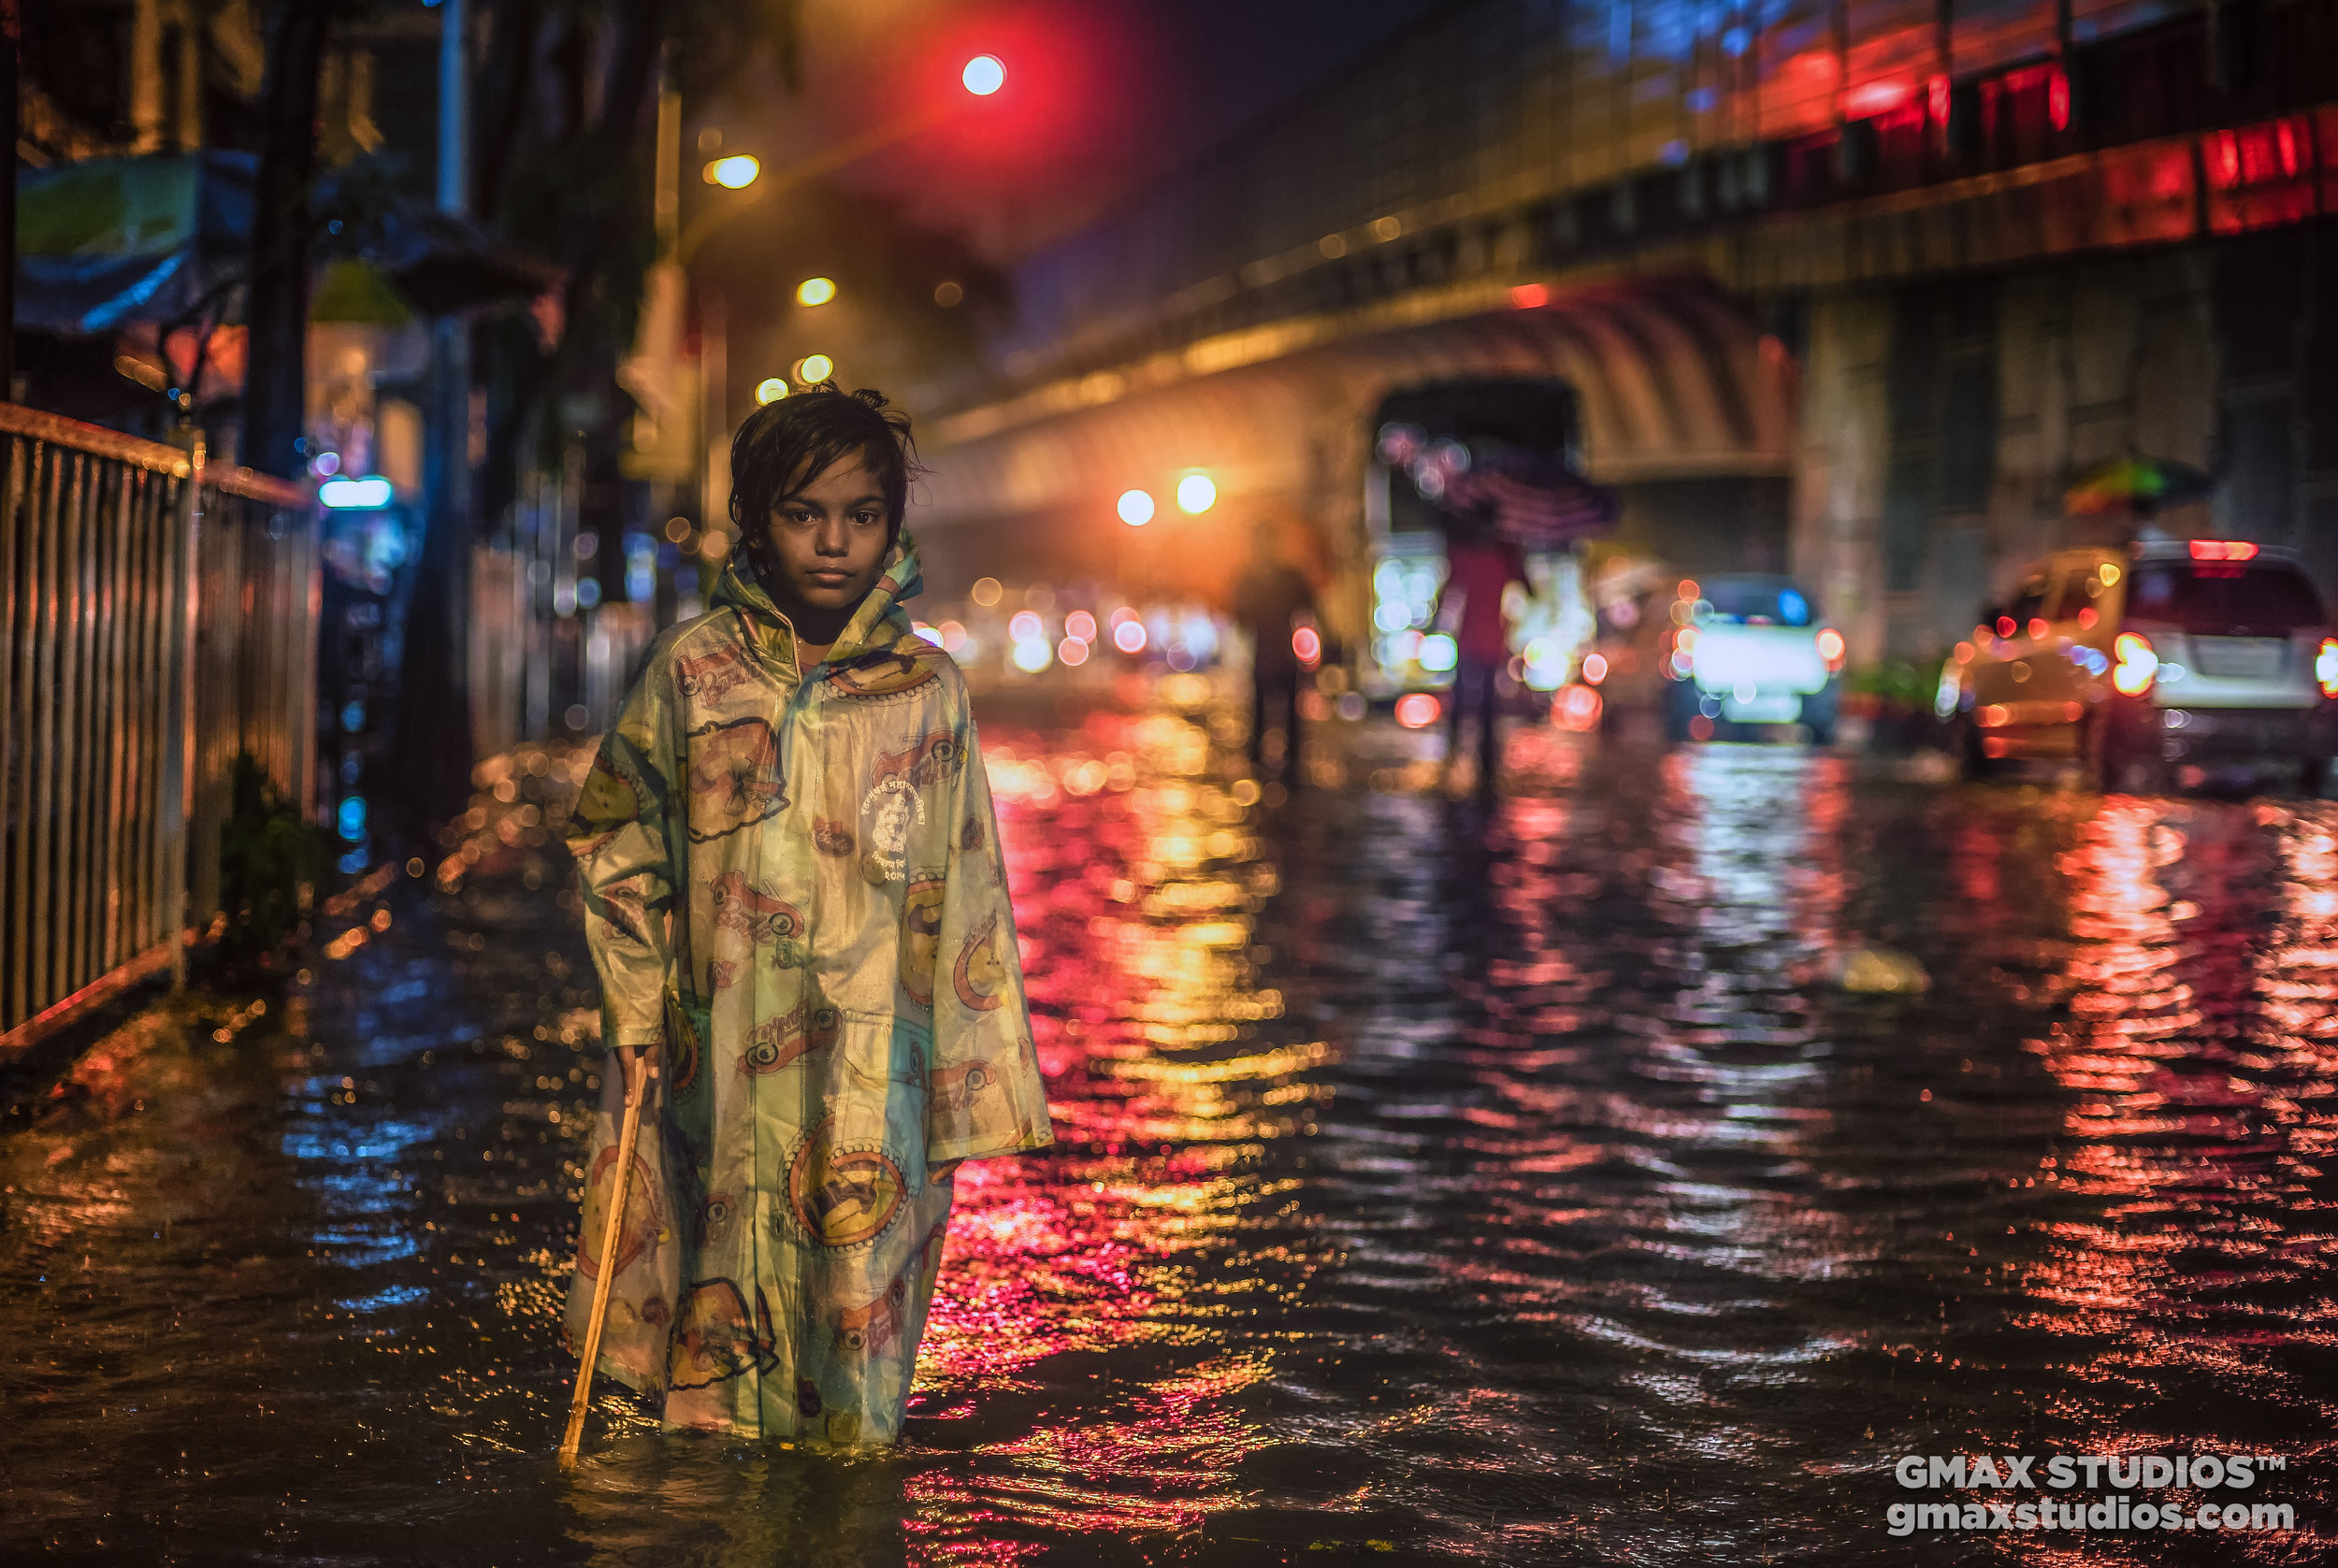
Auditya Venkatesh debunks the legend that taking pictures with your smartphone is easier than shooting with a professional camera.
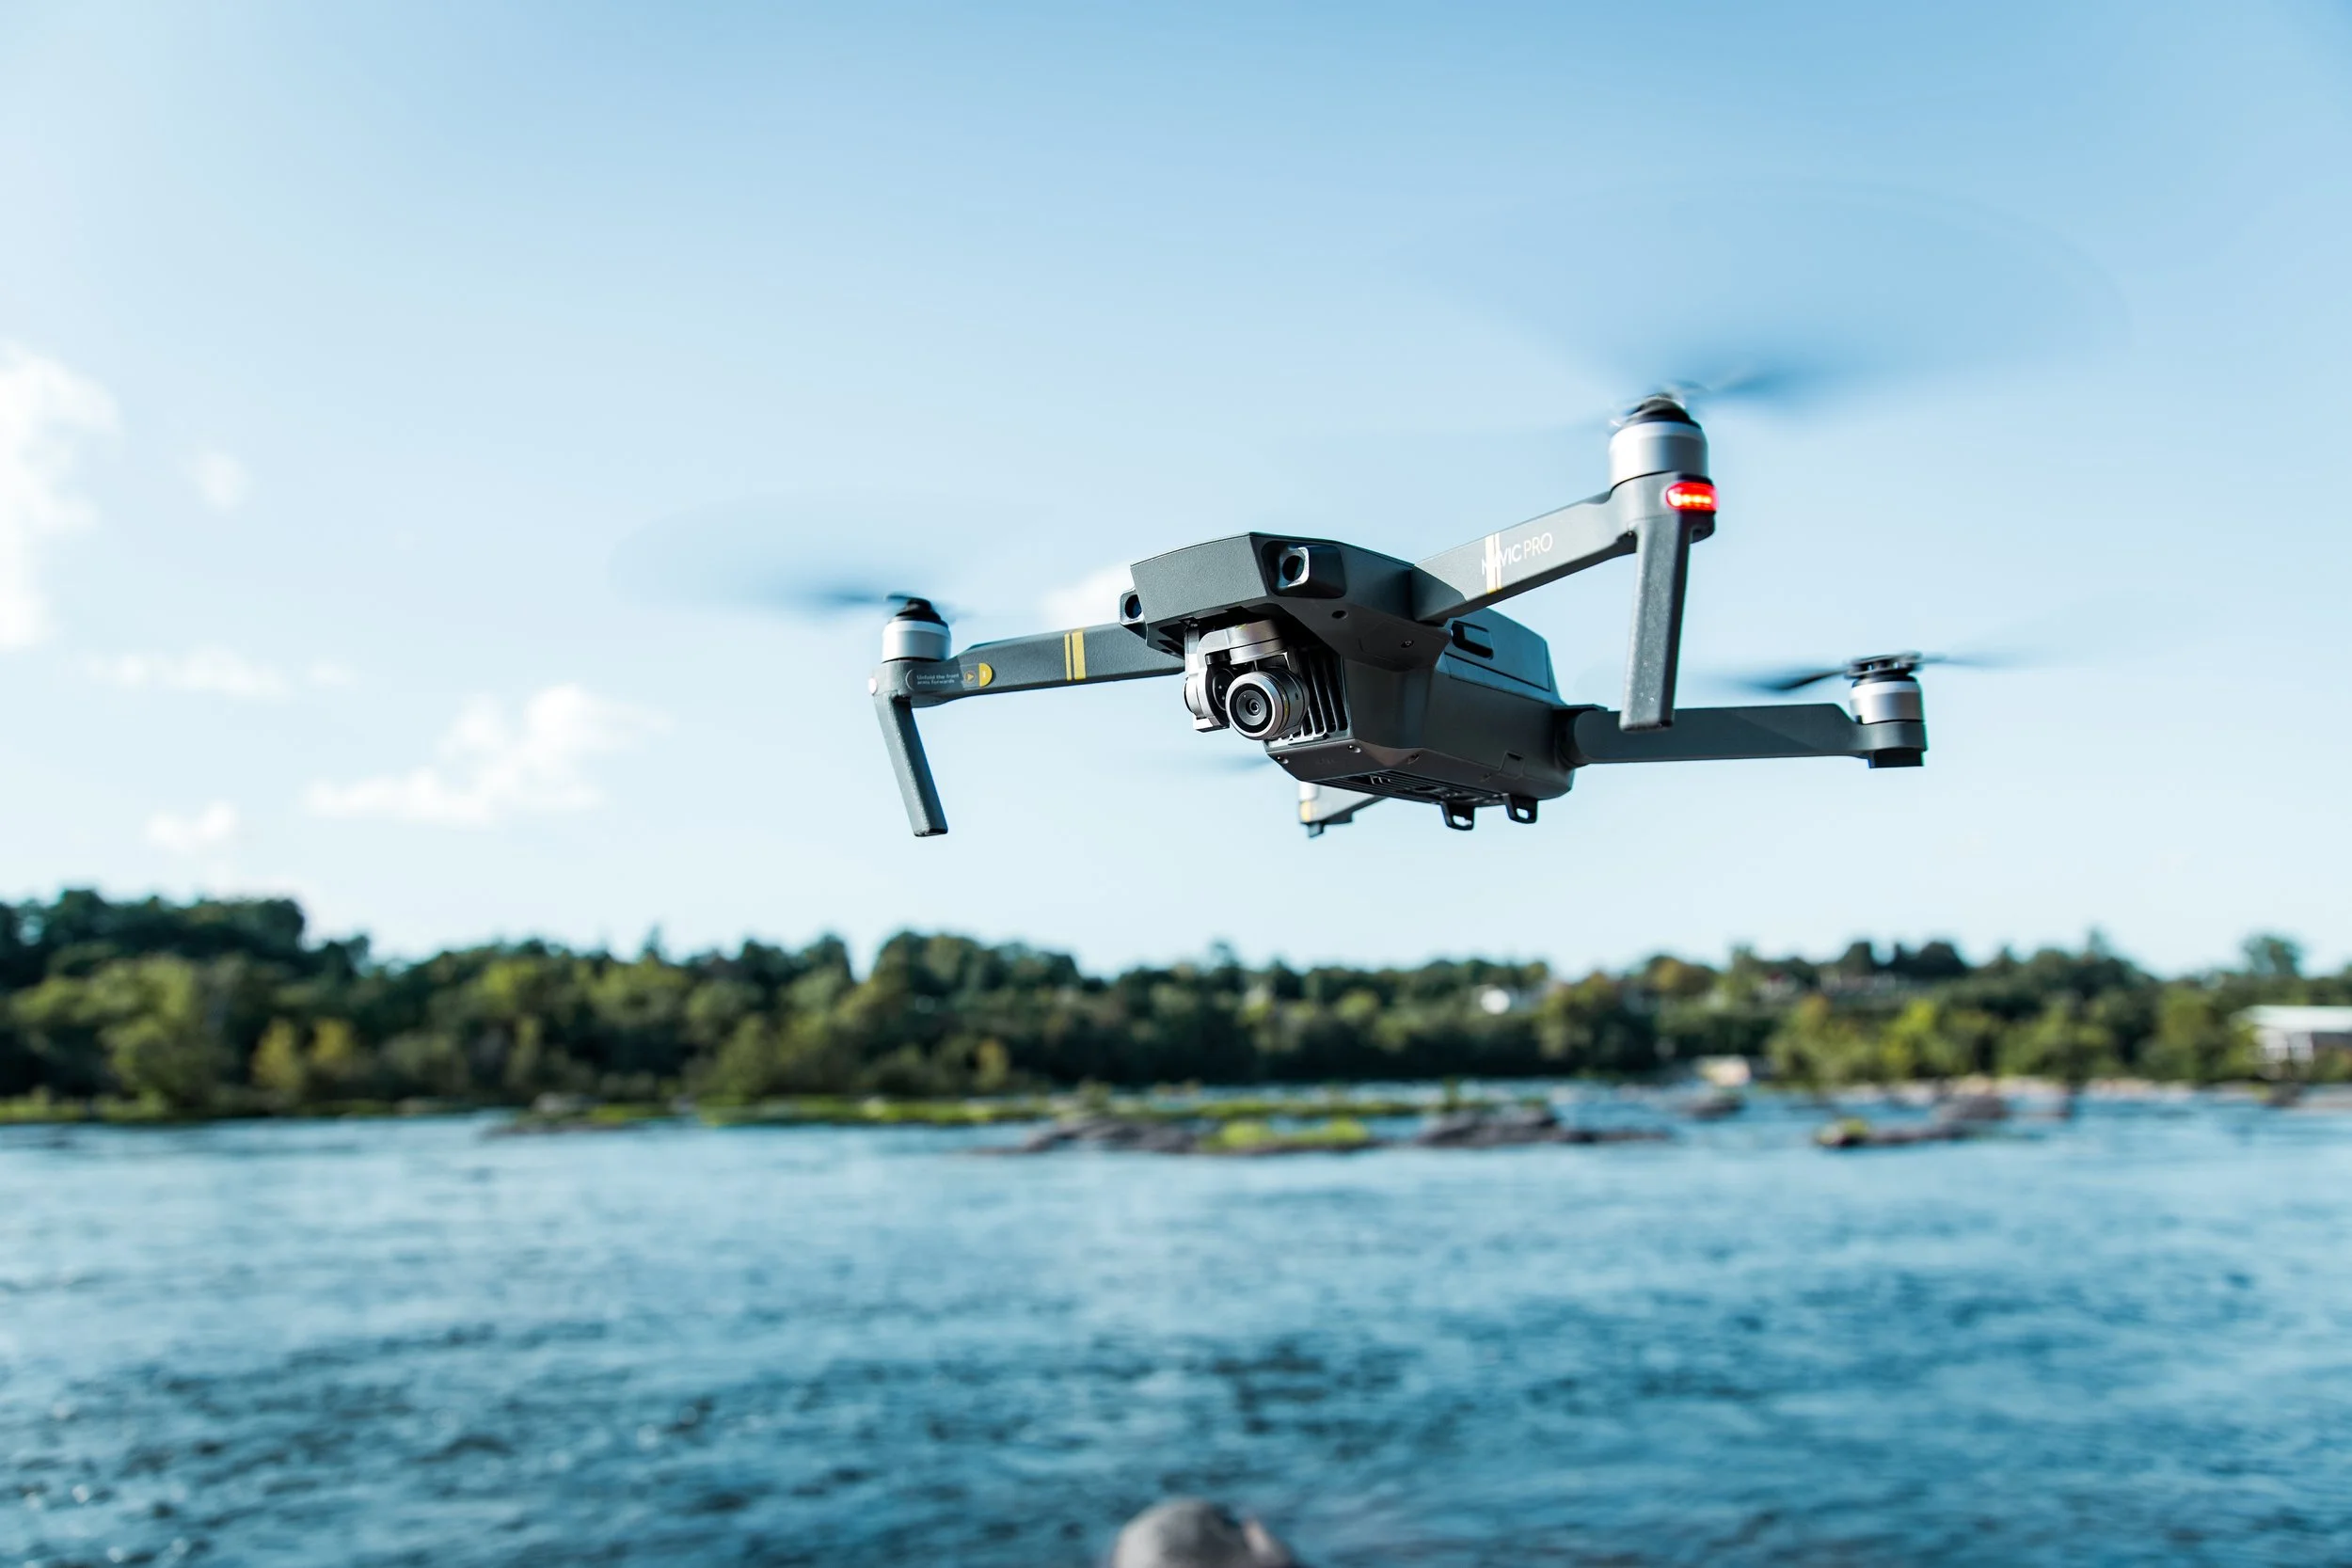
If you’re Indian, and you’re a photographer - it’s quite likely you’ve heard of Auditya Venkatesh. He’s leading the army of smartphone photographers all around India. And it’s not like he only shoots with smartphones, he shoots a ton of commercial stuff too - but he wants to get the message out there that equipment shouldn’t limit you. It should empower you.
Yes, this image was taken on a smartphone. © Auditya Venkatesh Photography.
“You want to be shooting with whatever equipment you have on you.” says the acclaimed photographer and cinematographer (now a director of photography in movies as well).
Gorky M caught up with him backstage at Pepx photocon, Mumbai, where he was giving a talk and engaging his fans, and the maverick dished out plenty of insights and tips for our viewers.
“As cliche as it sounds, the most important thing is being yourself when taking pictures.” What Auditya means is that while there may be many images that people enjoy looking at, it’s important to go with what you enjoy shooting most. They could be portraits or landscapes, you must work on the kind of story YOU want to go with.
Auditya also debunks the legend that taking pictures with your smartphone is easier than shooting with a professional camera because you can just whip it out and take pictures.
“If you’re trying to shoot something more seriously,(with a smartphone) it’s actually a lot more effort. You have a really small sensor to start with, you barely have any depth of field to play around with, you get a lot more noise when shooting in low light situations. There’s a whole bunch of things (that limit you) actually. So it does take a lot more effort.”
© Auditya Venkatesh Photography
Check out the video linked at the end to know how Auditya takes mind boggling images on his smartphone.
Auditya shoots plenty of commercial assignments where the equipment he uses is top of the line, but he’s become synonymous with smartphone photography. He doesn’t mind that at all.
“I get a lot of emails and messages from people saying that they don’t have professional cameras and if it’s possible to still make images everyday. And that’s why I share so many smartphone photos. Fair enough if people think I only shoot on smartphones. ”
And there’s more where that came from. In episode 5 of our series ‘In Frame With Gorky M’, Auditya shares how it all began, and how he works. It’s a pretty interesting conversation between the two of them. Check out the entire conversation in the video embedded below. Don’t forget to subscribe. There’s more to come from GMax Studios in 2019.

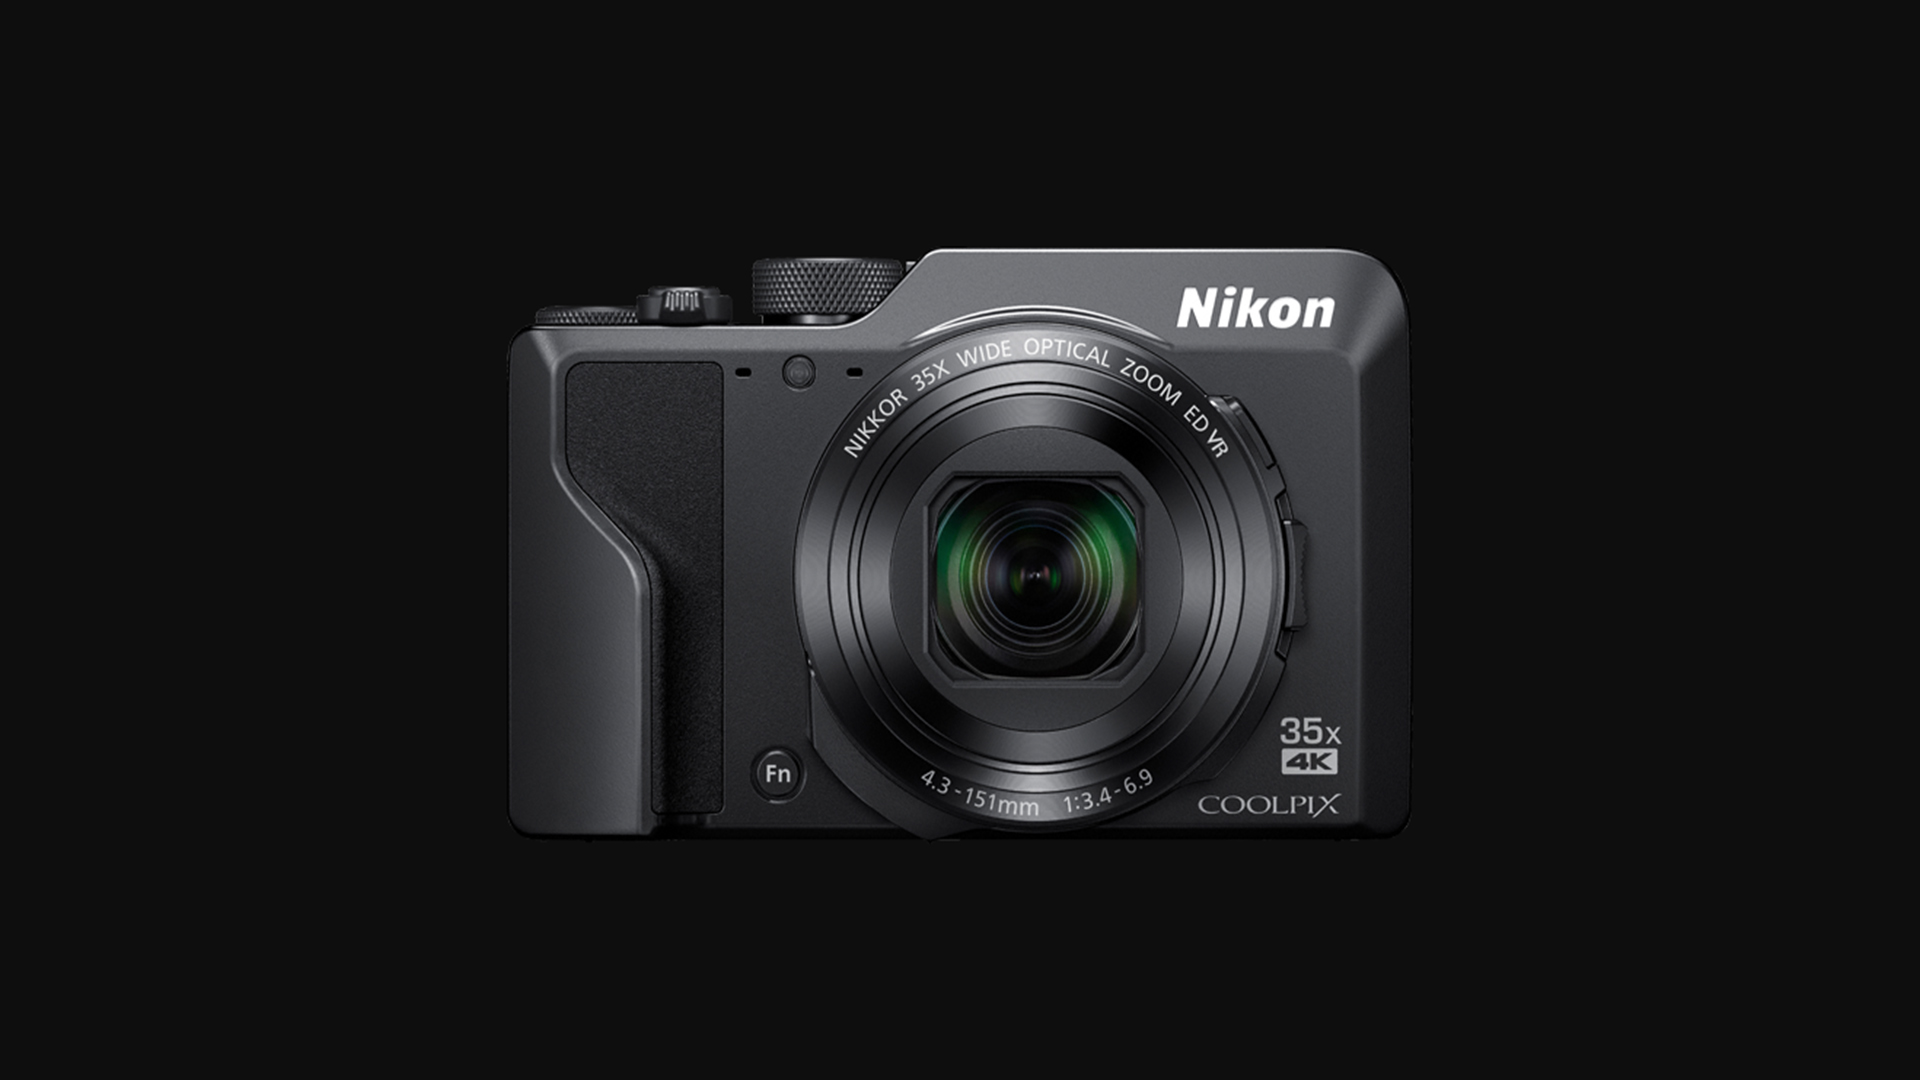
Nikon Firmware Update Enables Raw Video, Eye AF And CF Express Cards On Z7 And Z6
Nikon just dropped this news. This is going to change the mirrorless game.
Nikon has announced a firmware update that will enable raw video output to an external recorder, Eye AF and CF Express card compatibility.
Apple ProsRes RAW Output
On the second day of the CES 2019, Atomos’ CEO Jeromy Young announced that the new Atomos Ninja V is compatible to record ProRes RAW with the new Nikon Z6 and Nikon Z7.
“Atomos is excited to work with Nikon on the development of ProRes RAW recording from Nikon’s Z series. This expands ProRes RAW to Ninja V and is the world’s first true full frame mirrorless to give raw video output. The combination will enhance content creation at all levels, from Social, through Pro Video and into Entertainment.”
- Atomos Global
According to Atomos, the Nikon Z6 and the Nikon Z7 output a stream of RAW data via a HDMi cable to the Ninja V. Capturing Apple ProsRes RAW with the Ninja V will unlock wider and complete control of the video image at highest quality possible.
Some believe that Atomos is using a closed loop protocol with-in the HDMi, which basically means that they are taking all the pixels and rearranging them.
Nikon’s new mirrorless cameras, the Z6 and Z7 will be more than capable of outputting a RAW signal to the Atomos Ninja V, it’s not unrealistic to expect that more cameras will be capable of doing this in the near future. We wouldn’t expect that we are likely to see either Canon or Sony enable a RAW output to be recorded from their cameras.
Eye AF
With this new firmware update Nikon intends to announce its long awaited Eye auto-focus feature in their mirrorless cameras like the Z6 and the Z7. The Eye AF is a very good helping-hand when it comes to taking pictures such as portraits, event or street photography scenario.
“Our much-anticipated Eye AF function that is currently in development for the Z7 and Z6 can effectively detect your subject’s eyes, making focusing so much easier! You’ll capture stunning shots where focus has been clearly acquired on the subject's eyes - good news for portrait and streetphotographers!”
-Nikon Global
According to Nikon, the technology/feature is in its last and final implementation phase. In the demonstration video below, you can see it acquires the eye as fast as a Sony/Fujifilm has been able to do with their mirrorless technology. The only difference being that the area of the box seems to be much larger than that of Sony’s or Fujifilm’s Eye AF.
Source: Nikon Europe YouTube Channel
It will be possible to select which eye to focus on if there are multiple subjects in the frame, in which case, this makes it easier for the shooter to prioritise the particular subject.
We expect the Nikon’s Eye AF to be as efficient as Sony’s or Fujifilm’s.
As of now, Nikon has not released an official date about when we can expect this new firmware upgrade, but we believe it will be soon.
If you would like to know further please visit:
CF Express Card
Nikon has also announced that their new mirrorless cameras will be compatible with the new CF express cards after the firmware update. These cards use the same form-factors as the XQD cards which are the only data transfer interface used in the Z6 and Z7.
What’s really surprising is that Sony was the first one to introduce XQD cards and yet they have not incorporated the technology to any of their camera devices.
In a recent statement given by Pro Grade Digital states that they will be introducing a 1 terabyte CF Express card demonstrated 1,400 MB/s read speed and over 700 MB/s burst write speed.

Source: ProGrade Digital Website
“ProGrade Digital is delighted to be participating in this exciting technology demonstration highlighting the speed of the ProGrade Digital 1TB CFexpress card and Thunderbolt™ 3.0 in the digital workflow,”
-Wes Brewer, founder and CEO of ProGrade Digital.
“With read speeds up to 1400MB/s, this technology provides peak performance for offloading cinema-quality, video and still image files at speeds that are at least three times faster than ever before.”
- ProGrade Digital Global
If you would like to know further, please visit:
https://progradedigital.com/2019/01/08/prograde-digital-cfexpress-1-0-demonstrated-at-ces-show/

Panorama Portait Photography | Brenizer Method
Using the panarama technique to create unique portraits.
This photography video is a portrait photography tutorial, where we show you just one of the many ways you can shoot a panoramic portrait also known as the Impossible Portrait. This particular style of shooting a portrait is known as the ‘Brenizer Method’ pioneered by wedding photographer Ryan Brenizer.
If you’re new to panoramas or panoramic photography, you should watch this short photography tutorial on how to shoot panoramas correctly here:
The Brenizer Method is an easy to learn but difficult to master photography technique which is also referred to as Bokeh Panorama or Bokehrama. With this creative photography method, you can shoot a ultra wide-angle portrait while retaining the shallow depth of field that is so popular in modern portrait photography and on Instagram.
AMAZON: https://gmxsn.com/amazon
YOUTUBE: https://gmxsn.com/yt
GOOGLE+: https://gmxsn.com/gplus
INSTAGRAM: https://gmxsn.com/instagram
FACEBOOK: https://gmxsn.com/fb
TWITTER: https://gmxsn.com/twitter
TELEGRAM: https://gmxsn.com/telegram
5 Wildlife & Macro Photography Tips For Beginners By Photographer Yuwaraj Gurjar | In Frame With Gorky M, Episode 3
Wildlife photographer Yuwaraj Gurjar shares some important tips for those looking to get into wildlife photography and macro photography.

In the third episode of our latest photography series, ‘In Frame With Gorky M’, one of India’s authority figures on wildlife and macro photography, Yuwaraj Gurjar, sits down with filmmaker and photographer Gorky M - and shares some very important tips and secrets for beginners or those looking to get into wildlife photography and macro photography full-time. Be sure to note these down before going out to photograph.
You Cannot Pursue Wildlife Photography Full Time
Wildlife photography isn’t one of the commercial or the most glamorous photography genres out there. While there is a niche and a demand for it, it is also important that you’re taking up commercial assignments to keep yourself afloat. Wildlife photography is a fascinating genre, but not a high-income genre in photography unless you’re an established wildlife photographer.
Do Your Homework & Come With The Right Gear

According to wildlife photographer Yuwaraj Gurjar, preparation for a wildlife photography expedition begins three to six months in advance.
Going to wildlife sanctuaries and conservatories and photographing animals and birds is fine, but you must read up on your subjects before photographing them. It is important you know how to work your camera and you have the right lenses for photographing the birds and the wild animals you might see. Read the rules, regulations, and brochures of the safari or national park you’re visiting to avoid breaking any laws or committing any offenses, and talk to local guides and figure out where you might find a particular bird or an animal, so you’re in the vicinity when there is an opportunity to photograph them.
READ: Photography Tips From National Geographic Photographer Ira Block!
Having A Love For Nature Is The Bare Minimum

Be prepared to get down and dirty when you’re out in nature. © Yuwaraj Gurjar Photography
Those who pursue wildlife photography and the various genres that it encompasses such as nature, animals, flora and fauna, landscapes, birds, macro - have a genuine love for mother nature. You must ask yourself if you’re passionate enough about it. There will be times when you have to climb hills, photograph in the rain, climb down ditches and unsavory places to photograph, which requires a level of patience and dedication that isn’t always possible. This is why it’s important that you are passionate enough about wildlife photography and only then will you be able to make somewhat of an impact with your work.
There Is Already A Lot Of Work On Tigers and Elephants
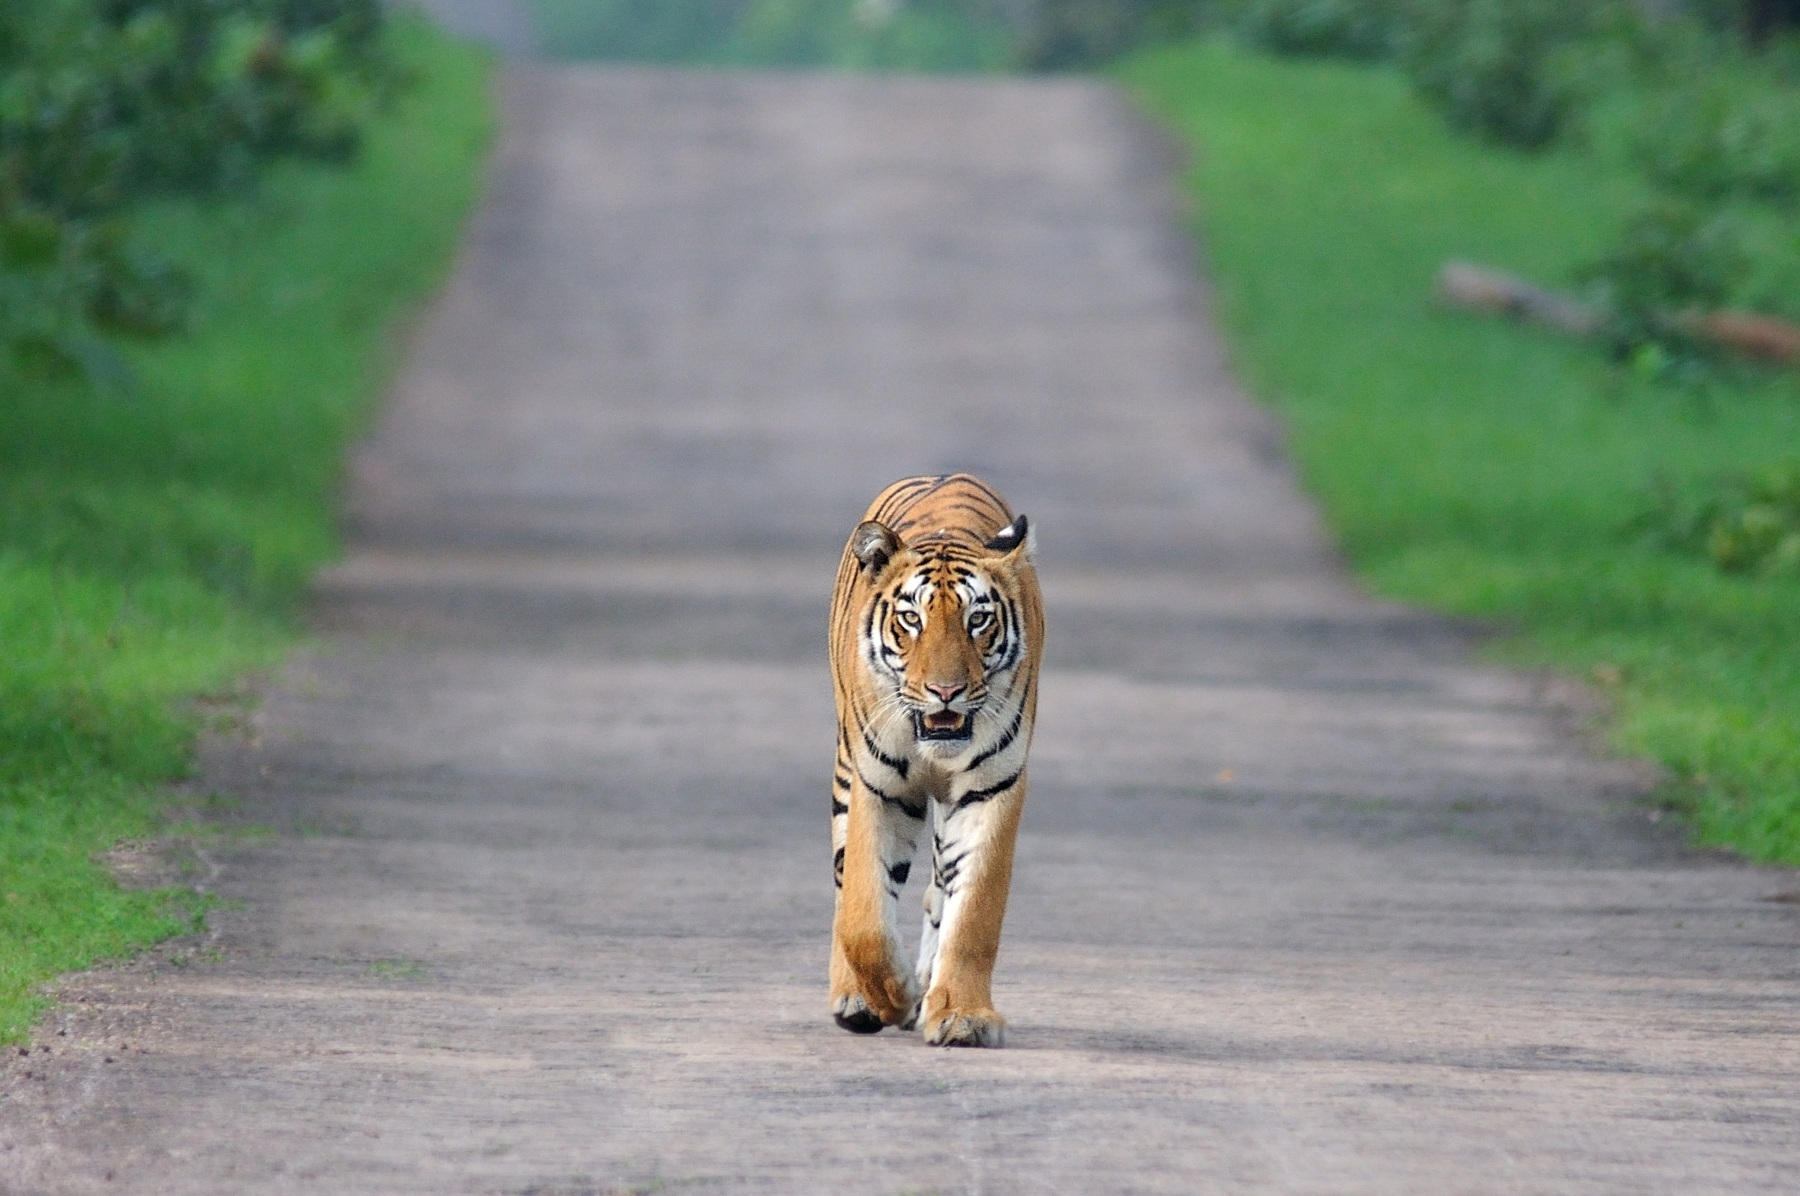
An Indian Tiger Photographed by © Yuwaraj Gurjar Photography
Don’t be discouraged by this, we’re simply saying this so you’re aware. Established wildlife photographers have already done a lot of work on Bengal Tigers, Indian Elephants and Dolphins etc. So make sure, if you’re photographing similar species, that you look at it from a different perspective - so your work is able to stand out. There are also many species that people aren’t looking into. They could be unique to the area you live in, or a variation on the species that are already out there. “People are still discovering new birds in the Himalayas,” says Yuwaraj Gurjar. Maybe you could try Macro photography - where there’s a higher chance of finding something new or coming across a rare species.

Macro shot of a Vine Snake gulping a Frog, © Yuwaraj Gurjar Photography
Macro Photography is a versatile genre of wildlife photography where there are tonnes of species to photograph and new things to find.
Travel With A Group Or An Experienced Professional

Even accomplished photographers prefer to travel in a group on a wildlife photography excursion, says Yuwaraj Gurjar. Image © Yuwaraj Gurjar Photography
This really matters. If you’re looking to learn the ropes of wildlife photography or macro photography, it is better if you travel with an experienced wildlife photographer so you learn more quickly than you would on your own. The cost of a wildlife safari also becomes more manageable when divided between 4-6 people. Not to mention that it is also a safety concern, so traveling to jungles and forests in groups or with local guides becomes essential. The local guides are usually chatty, and if you were to engage them in conversation, they would be more than willing to help you and give you an idea of the species or animals that live in a particular habitat.
And that’s not all. There are many more insights and little tips to help you start your journey as a wildlife photographer in the video below. Yuwaraj Gurjar also has advice on which lenses and camera gear to use for wildlife photography. Be sure to subscribe to us on YouTube if you want to watch more videos like the one below.
Presenting Episode 3 of the series - In Frame with Gorky M. In this episode, Gorky M. speaks with accomplished wildlife and macro photographer Yuwaraj Gurjar. Yuwaraj Gurjar is one of India's best wildlife photographers and one of the authority figures on macro photography worldwide.


Joseph Radhik Interview | Lessons In Humility And Wedding Photography | In Frame With Gorky M Episode 1
If you’re a wedding photographer, you might not want to miss this.
Wedding Photography has witnessed a massive revival all over the world. These days, wedding photographers can charge as much as they like. This can partly be credited to photographers like Joseph Radhik who’ve taken a different approach to photographing weddings by bringing out a previously unseen art to them. Joseph has won countless awards for his work and is the founder of Stories by Joseph Radhik, a wedding photography firm that’s been featured in magazines like Grazia, Harpers’ and People Magazine. A photographer with an entrepreneurial spirit, Joseph has managed to blow up his craft into a thriving business whilst retaining all of the creativity and passion.
Joseph is the first guest in our latest series, ‘In Frame with Gorky M’ - a half hour tete-a-tete with some of the world’s best photographers. In the video, Joseph talks about how he got into wedding photography, his personal gear and more. The full episode is embedded at the bottom of the post, you can get right to it if you like.
“I worked as a business development manager five days a week, and on a Friday I would shoot a wedding and be back in office on Monday. ”
Photograph by Joseph Radhik, © Stories by Joseph Radhik
It’s this attitude and commitment that’s made Joseph the one of the prized photographers in the industry.
And there’s lots we’ve learned about the man these past few months, bumping into him at the Sony A7III launch in Mumbai (He’s also Sony’s Global Imaging Ambassador) and from the time he came over to talk about his passion project PEPx Photocon. He was coming straight from a photo-shoot, so he came with suitcase and all, very much, as we like to call it - in the zone. We were going to be filming our conversation in one hour, and he was going live simultaneously on his PEP Professionals app; his technicians setting up a live-stream that looked technical as hell. In those days we’d go live every Saturday, so we could understand the immense pressure. But Joseph was cool like you’d be on a Sunday morning. He was quick to figure out a solution when a problem arose, answering and hanging up calls at the pace of a stockbroker, at times, on his haunches like a camera assistant.
After seeing what Joseph’s schedule looked like, (putting together a 3-day global photography event, photographing a wedding, giving an interview and going live at the same time on his app) we learned that it’s no more just you and the camera. Photography is a big part of your life but it’s a relatively small part of your business. Most of your time’s eaten up by phone calls, production meetings, preparation and social media. It’s how you fare in those departments that determines if you’ll be remembered for picking up the camera or not.

Real photographers don’t shy away from selfies
In return for creating awareness on PEPx Photocon on our channel GMax Studios, Joseph had invited us to the event. He let us film the entire event, gave us the best seats in the house and also threw in twenty PEPx passes for our subscribers. It was because of this wonderful opportunity that we were able to chat with accomplished and globally renowned photographers such as Ira Block, Dinesh Kumble, Yuvraj Gurjar and Auditya Venkatesh.
PEPx was an unbelievable experience for a photographer. People were practicing photography the halls, students were chatting up their favorite photographers; ambassadors, acclaimed photographers, gearheads, camera companies, vloggers, motivational speakers - everybody was present. It was kind of like an Apple event, but for photographers. Joseph was speaking on all three days, and during the course of the event, we learned just how good an orator he is. His speeches are motivational and he also likes to laugh at some of his own jokes, but he kept the audiences engaged through all of it.

Photograph by Joseph Radhik, © Stories by Joseph Radhik
When asked about the best camera settings for wedding photography, (we know, it sounds absurd) Joseph said that the best setting is getting to the location with your camera. The theater erupted with laughter. While there were other renowned photographers speaking at the event, seeing Joseph get up on stage was always exciting, his jokes and insights being met with much laughter and applause. He was able to harvest every colloquial sentiment to make the people feel at home.
“In 2008, I googled ‘wedding photographers in India’ and it returned zero results.
I chanced upon a genre that I never knew existed.”
Photograph by Joseph Radhik, © Stories by Joseph Radhik
Wedding photography came to Joseph when he was looking for a photographer to shoot his sister’s wedding. At the time, he was photographing flowers and sunsets like every rookie with a D-SLR. (Scroll through some of his older photos on flickr, we’re not lying) “I chanced upon a genre that I never knew existed”, says the the three-time fearless photographer of the year, his eyes lighting up from visualizing the moment. He ended up photographing his sister's wedding, and naturally, he got good at it as he shot more and more. He even began to dress the part. In fact, his photography gear also comprises of waistcoats just so he can blend in better. “I’m working, but it’s still a wedding.” It’s a statement that’s profound because of its simplicity. It can only come from a guy who truly loves to photograph weddings.
“Wedding photography had everything that I loved. Photojournalism, beauty, light, documentary, landscapes. Weddings are also like wildlife. You need perfect timing.”

Photograph by Joseph Radhik, © Stories by Joseph Radhik
As an effort to enjoy himself more, Joseph carries only a handful of equipment - his favorite lenses, a double-camera strap (so he looks like a badass cop) and has a relatively small team helping him out with the lighting and managing of data. While his world is fairly complex, his photography is simple. It’s how he’s able to still love doing what he does despite his phone ringing off the hook. As a photographer, he’s not above shooting group photographs of the couple’s friends and family he says. The truth of that statement hits your chest. It’s a lesson in humility from the guy who shot India’s most talked-about wedding.
Watch the entire conversation between Gorky M and Joseph Radhik below. He talks about his inspirations, shares some valuable trade secrets and even lets us take a peek inside his camera bag.

Why is the 50mm 1.8 lens the best lens in the world and why should you buy it!
It’s been a while since you’ve had this DSLR but your photos just don’t stand out. They seem to be missing something. You can change that today.
It’s been a while since you’ve had this D-SLR but your photos just don’t stand out. They seem to be missing something. That finesse. That x factor. That punch.
That ‘D-SLR look’ you’ve seen on Instagram.

Mind you, If you’re not getting the kind of shots you want, it could make you fall out of love with photography. At the end of the day we do things to get results. And if you’re putting in the time and you don’t think it’s yielding anything substantial, it can turn you off big time.
Here’s what happens. You’re getting great natural light on your subject. You might even think that the picture has a kind of mood. You compose your shot, hold your breath and click the shutter release button. Nice.
Later, you see the image on your computer and you can’t believe it’s the same picture. It looks ordinary. You scratch your head and go, “I thought I’d get quality images with a D-SLR.”
But here’s the thing. Image quality and sharpness often depends on the kind of lens you’re using and its aperture (aperture is the opening of the lens, which is denoted by the f number. For example, f.4 or 5.6.) The lower that f number is, the wider the aperture will be.
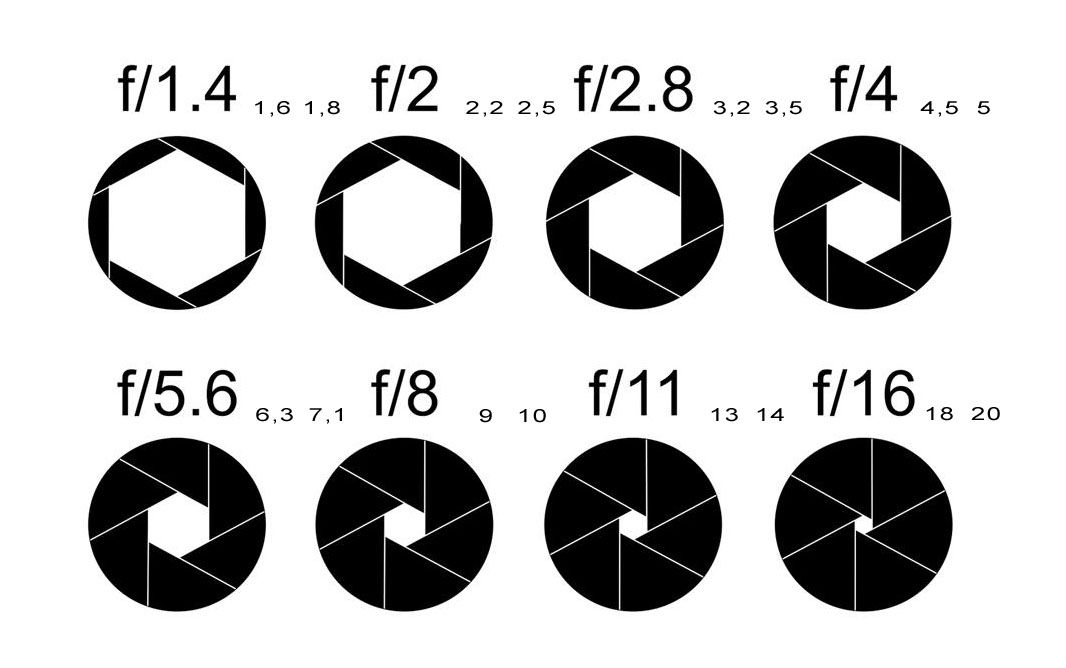
A wider aperture allows more light to enter the lens, and this allows your camera to render focus areas much better.
The 18-55 kit lens that comes “free” with your D-SLR may seem good enough to start with, but it has an aperture range between f/4 and f/5.6
If you’re looking for beautiful bokeh, sharper image quality, a 50mm prime lens with a 1.8 aperture is a great lens to buy.

Background blur has mostly to do with your aperture
The 50mm 1.8 prime lens is also called a ‘nifty fifty’ because of how nifty or useful it is to photographers. It's light, cheap and almost every camera company makes it. It's also a fast lens, (lenses with wider apertures are called fast lenses) which means you can shoot at higher shutter speeds, and you don’t need to bump up the ISO too much. In terms of quality, the nifty fifty is best bang for your buck.
Here are a few reasons why we think it’s a great lens.
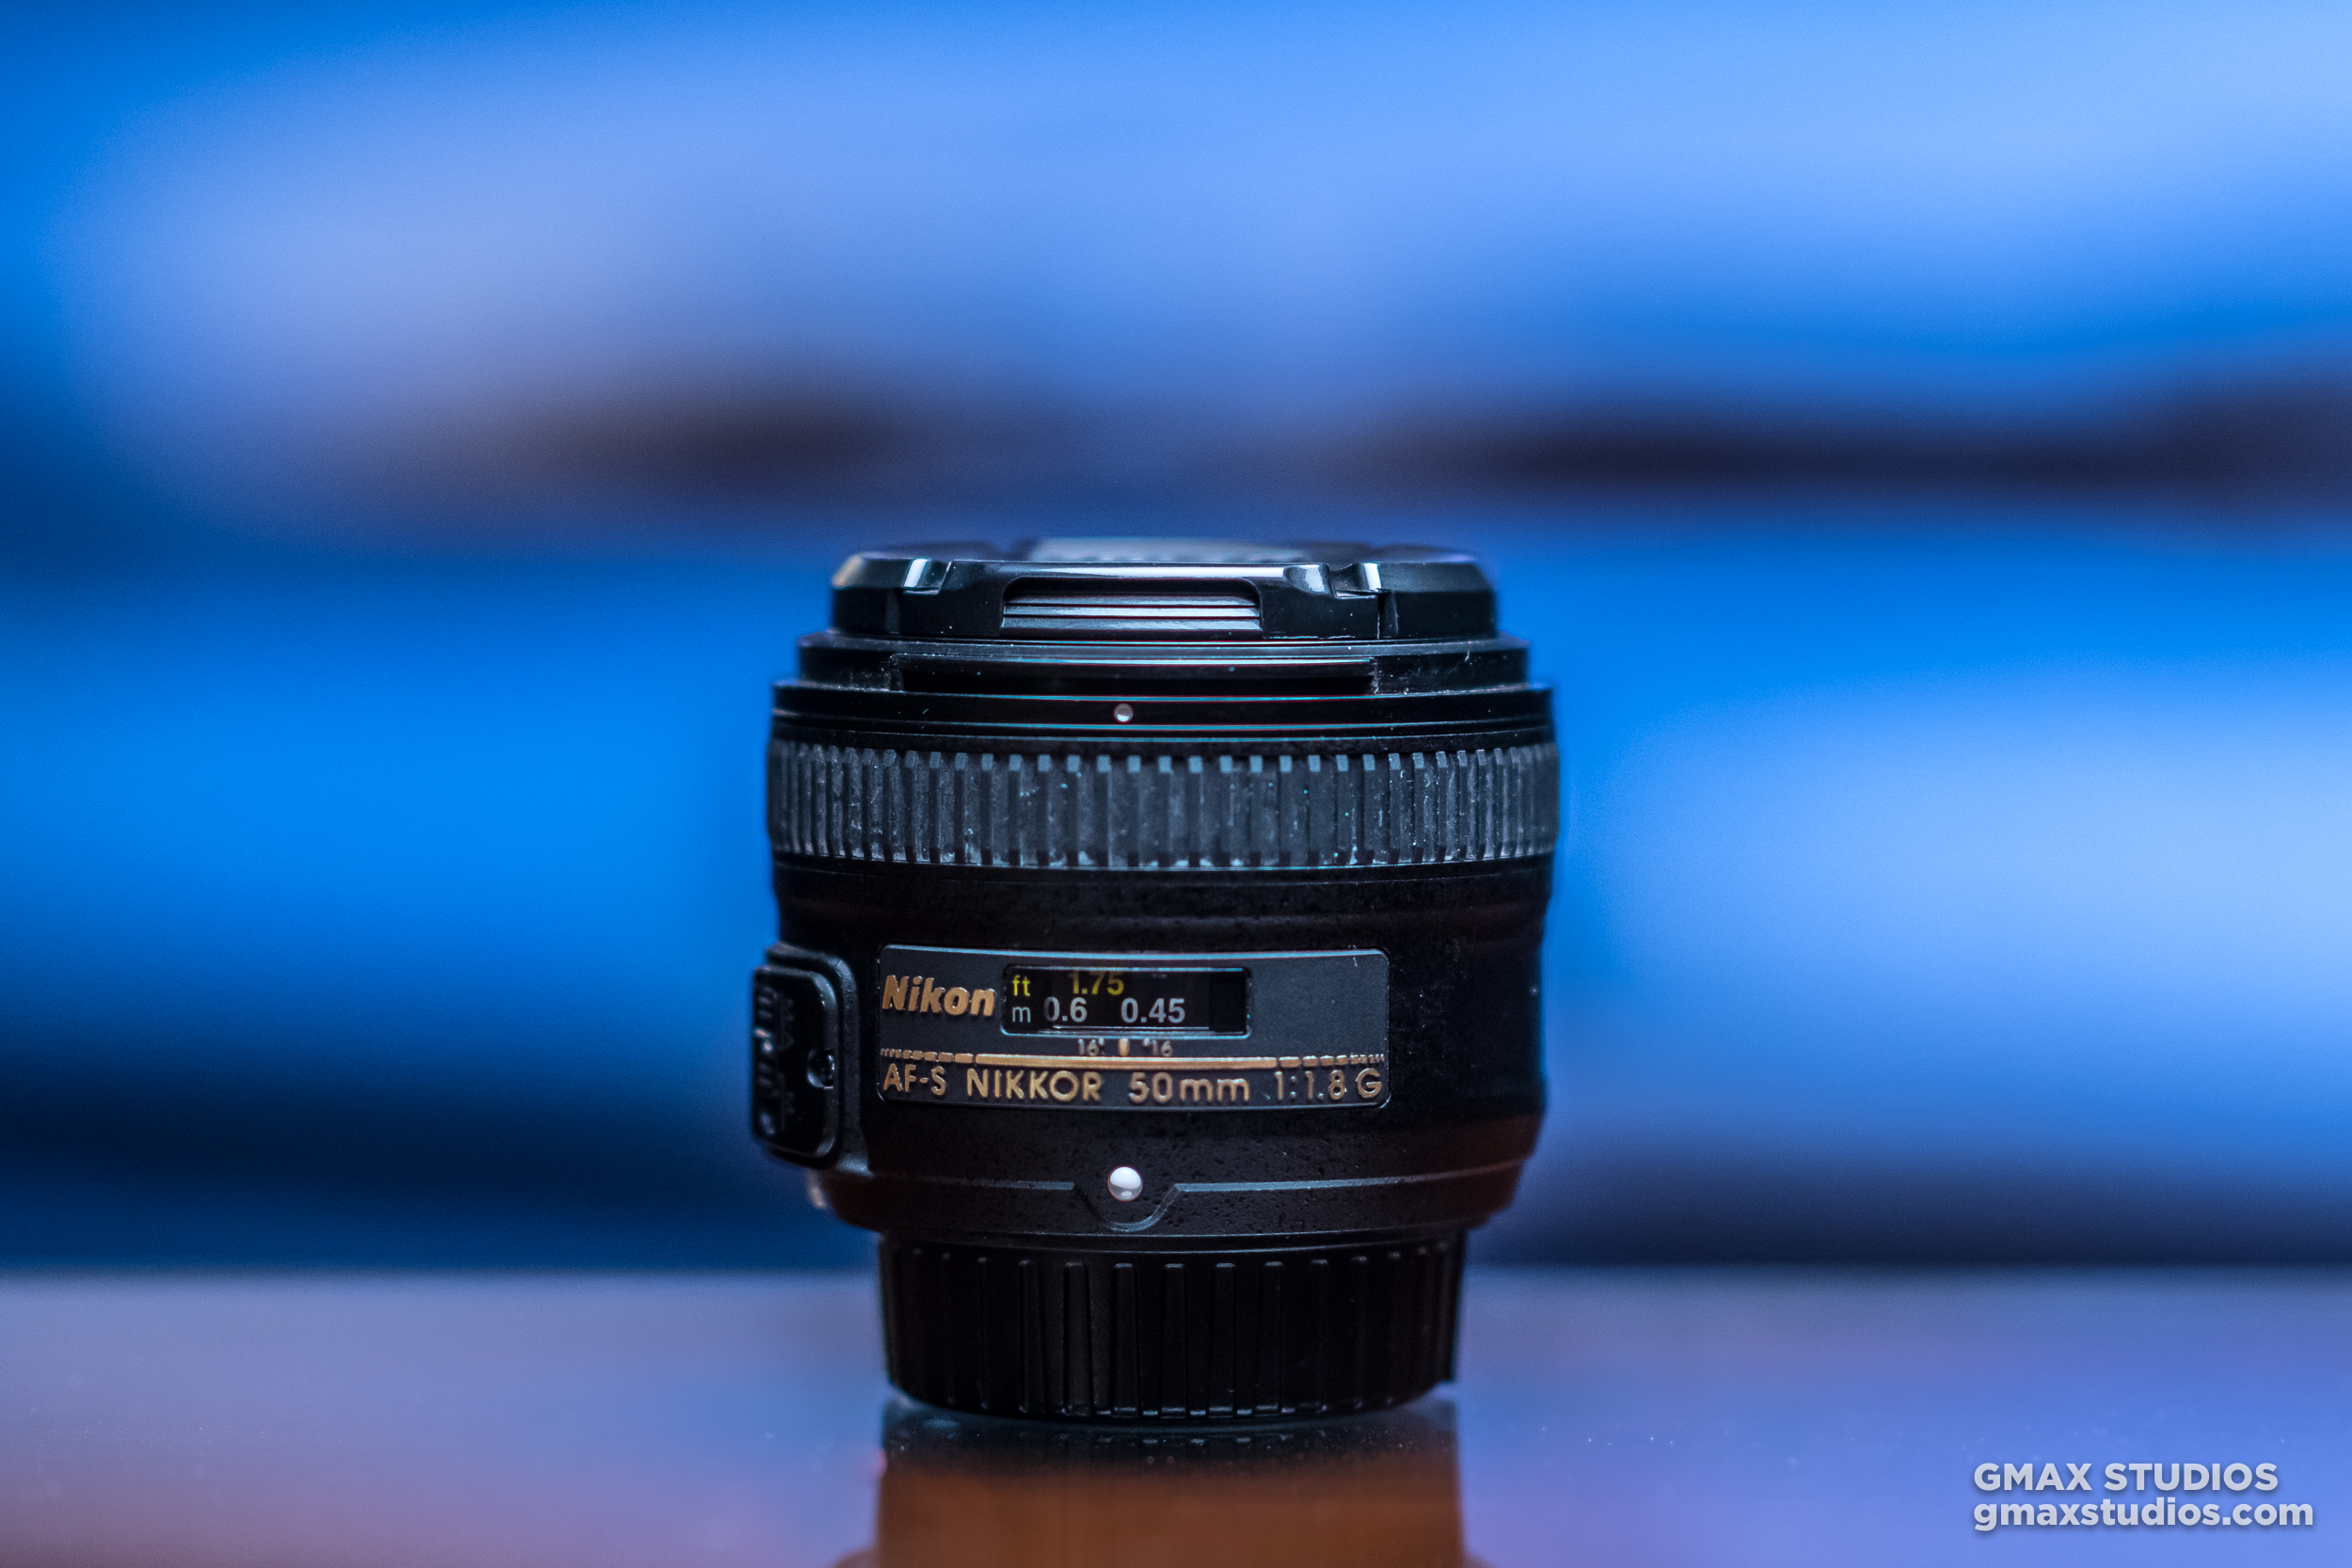
The nifty 50 is the personification of “good things in small packages”
It’s Light and Easy to Carry
Weighing between 150 to 200 grams, the 50mm 1.8 will have your shoulders thanking you for it. It fits right in to any camera bag, and you can take it anywhere without attracting much attention. If you had to pick one lens to travel with - this would be the one.
It’s Versatile
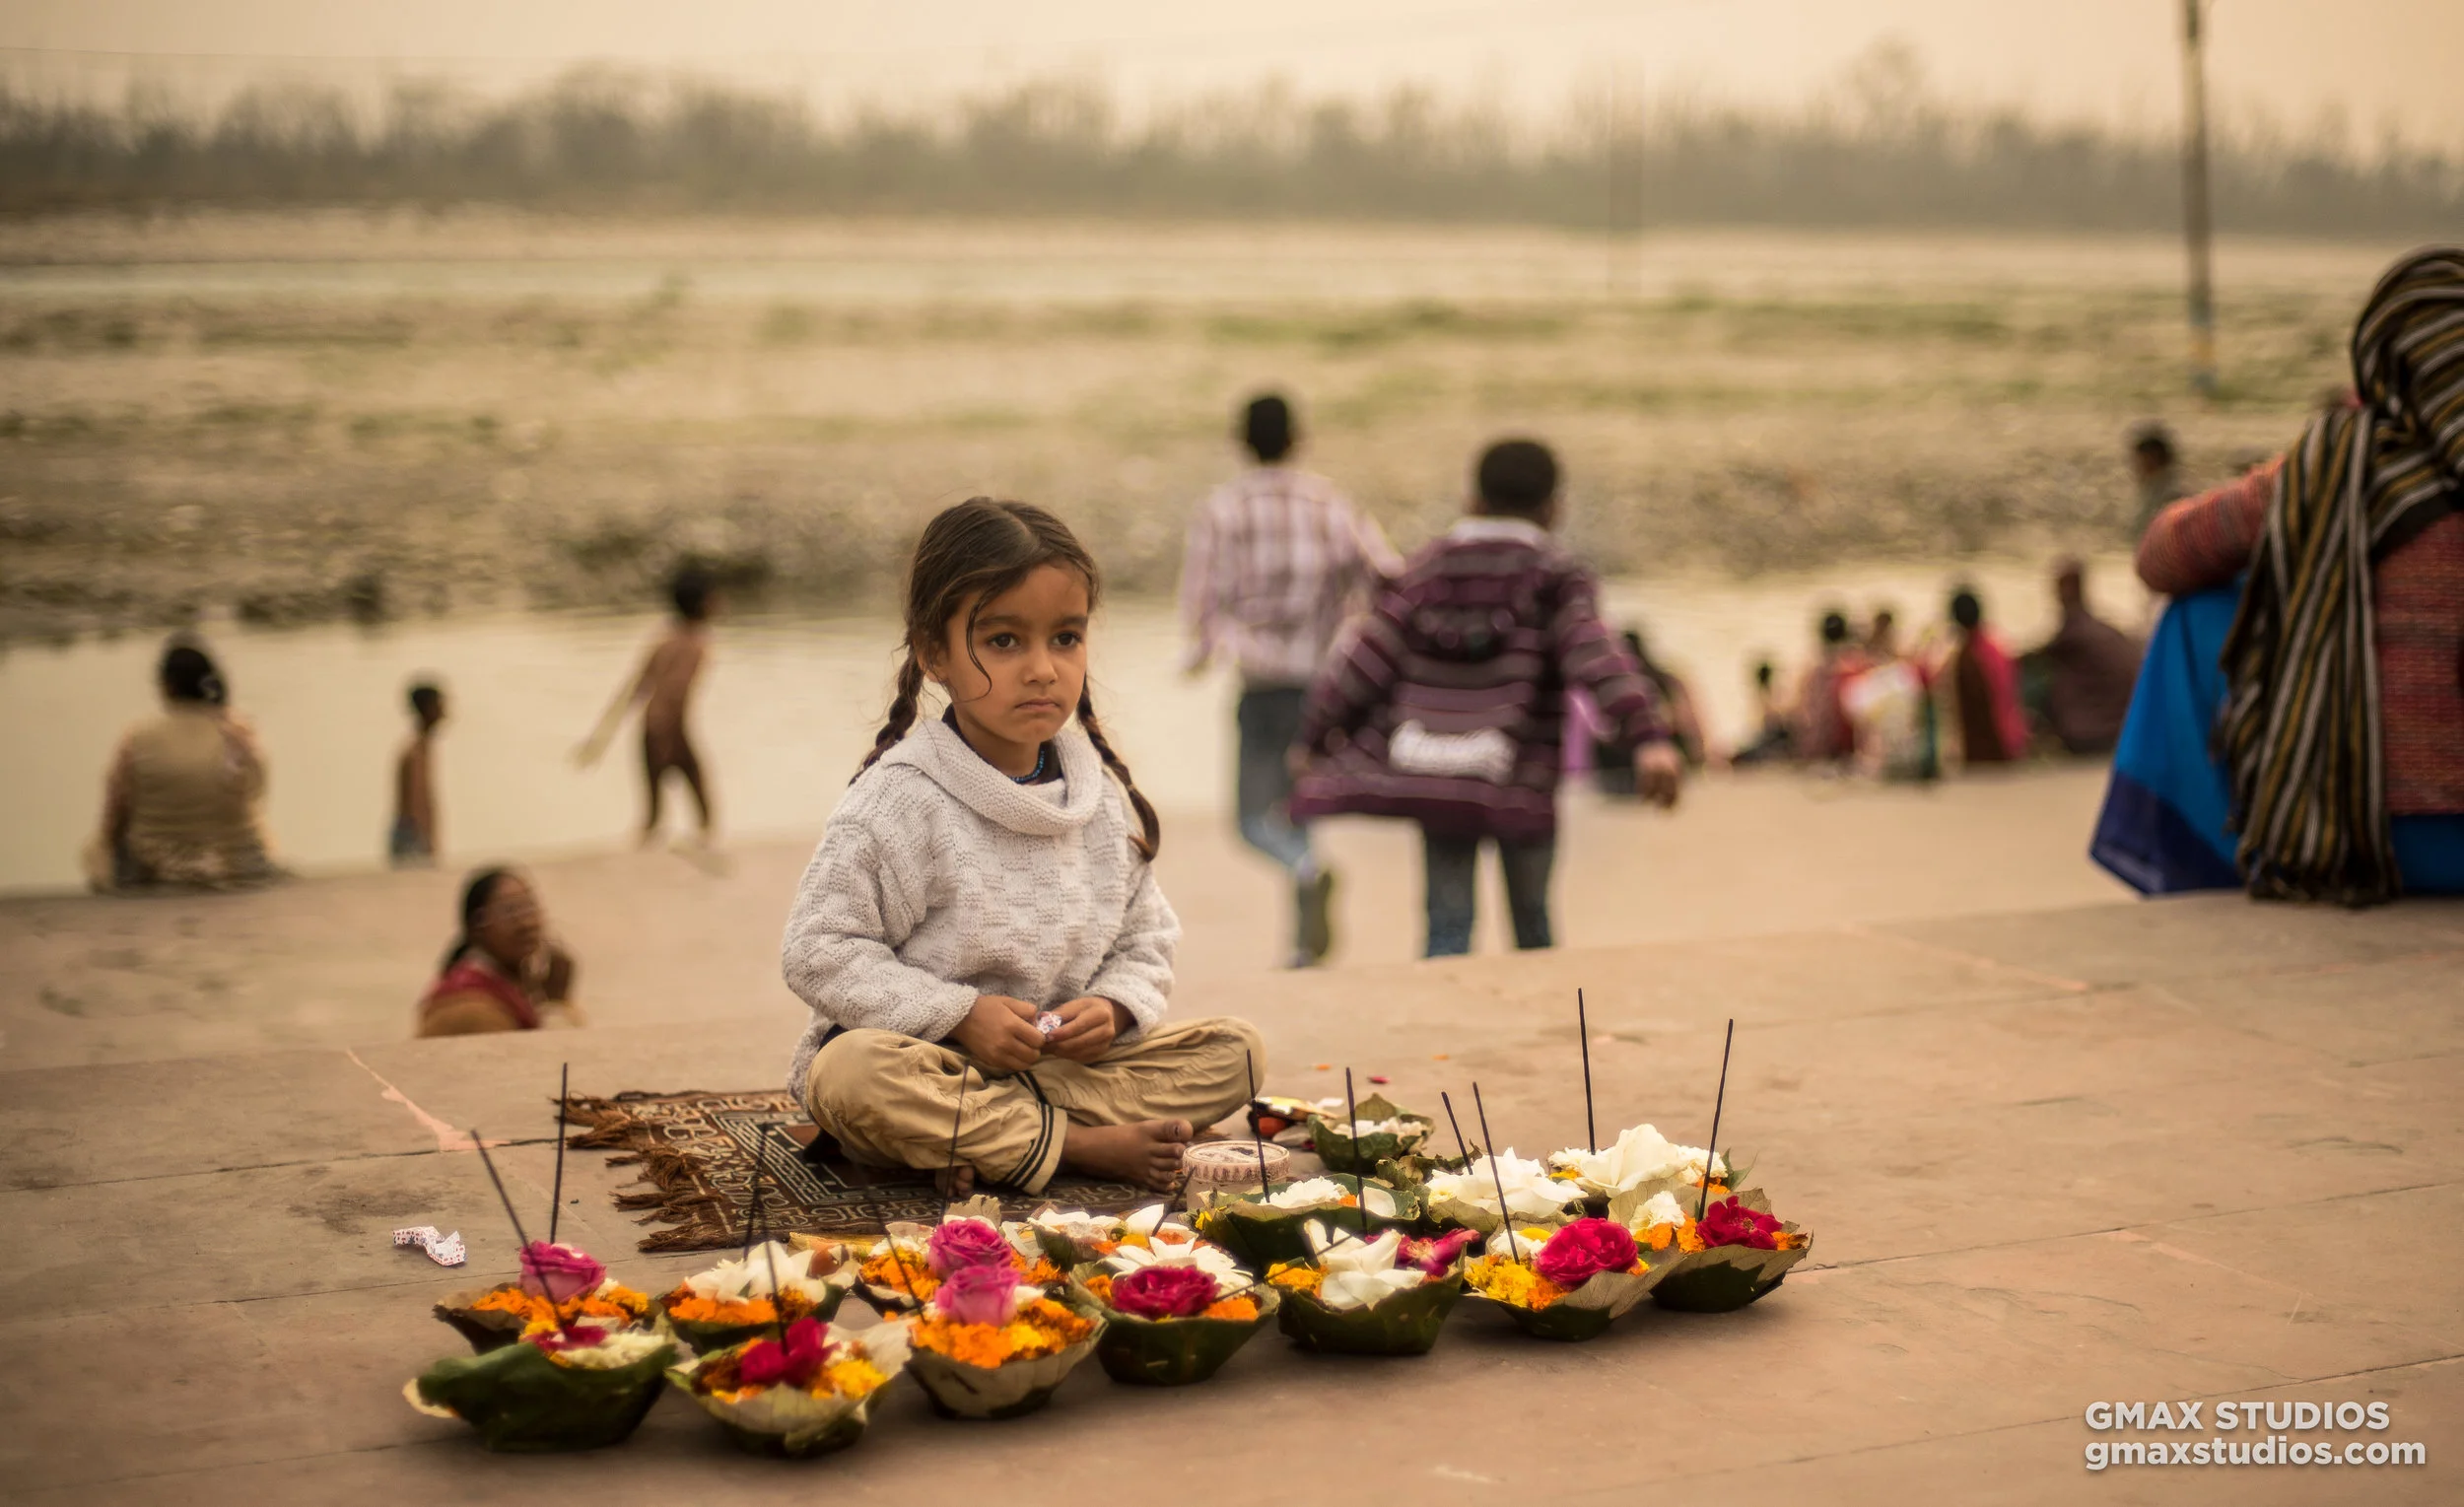
The nifty 50 is the Johnny Depp of camera lenses. It can practically be used in every genre of photography. Portraits - check. Landscapes - check. If you’re into street photography, it’ll be hard to top the functionality of this lens.
Everything Looks Right
A 50mm lens is also called a normal lens. At a focal length of 50mm, its field of view is similar to what the human eyes perceive. Everything looks as it should, there’s not much distortion like in the case of wide lenses or the feeling of distance when you take a photograph using a telephoto lens.
It’s a Fast Lens
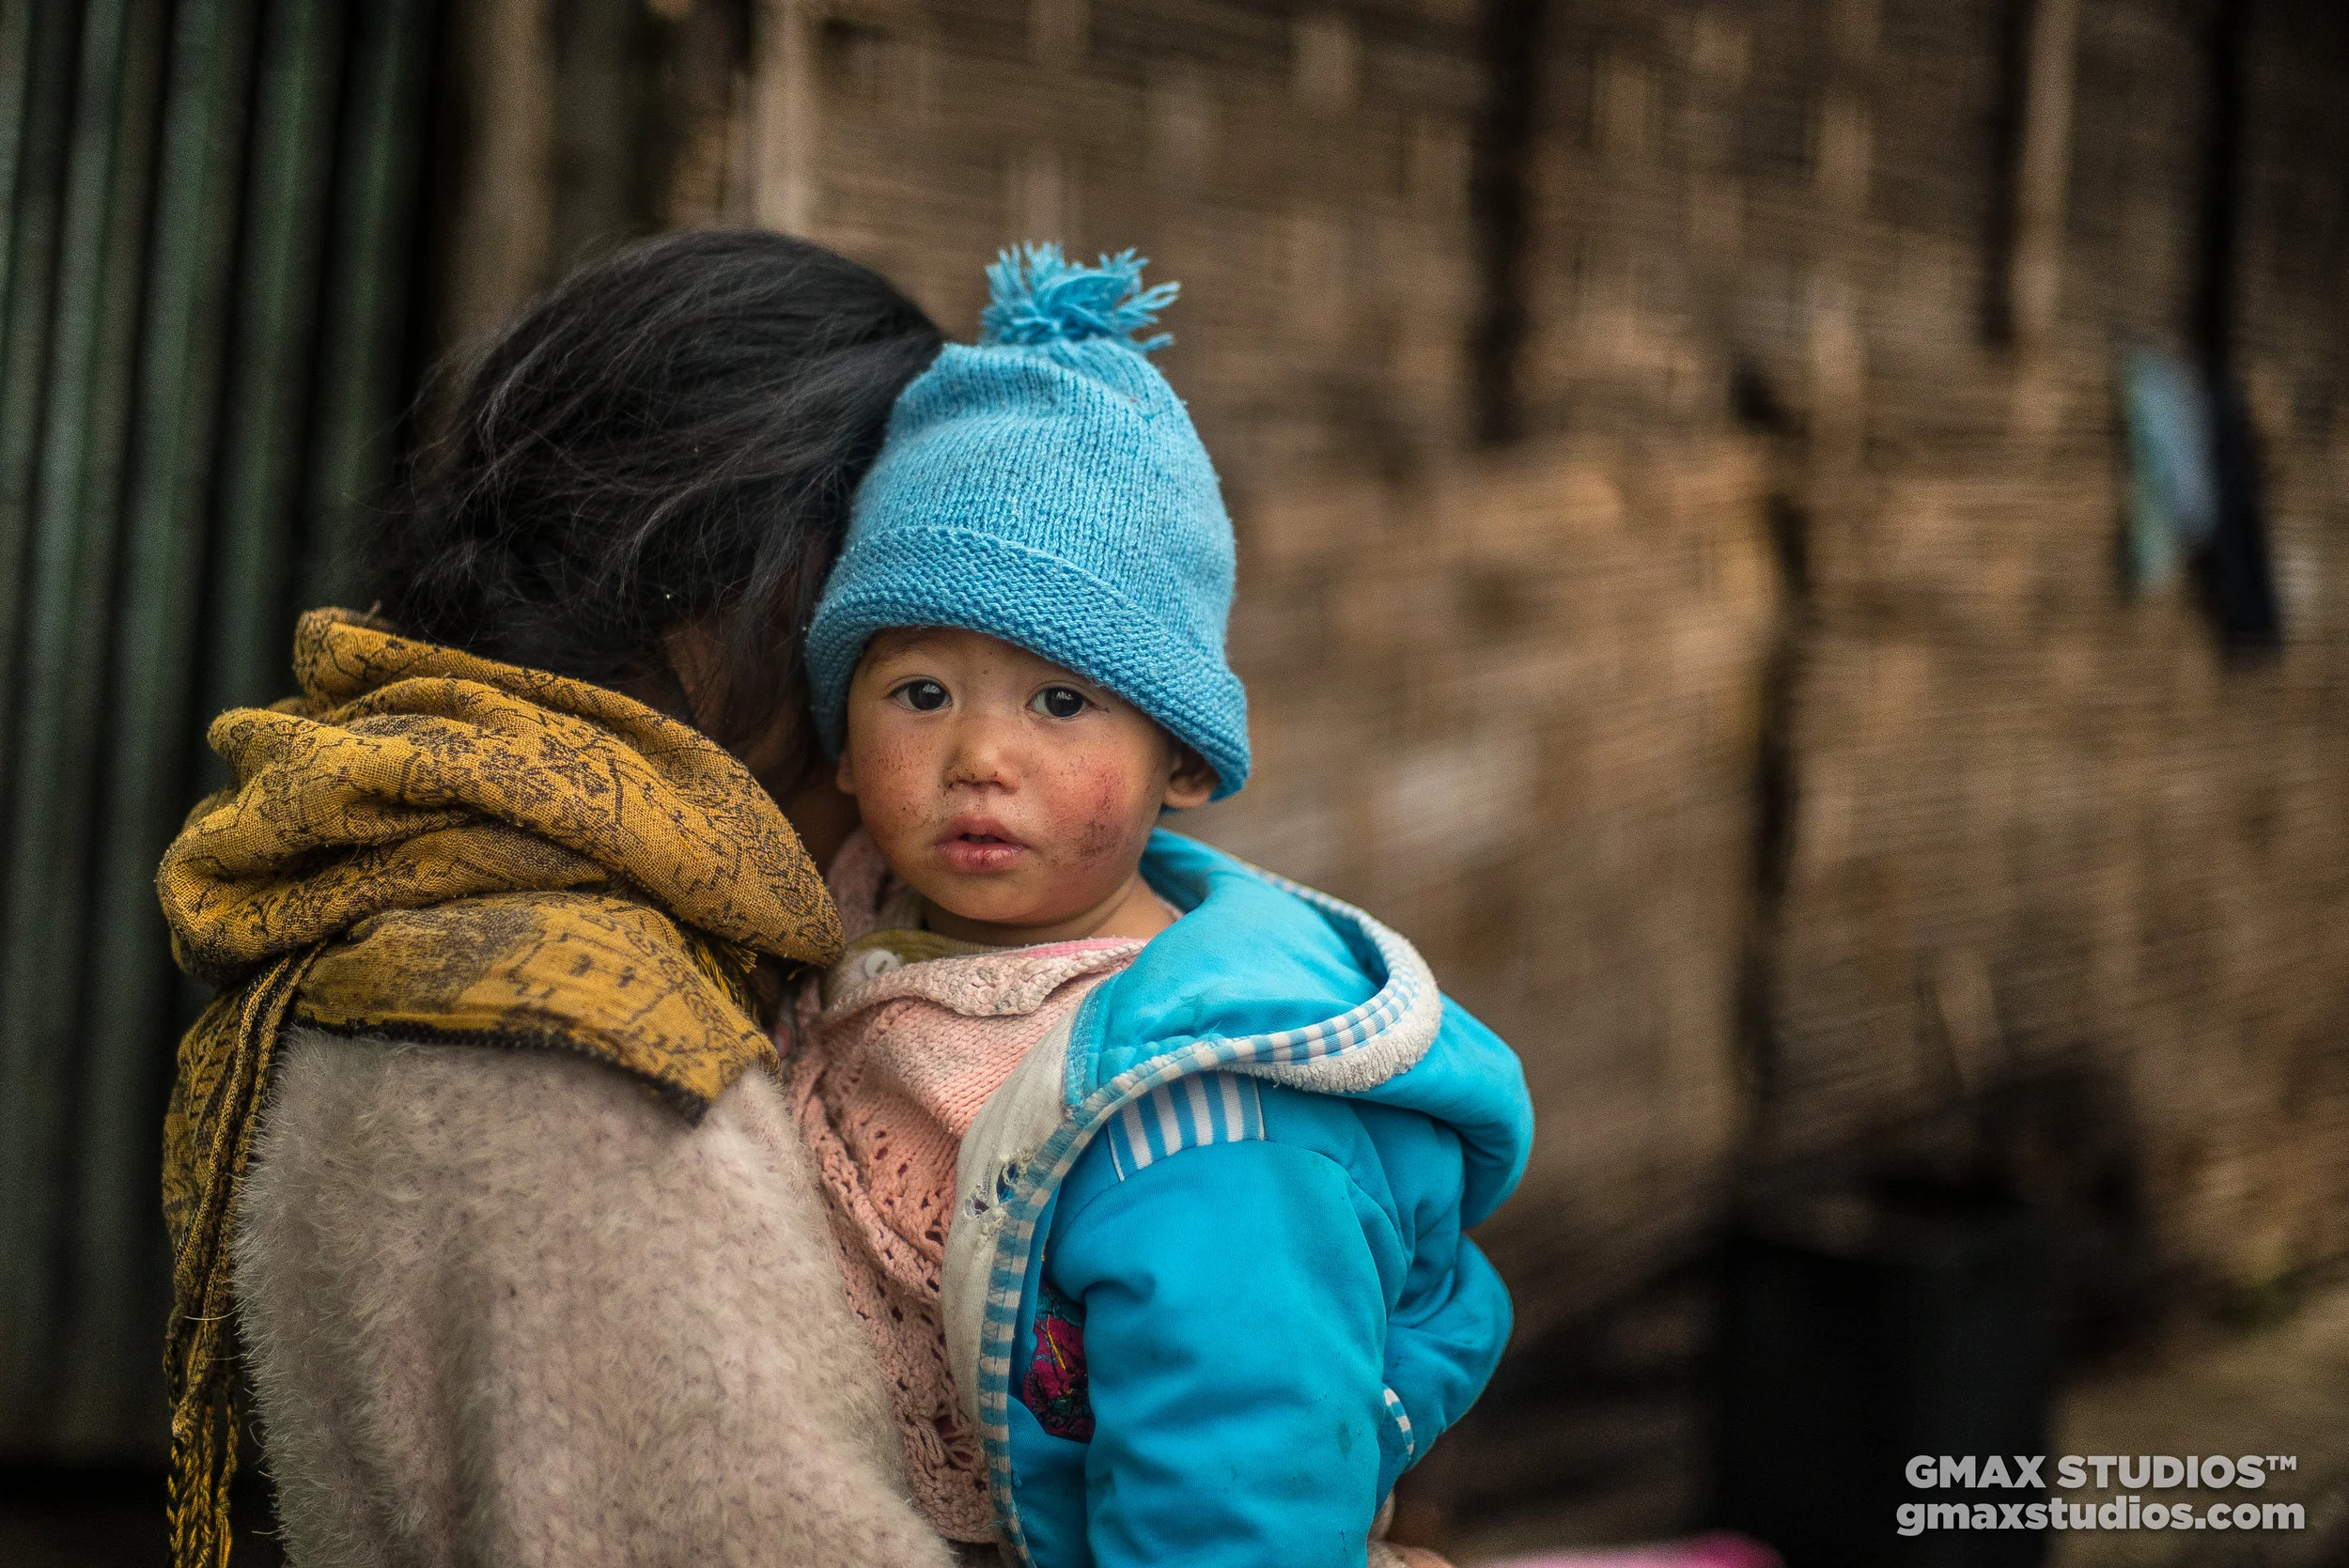
Like we mentioned earlier, fast lenses allow you to shoot using high shutter speeds - which means less camera shake resulting in sharper photographs. You can shoot in low light conditions easily. So feel free to step-out past 6 pm and photograph as much as you want, and the next time your friends come over for a party and whip out their samsung, tell them to put it aside because you have them covered.
It’ll Give You That D-SLR Look.
Chin up. You’ll finally get that D-SLR look you’re after. By that we mean pictures that have a shallower depth of field, where the subject is separated from its background to a greater degree. We all love those blurred backgrounds, don’t we? Well, the depth of field depends on your aperture and it isn’t a trick some photographer came up with.
Increased Sharpness
The 50mm lens is incredibly sharp. If you’ve been shooting with zoom lenses, the sharpness you’ll get from a prime lens will surprise you.
You'll have no trouble taking fashion or commercial shots with the 50mm 1.8 lens.
It’ll Make You a Better Photographer
Yes that's correct. If you’re used to taking photographs with a zoom lens, it’s quite possible that the constant zooming in and out might have pampered you a little bit. Because you can zoom in or out whenever you want you don’t work as hard, like you would with a prime lens that has a fixed focal length.
A prime lens isn’t a wide lens and it isn’t a telephoto lens. It’s somewhere in between. Which means you’ll have to travel back and forth to frame your subject correctly. This will teach you how to compose, get creative and think out of the box.

Photograph by Himanshu Singh Gurjar
If you’re still not convinced - check out this video on the nifty 50. It’s quite likely that it’ll become your favorite lens in the world too. Leave us a comment if you have any questions.


Joseph Radhik | Photographing The Perfect Wedding | Why you need to attend PEPx Photocon Mumbai | What’s In My Camera Bag?
“At the end of the day, it’s about telling a story through the medium you have.”
At GMax Studios, we remain busy putting together photography and film-making tutorials for our loyal YouTube subscribers during the week. Our schedules allow us a little more than lunch now and then. But when a guy like Joseph Radhik stops by for a chat, we put stuff on hold indefinitely. Not because we’re suckers for star power, but because we never miss an opportunity to learn from the best.
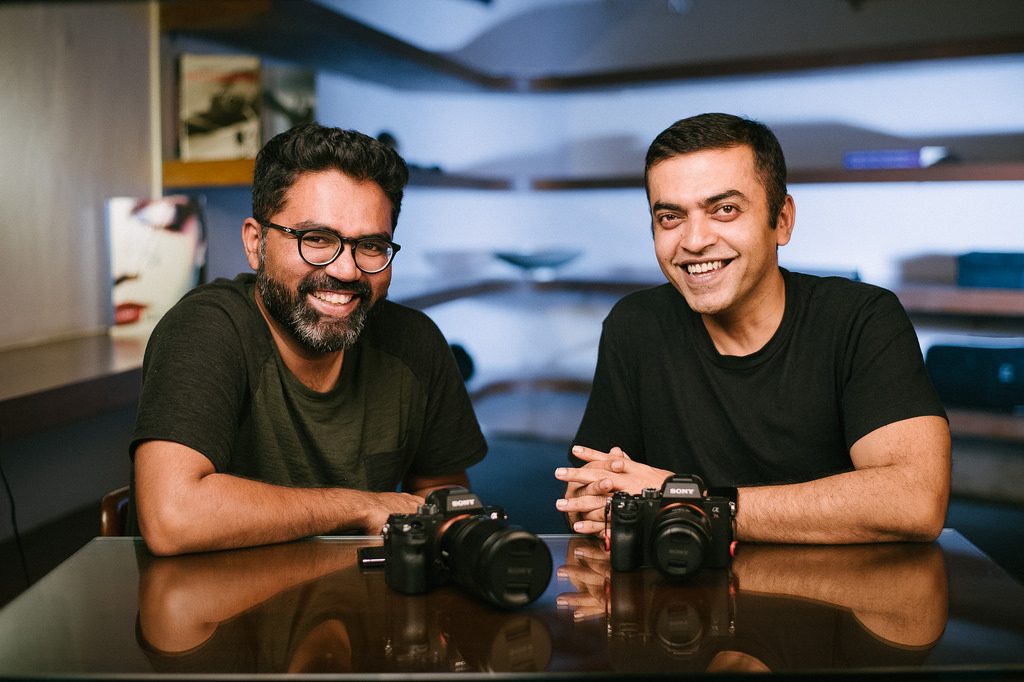
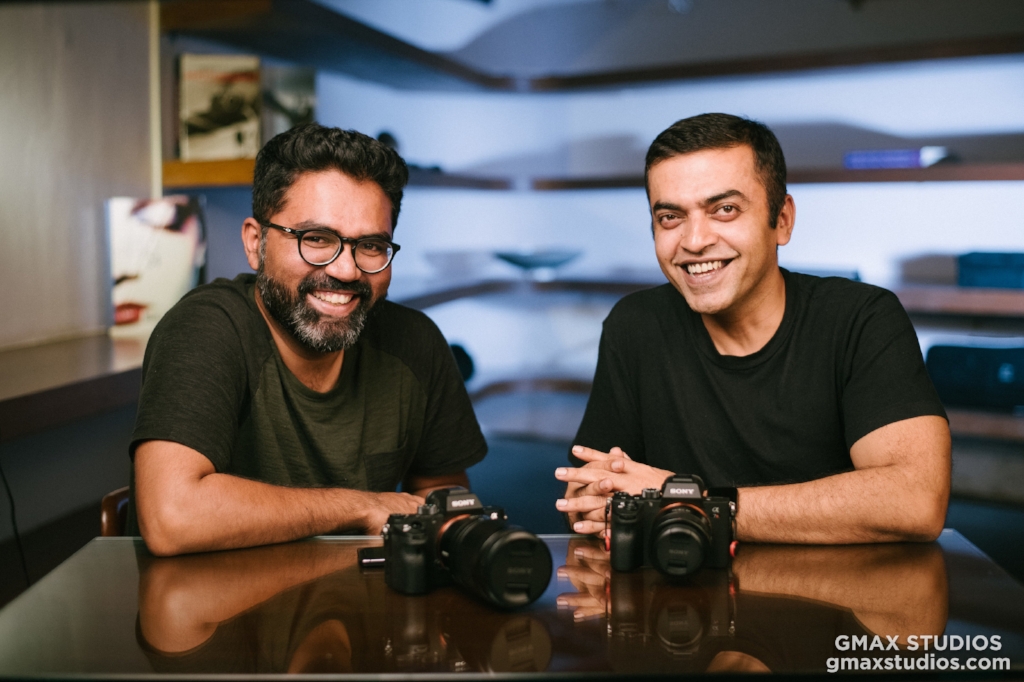
The boys and their toys: Joseph Radhik and Gorky M.
For those who don’t know Joseph Radhik: he owns and runs Stories By Joseph Radhik - an award winning team of photographers that create stories of love, laughter and happily ever after. In short, they’re super-cool wedding photographers who’ve been featured in celebrated magazines like Vogue, Grazia, Harper's, People Magazine and many more. That’s not exactly short; but in our defense, it’s not easy putting down his resume in a paragraph.
Oh, and did you know that he photographed, quite possibly, the wedding of the decade? That’s right. He photographed Virat Kohli and Anushka Sharma’s wedding.
That statement alone is enough to end any other workplace chit-chats you got going on. We met Joseph at a photography event last year, and a get-together at the studios was on the cards since then. When it finally happened, he spent an entire day talking to us about PEPx Photocon, what gets him going and what gear he uses when he’s out photographing.
Joseph’s mantra is simple. “Keep it simple, stupid.” While he certainly knows what he’s talking about, he doesn’t like getting too technical about camera settings and gear. “At the end of the day, it’s about telling a story through the medium you have.” We couldn’t agree more.
Joseph is also one of the most humble guys out there. “I’m never too busy to shoot group photographs at a wedding” he says. For a guy who is booked all year around, what Joseph carries in his camera bag will surprise you. Check out what's in Joseph Radhik's camera bag, in this video, where he talks to Gorky M.
Joseph also spoke in detail about a massive photography event he’s put together. It’s called PEPx Photocon(think TEDx for Photographers), a three day expo and photo fair that brings together great talent and brands together. PEPx is the first of its kind in India. It’s designed for the beginner, the enthusiast, the hobbyist, the not-professional, the student, and the lover of photography. The line-up itself will make you ditch whatever you’ve got going on and rush to Nehru Center, Mumbai.
You’ve got cultural documentary photographer Ira Block who’s produced over 30 stories for the National Geographic Magazine and led National Geographic Photo Workshops, Expeditions and private workshops across the world, Russian Portrait and Conceptual photographer, Natalia Arantseva, Dutch portrait/fashion photographer Brendan De Clercq to name a few.
There are also plenty of award-winning and deeply admired Indian photographers speaking at the event. You have the likes of Rafique Sayed, Dheeraj Paul, Diinesh Kumble, Umesh Gogna, Harsheen Jammu, Shiresh Karrale, Yuwraj Gurjar, Shiresh Karrale, Photriya Venky, Anup J Kat, Ankita Asthana, Sid Sharma and Auditya Venkatesh.
Sapan Verma is taking over mic duties with his stand-up act, and you have the man himself - Joseph Radhik.
It’s 1499 rupees for 3 days of some the most immersive and inspirational experiences you can have as a photographer. You can book tickets for it here.
Editor: Rishabh Udgata

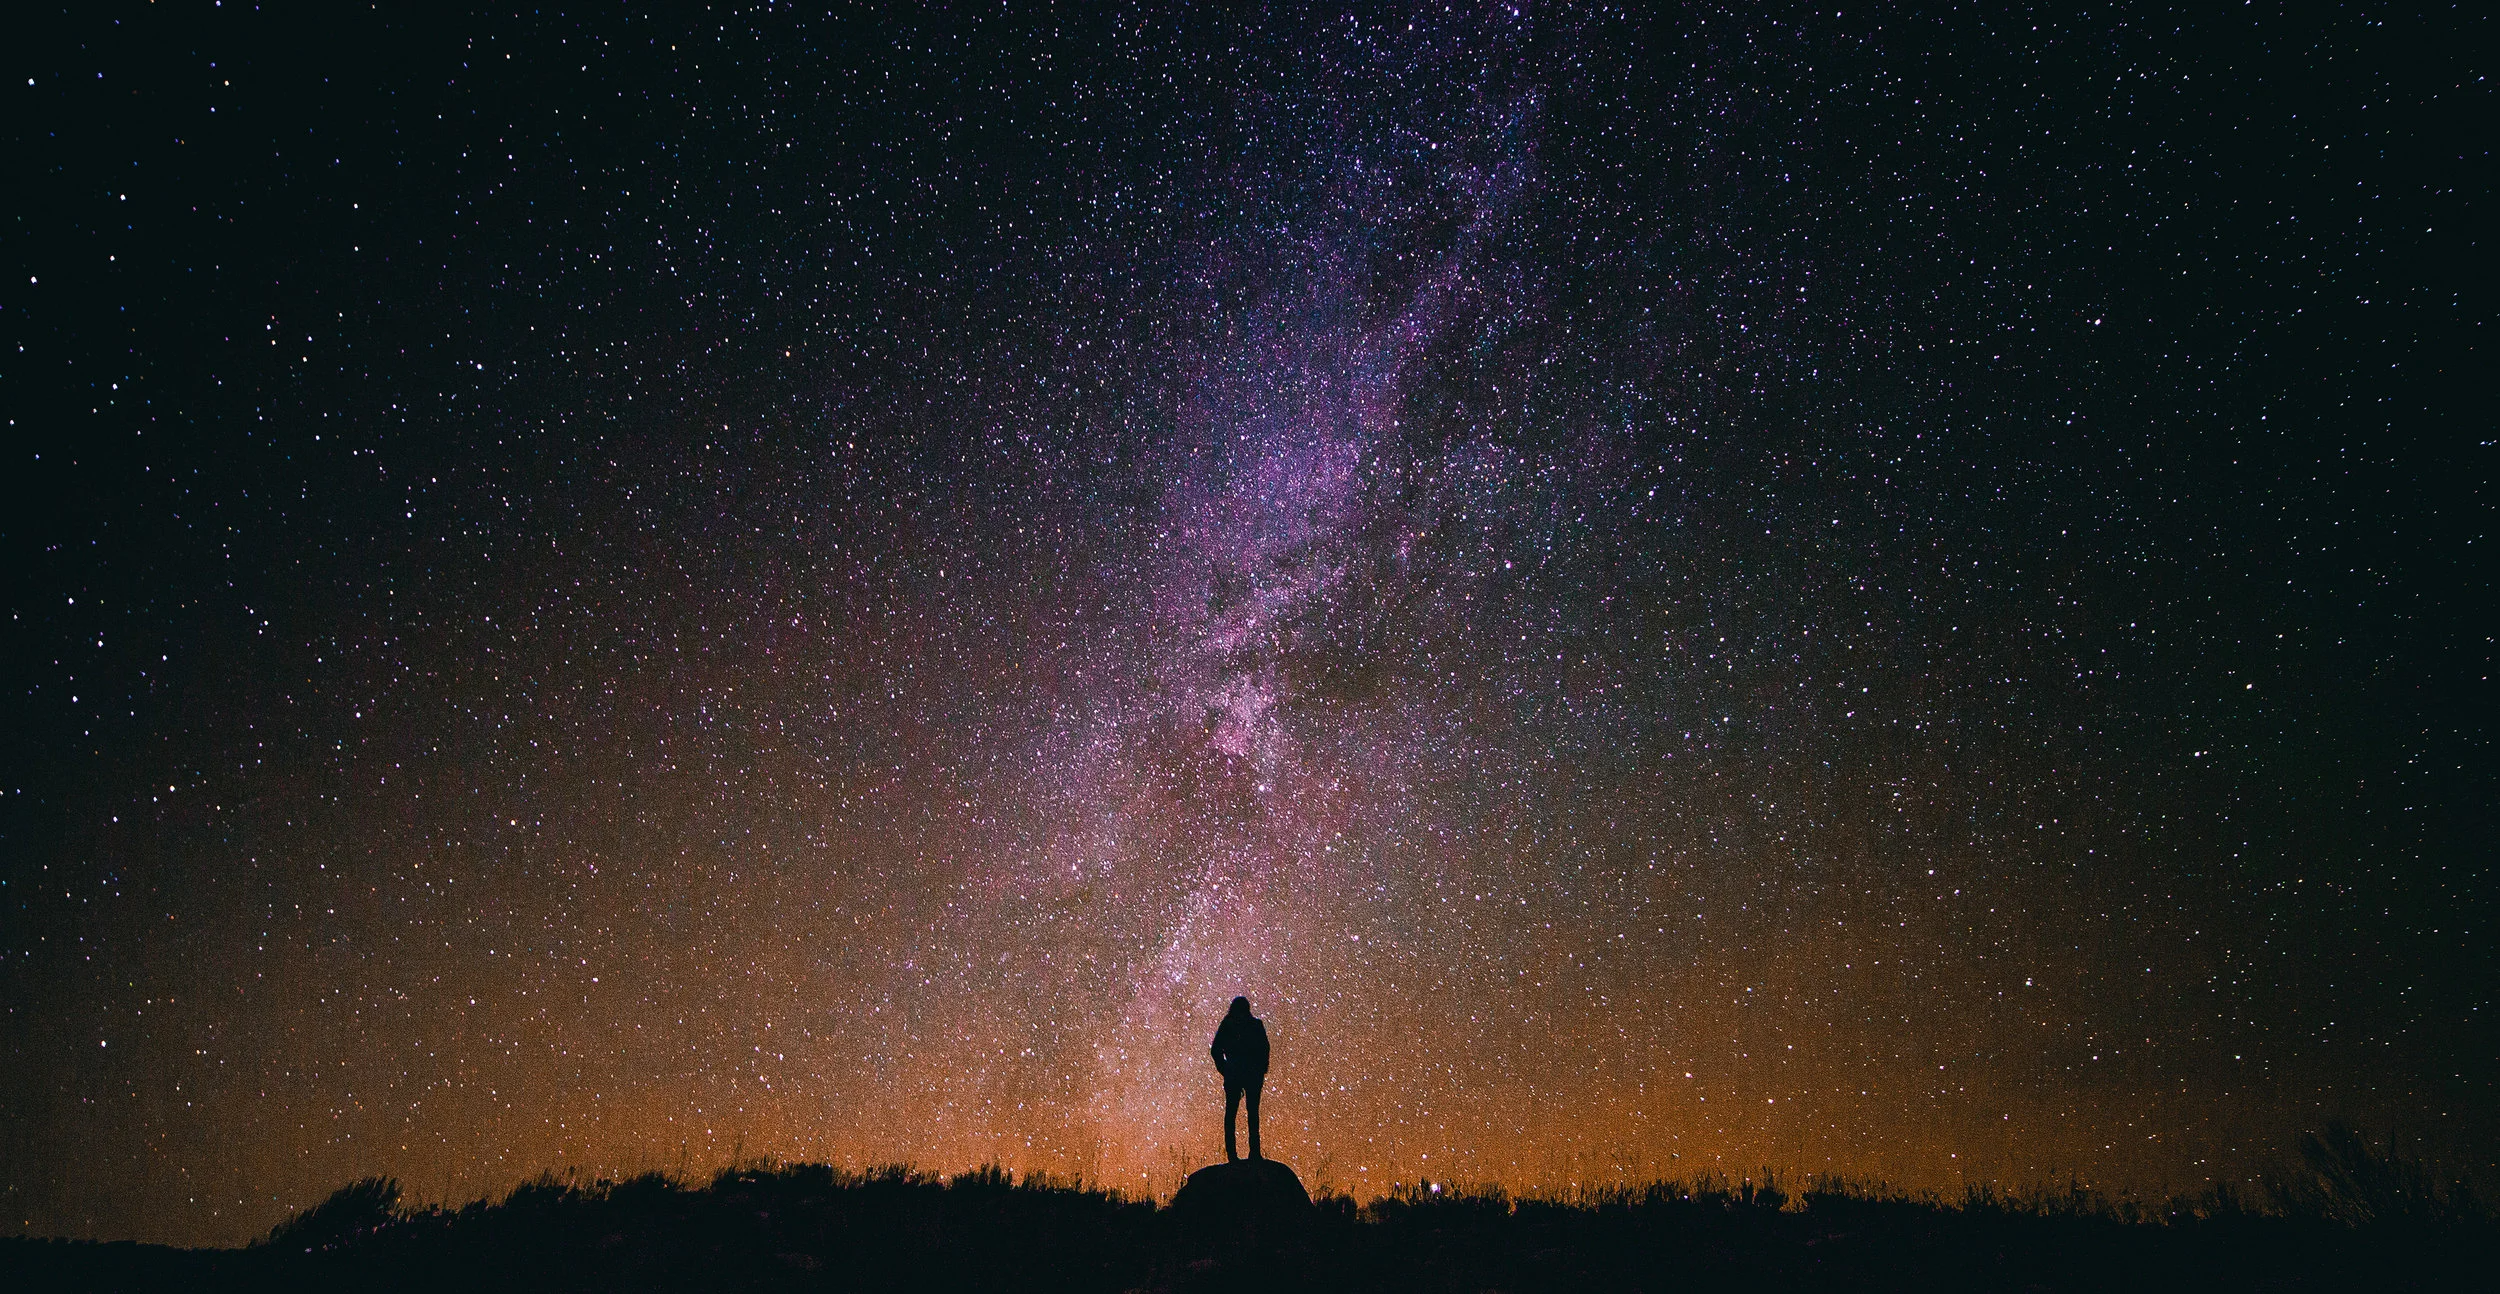
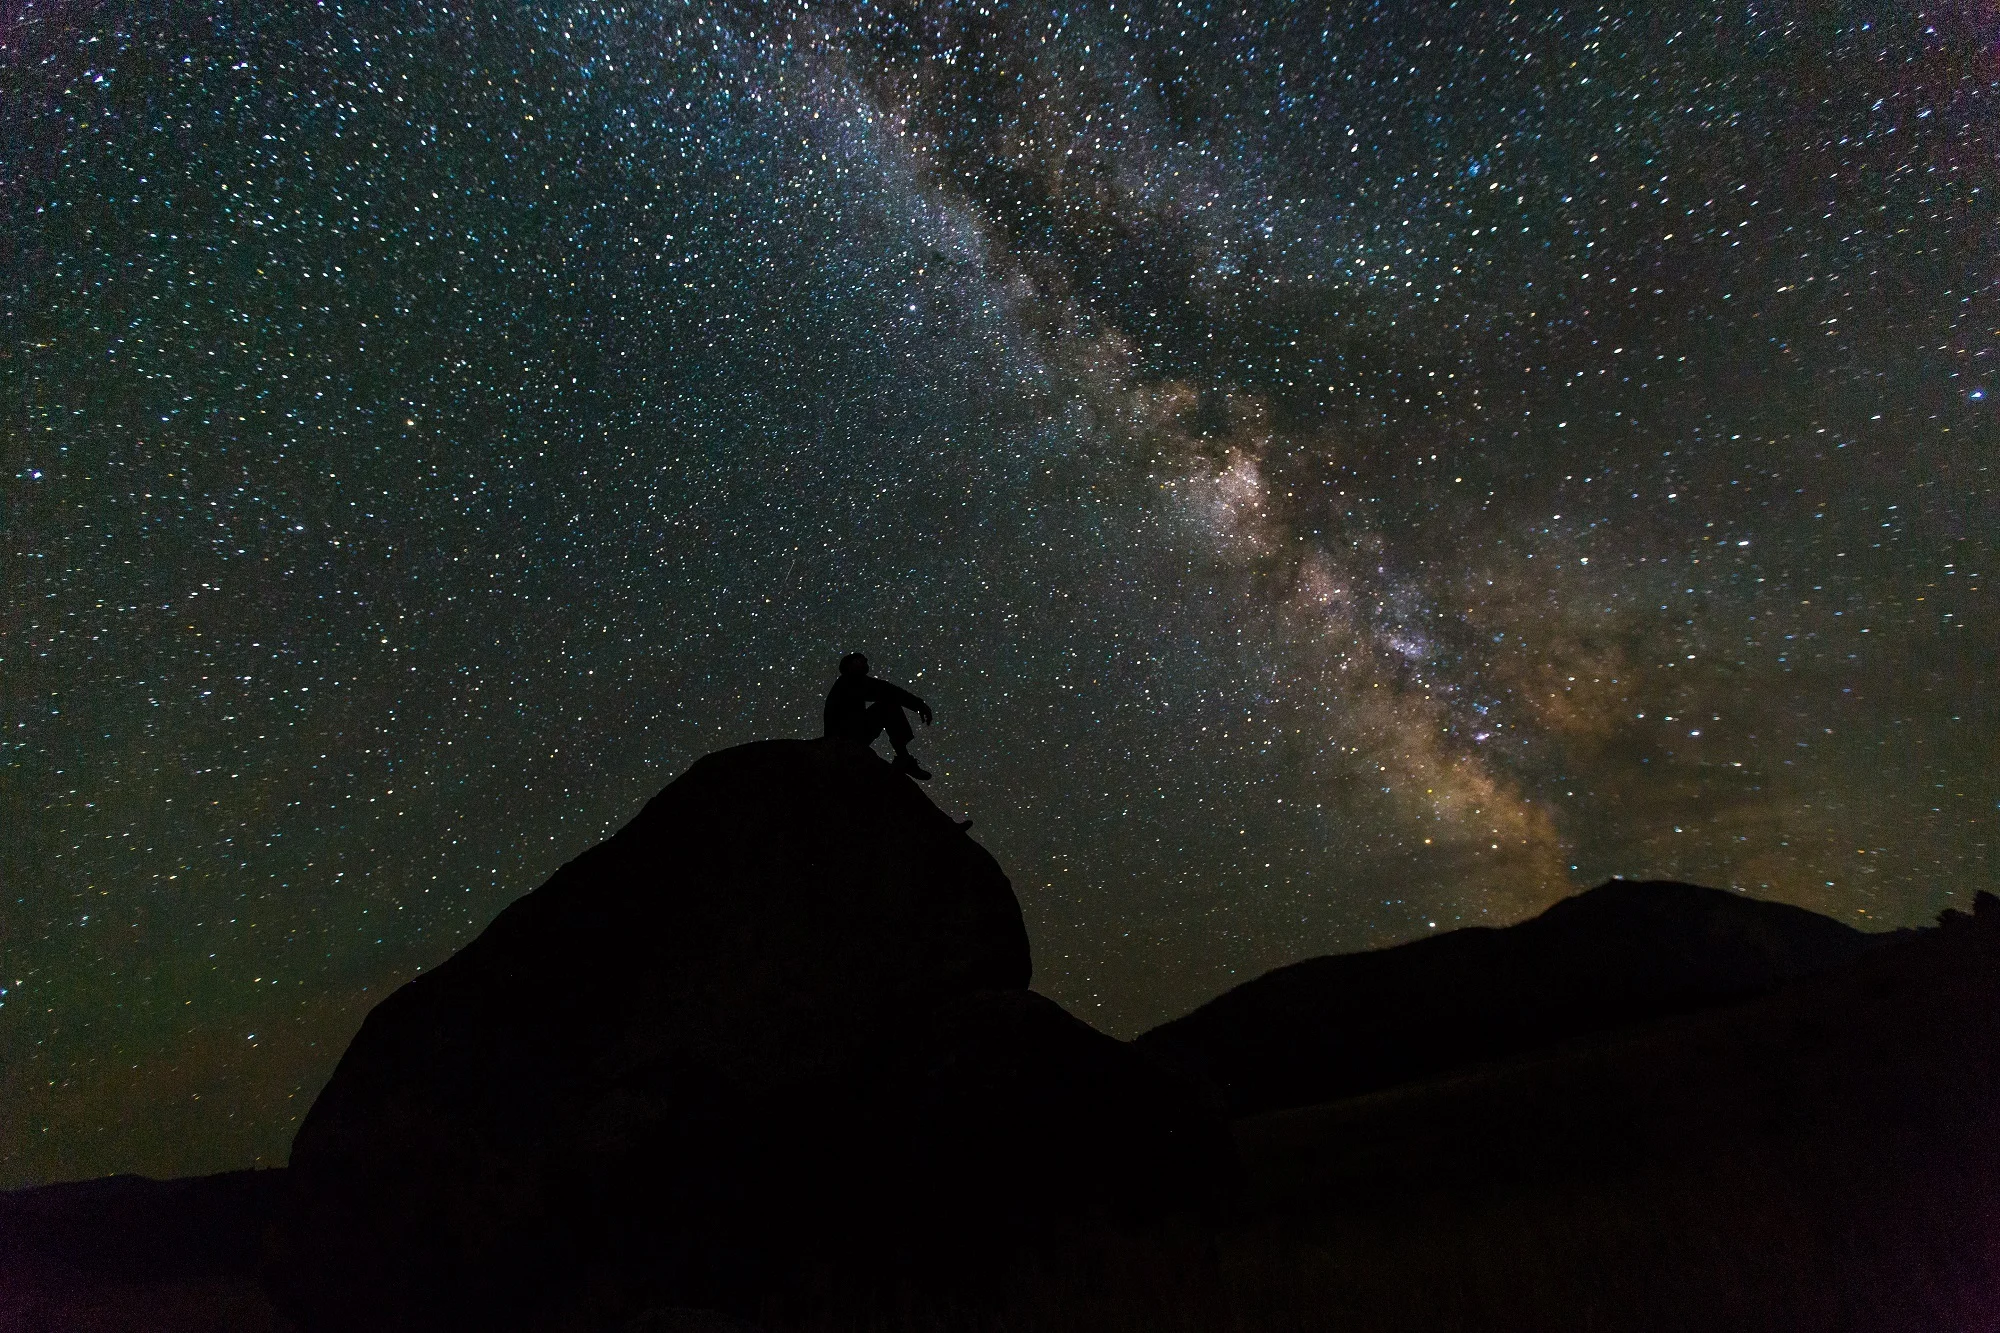
How To Capture Milky Way In India | Astrophotography Basics For Beginners
9 years back when I started with photography, photos of Milky way always fascinated me. A device (D-SLR) invented by humans which has the power to capture the great Milky way excited me even more. It always made me think that Milky way was not visible in India, but when I started studying about Milky way photography I got to know that our Earth is a part of Milky way Galaxy and it is visible from everywhere. It is true you cannot shoot milky way all year around, there are certain time slots when the “Core” of Milky-way is visible in certain parts of Earth. In Maharashtra, the best time to Shoot Milky way starts from March and ends after May as it get cloudy.
As I started to explore Milky way Photography I realized that shooting Milky way was not as easy as I thought. There is a strict workflow you need to follow if you want to capture Milky way. At start it was all Rocket science for me but as I started to explore I realized any one can capture Milky way if you follow the workflow. So I have tried my best to list down the workflow and techniques to capture Milky way in India.

Equipment
Camera
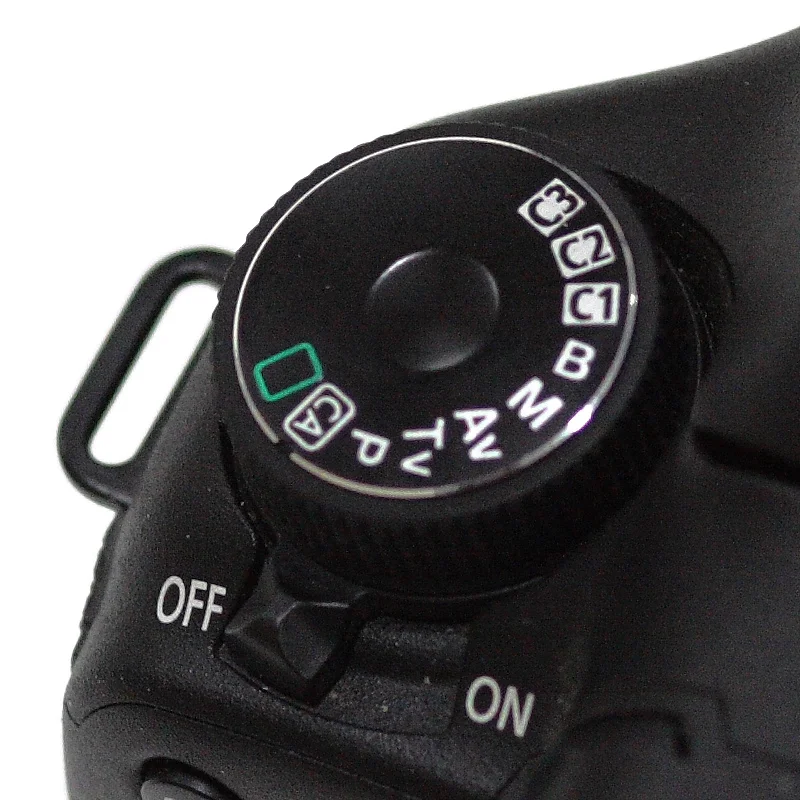
Milky way Photography is categorized under long exposure photography, which simply means, you need a camera which allows you to open the shutter for longer duration. Thus you need a camera which allows you to shoot in Manual Mode, giving you 100% control on your camera settings. We personally prefer using 25 to 30 seconds shutter speed to get good details of Milky way.
Lens
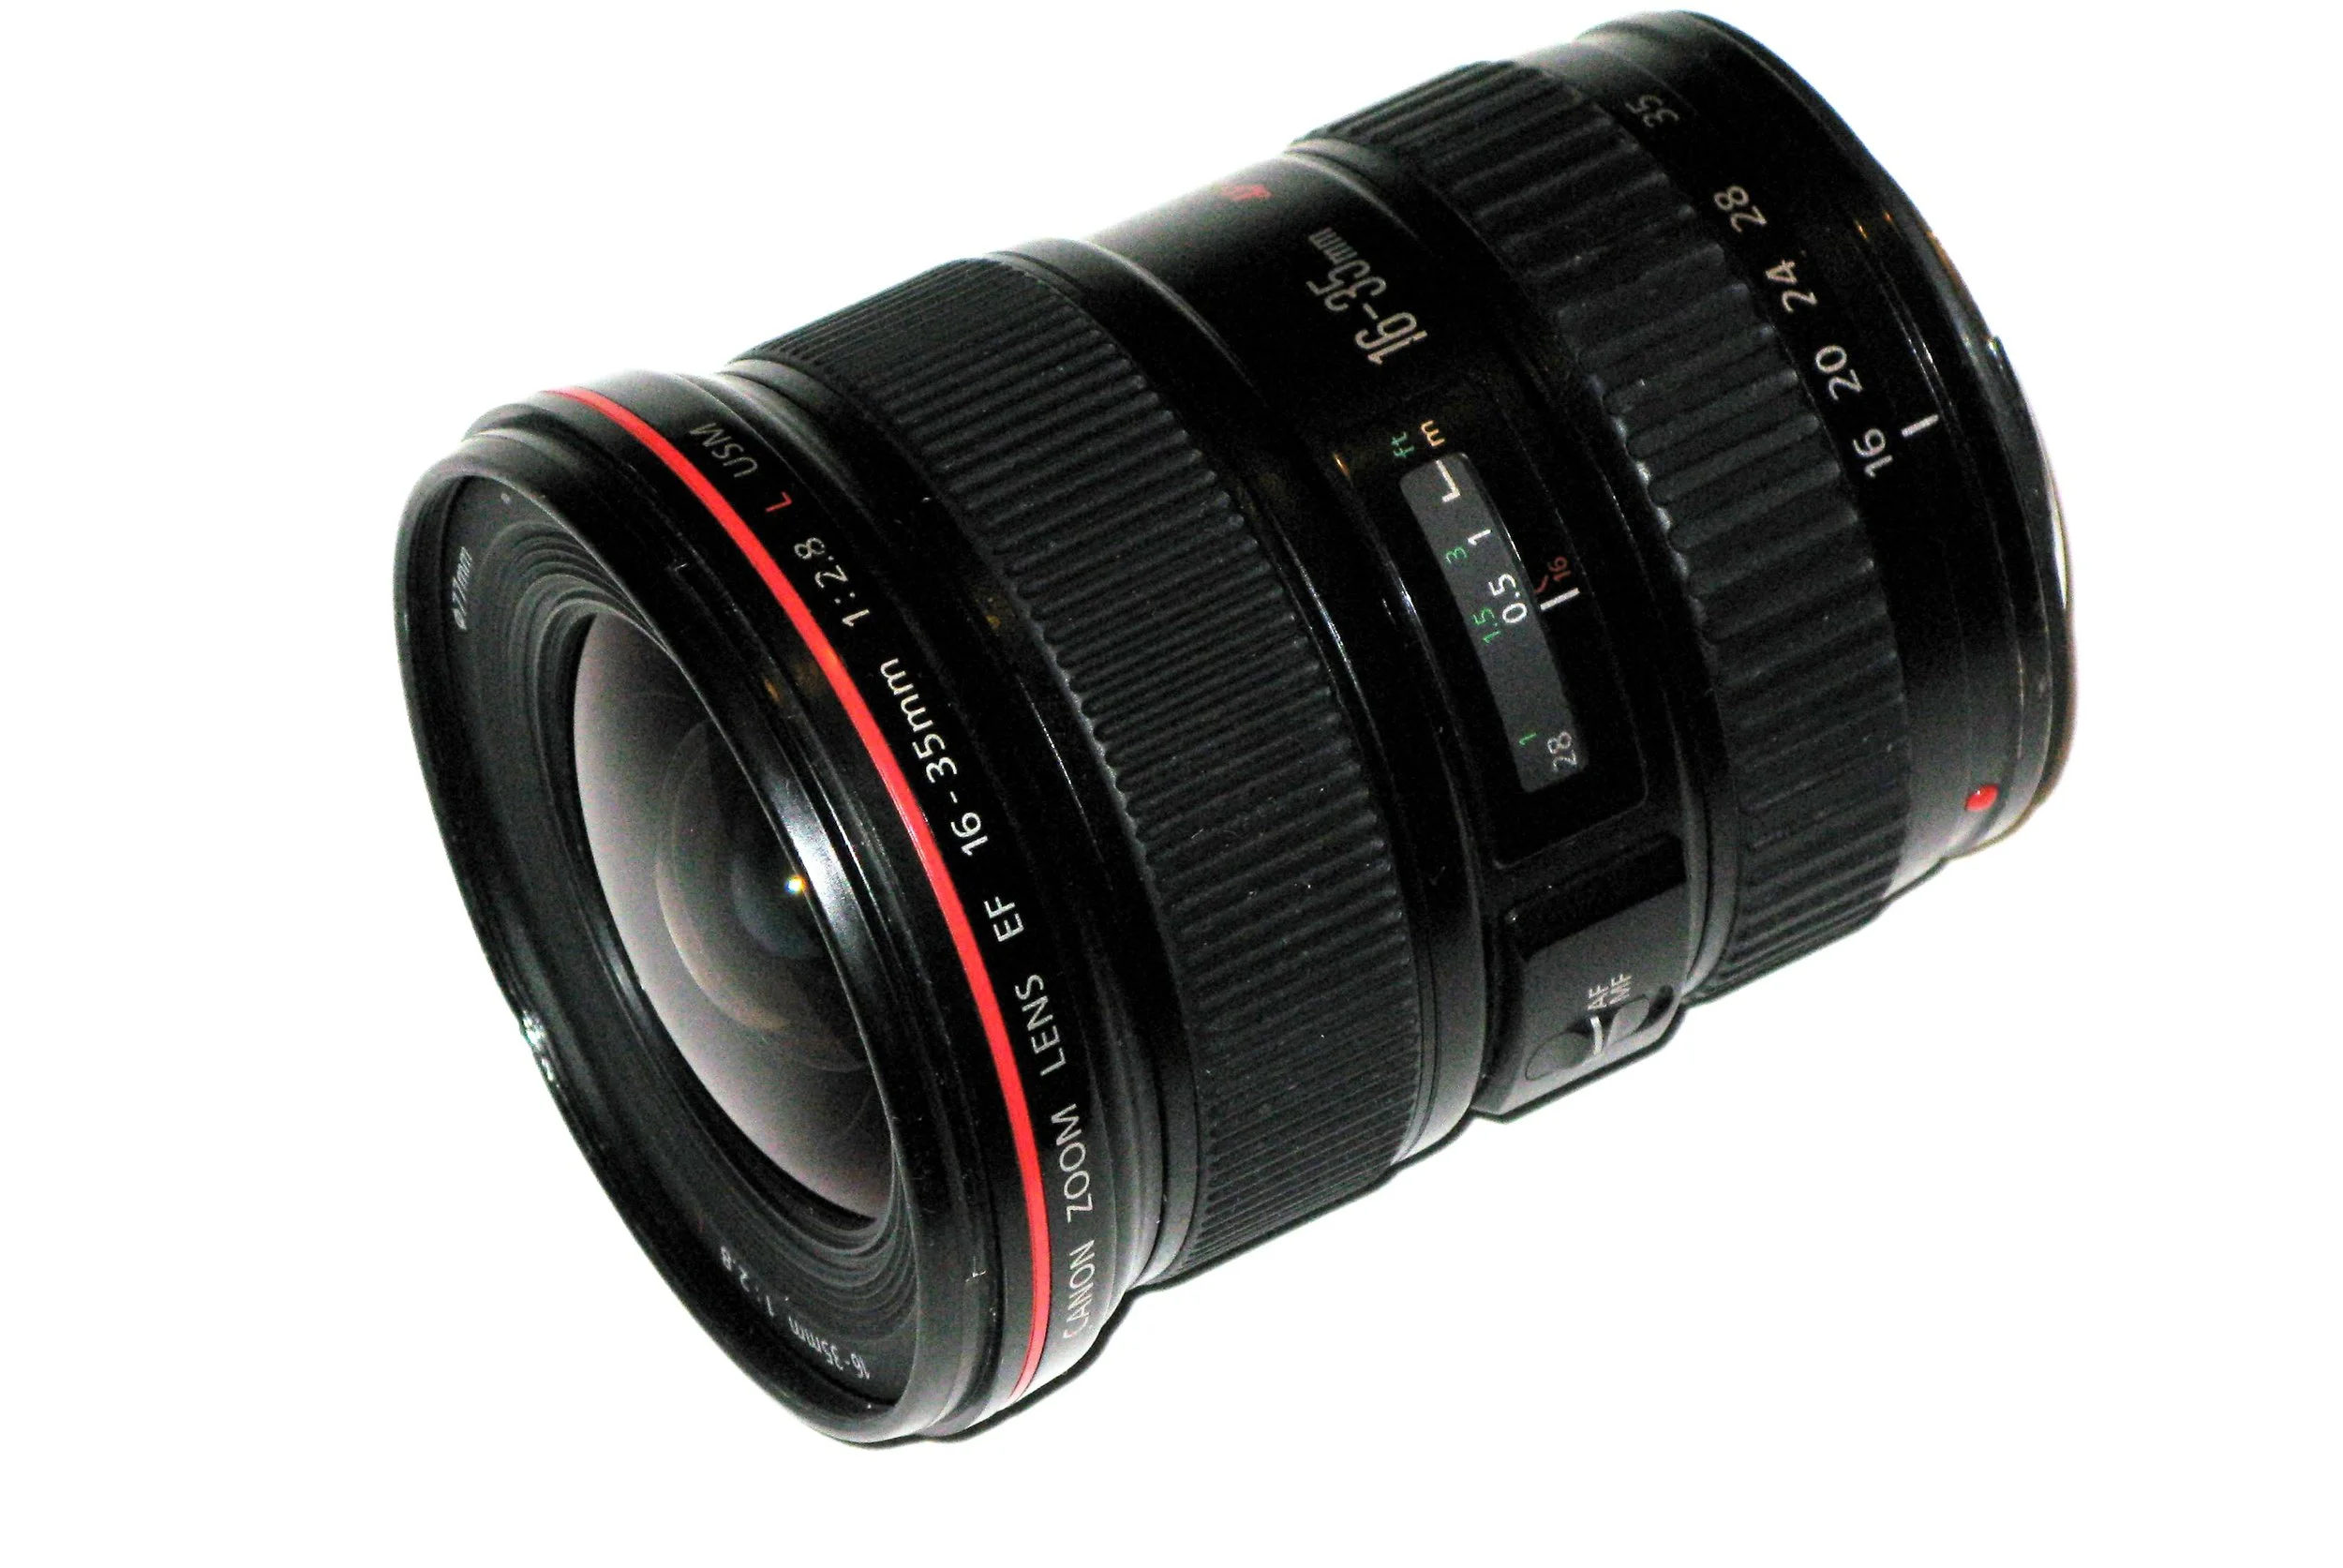
A fast super wide angle lens (f/2.8 or lesser) with infinity focus is a great equipment to capture the fine details of Milky way. If you are not able to find a fast lens with infinity focus you can always shoot with your kit lens at f/3.5. You simply have to auto focus on a far distance light source and then convert it into Manual Focus. If you keep your lens on Auto Focus mode it won’t be able to focus, thus always keep it on Manual mode. Always zoom in the photos and check whether the stars are in sharp focus or not.
Tripod
Any good sturdy tripod is suitable for Milk way Photography. As the shutter is going to be open for more than 20 seconds we have to make sure there is no camera shake.
Shutter Release Remote/Cable
Wired or wireless shutter release cable is used by many Night Sky photographers as it helps to reduce the camera shake when you press the shutter button.

If you don’t have shutter release cable you can switch your camera to self timer mode and press the button which will help to avoid the unwanted shake. There are two types of gear available in market one is called Intervalometer and another is shutter release cable which is cheaper compared to intervalometer.
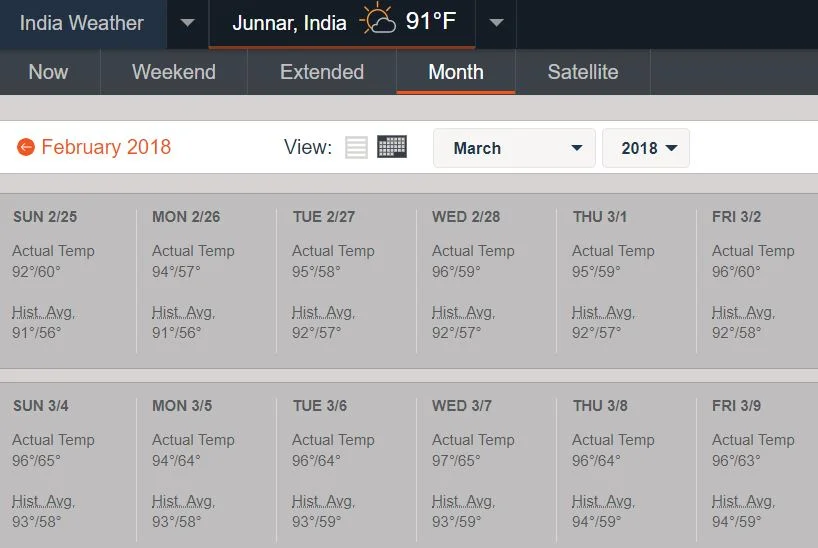
Weather
Always look for clear sky. In cloudy conditions, the Milkyway will get covered by the clouds. We use http://www.accuweather.com/en/in/india-weather to check the weather conditions and confirm the date accordingly.
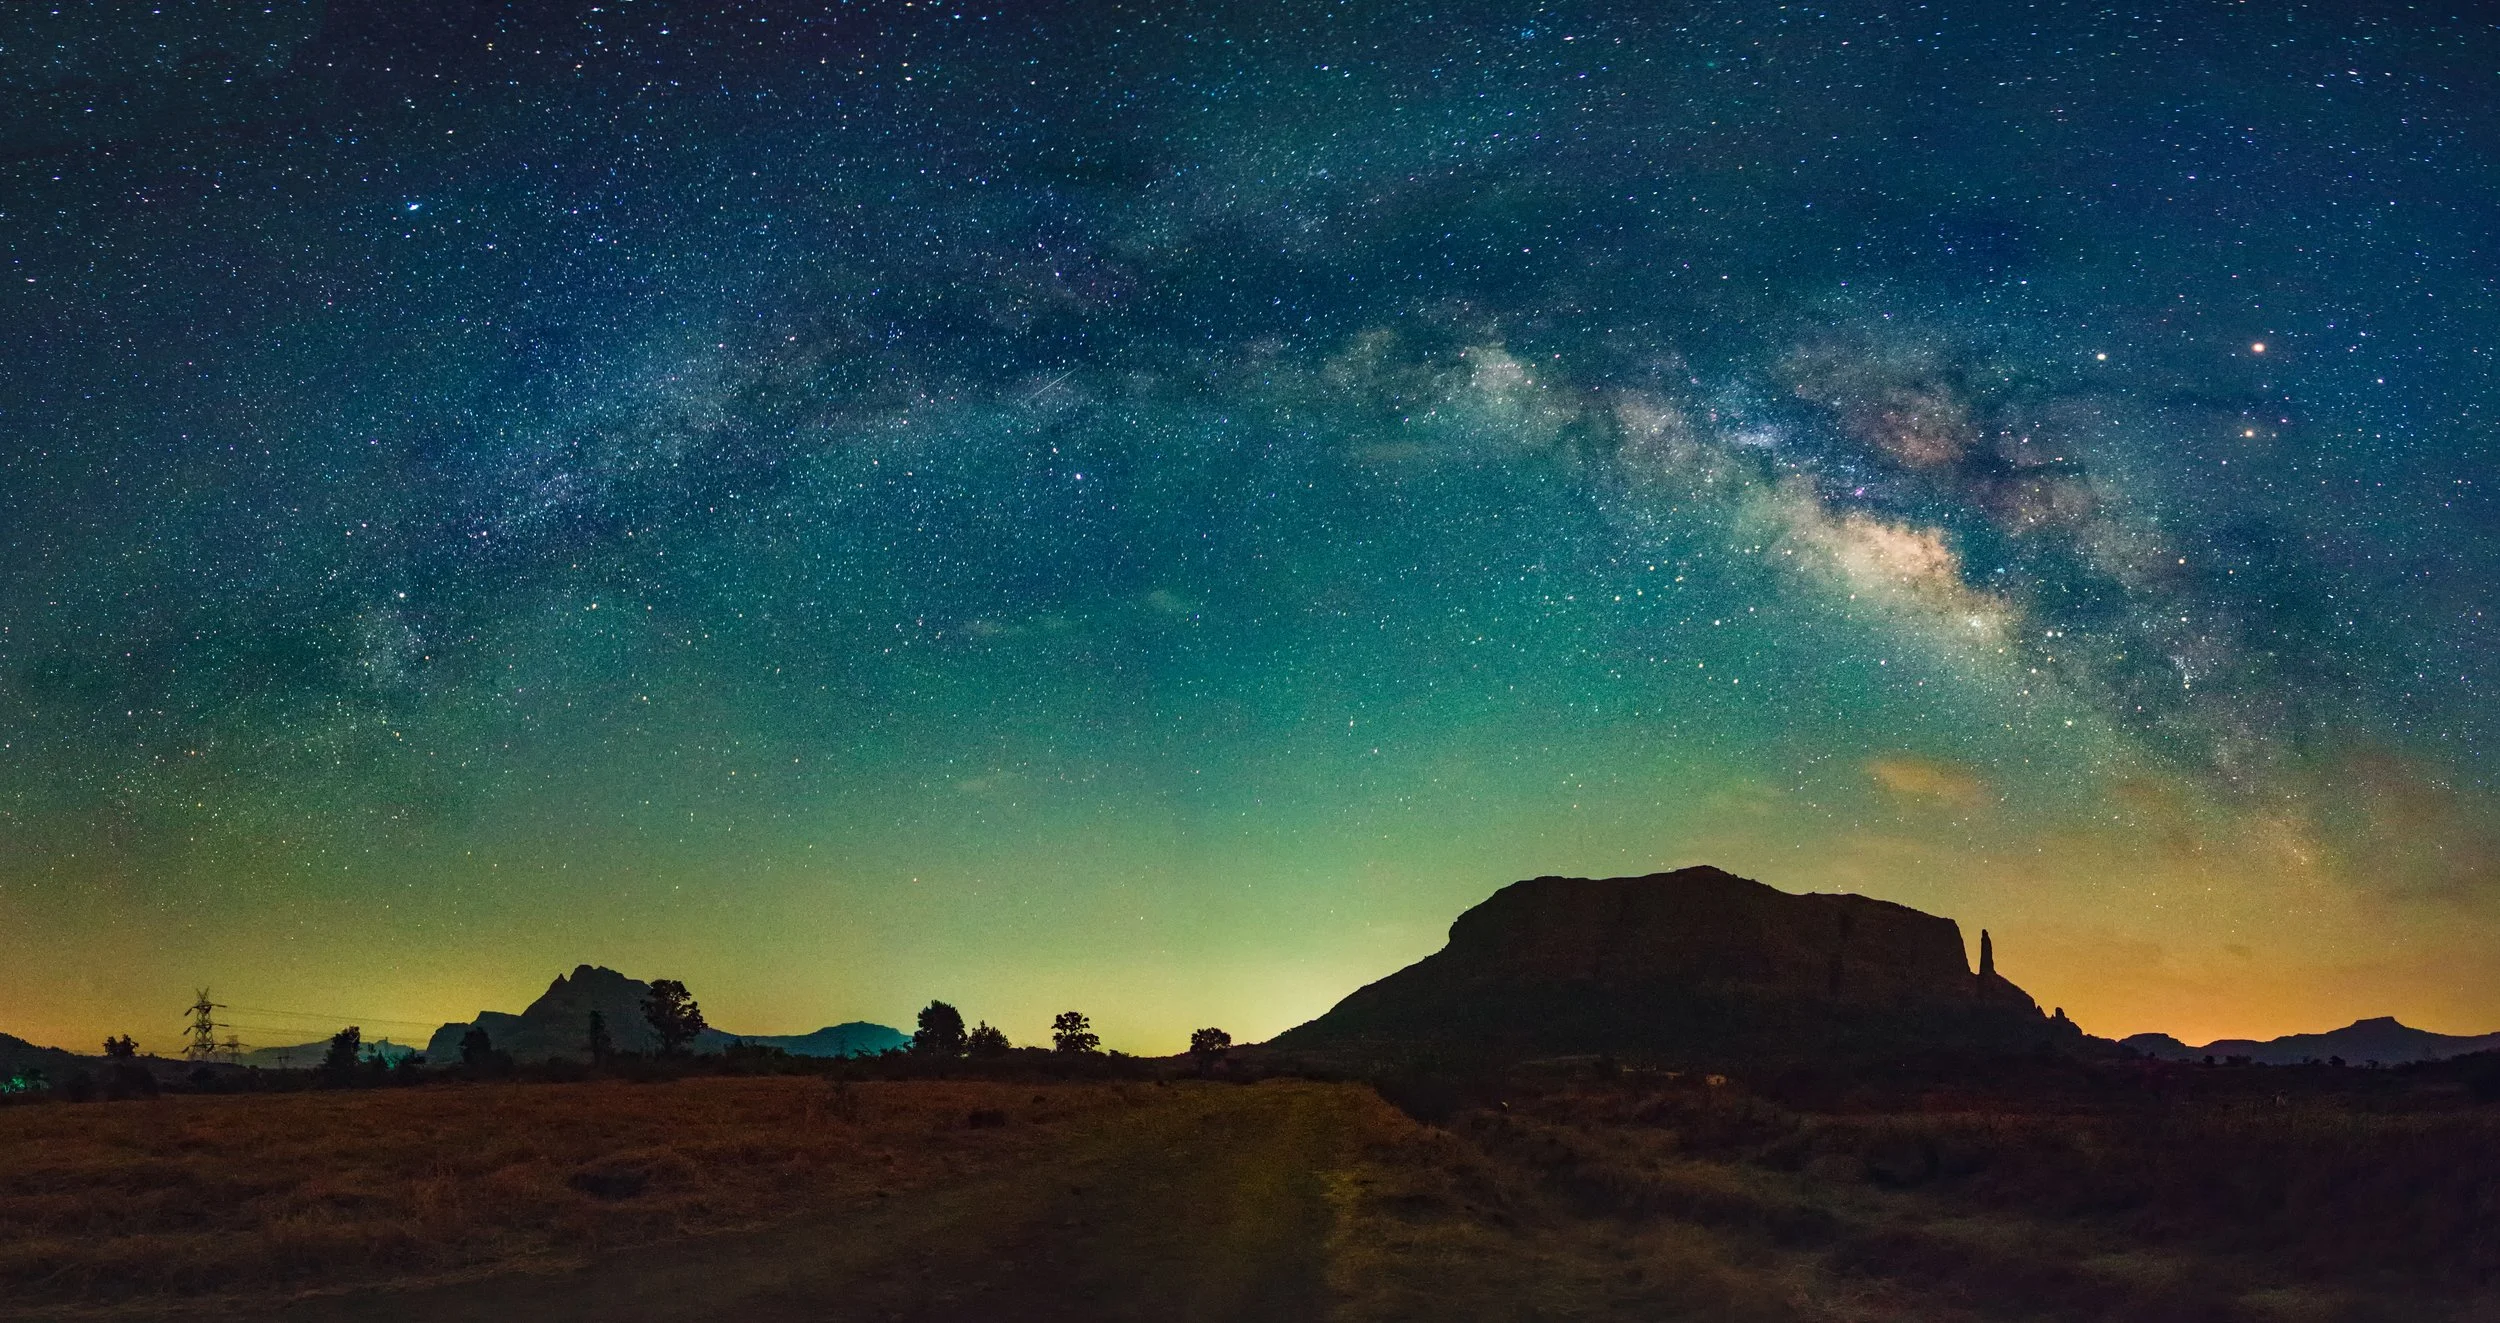
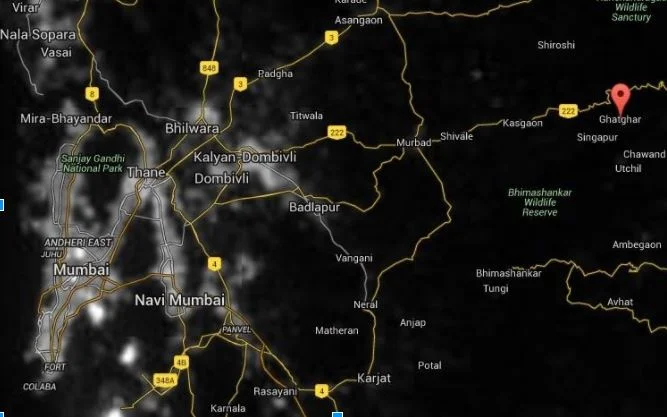
Location
When it comes to Milkyway Photography a Dark Sky is the most suitable place. Dark sky is a place which is away from Light Pollution. Lesser the light pollution clearer the sky looks. We shoot a lot in Naneghat which is close to Ghatgar. You can go on this website http://www.blue-marble.de/ and type your location, if your location is not on the website type the closest known location and you will be able to see the dark sky in the map. The Map is divided into two different color patches, i.e. grey and black patch. The grey patches represent the light polluted areas which you have to avoid and dark patches represent the Dark Sky. With the help of this map you can find your own Dark Sky.
Software
With the advancement in technology you have many different apps and software to locate the position of Milky way. We personally use ‘Stellarium’ as it is very precise and free. You can download this software for free from http://www.stellarium.org/. The moment you type your location the software will align according to your location. You can change the Date and Time and see the position of Milky way on that given Date and Time. It usually rises between South and East from Naneghat.

Camera Exposure
Aperture
f/2.8 with infinity focus gives best result. Bigger the aperture opening more light will enter. Thus always keep the widest lens opening available on your lens. If you are using your kit lens use f/3.5.
VISIT THE GMAX STUDIOS STORE ON AMAZON
ISO
As we will be shooting under Dark Sky we have to boost our ISO to minimum 1250 or 1600 depending upon the sensitivity of your D-SLR sensor. The Maximum ISO we used till now is 6400 on Nikon D7000 with Tokina 11-16mm shot at f/2.8.
Shutter Speed
There is a calculation rule called ‘500 Rule’ which means you have to divide 500 by the focal length of your lens and you get the required shutter speed. This Rule is followed to avoid Startrails in your Milkyway Photos. We personally prefer the trial and error method to get the best result for our photos. We use a shutter speed of 25 or 30 seconds for our photos.
White Balance
We always shoot in Auto Mode and then finalize the colors in Post processing.
Depending upon the feedback we will be working on a video on How to capture Milky way in India. Please write us back if you guys want a video on how to capture Milkyway in India. If you have any doubts please feel free to mail or leave a message. Please register yourself on our website for updates on our Milky way Photography Workshop.
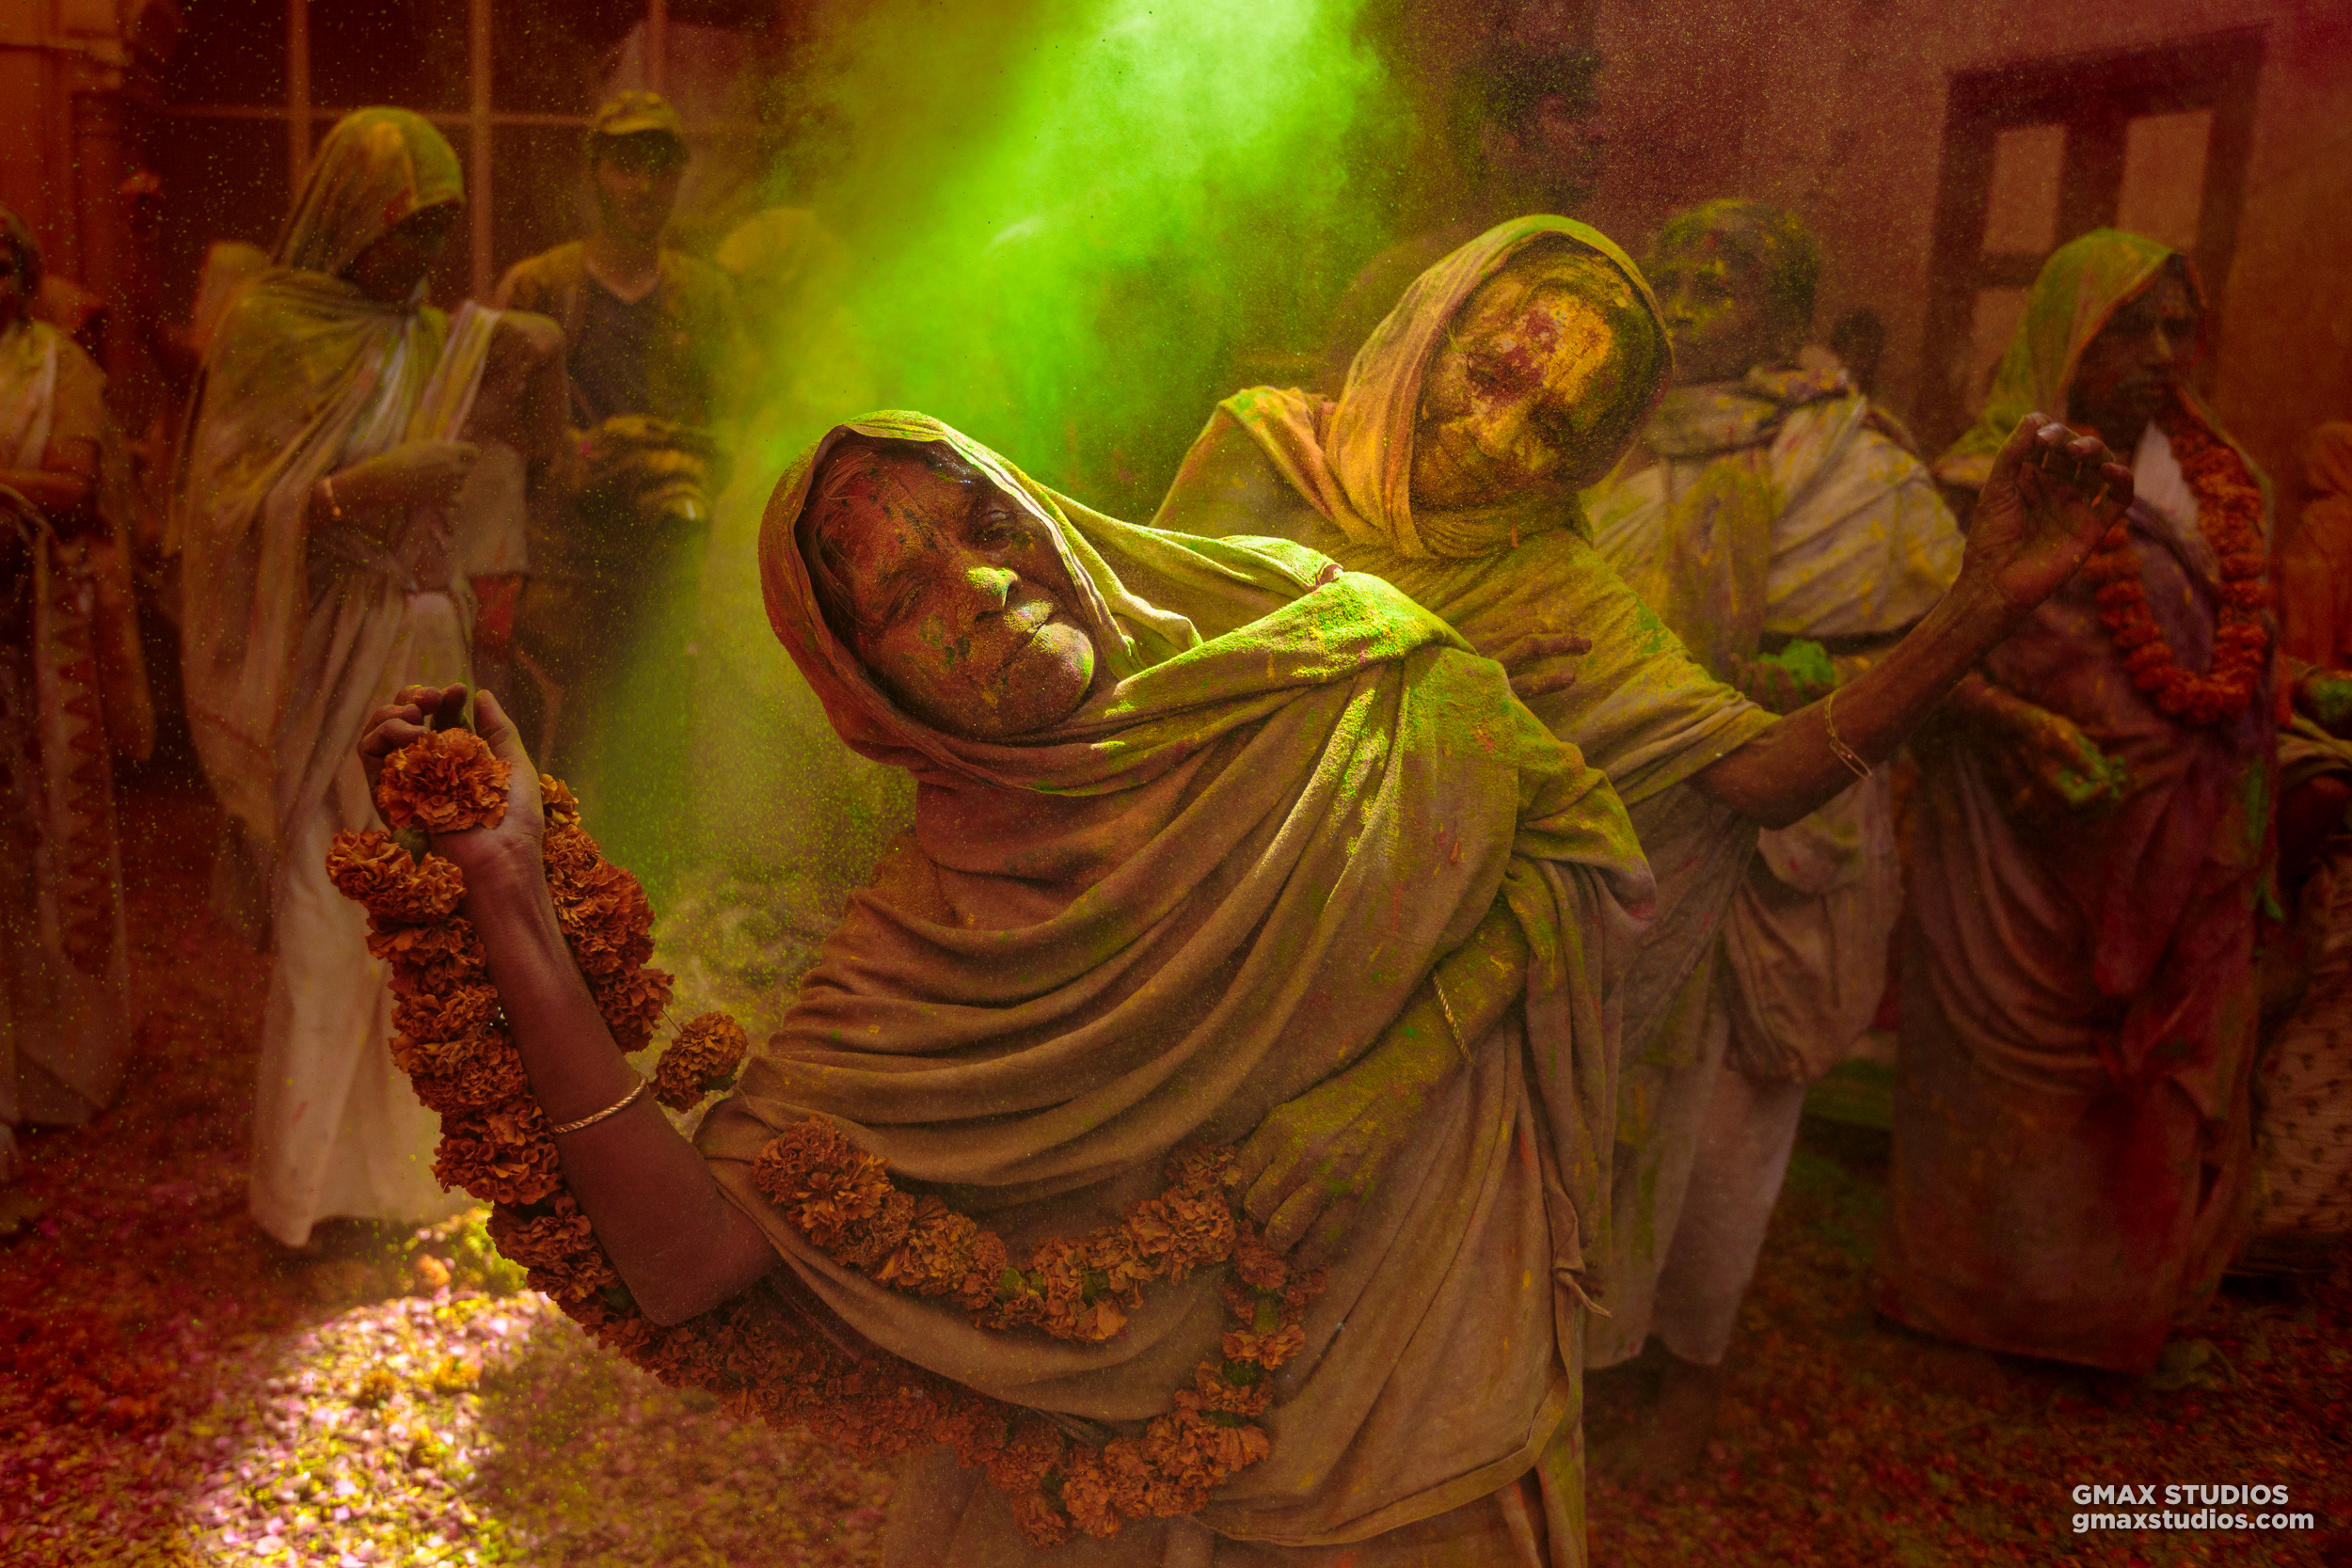
Mathura widows play with colour after 400 years | Photographing Holi Celebrations In Vrindavan
It’s been two years since we visited Vrindavan to photograph the illustrious Holi celebrations. Here is a look back at that colourful photography expedition.
It’s been two years since we visited Vrindavan to photograph the illustrious Holi celebrations. While the trip was special to begin with, the famous widows of Vrindavan played Holi with color for the first time in 400 years - making the occasion extraordinary. It would've been ideal if we published this article in 2016 itself, but photographs are even better to look at when there’s a little history attached to them.

That being said, none of these photographs were easy to take. It was the first time our camera and gear was exposed to water. We’ve since done a live session and a video tutorial on how to protect your gear from water, but nothing could have prepared us for this. Once we made it to the dharamshala that we would be staying at(more like leaving our luggage there because we’d be shooting continuously), we headed to Gopinath Temple.
There are streets in India that even google maps can't figure out, and a lot of the shortcuts and alleys in Vrindavan are like that. The people in Vrindavan were extremely kind and courteous, and pointed us in the direction we needed to go. At times they would even get on to the rickshaw and tell the driver exactly where to turn! Once we were on the right path, they would get down and start walking back. Something like this is unheard of in Mumbai. To the people of Mathura, it’s just life.
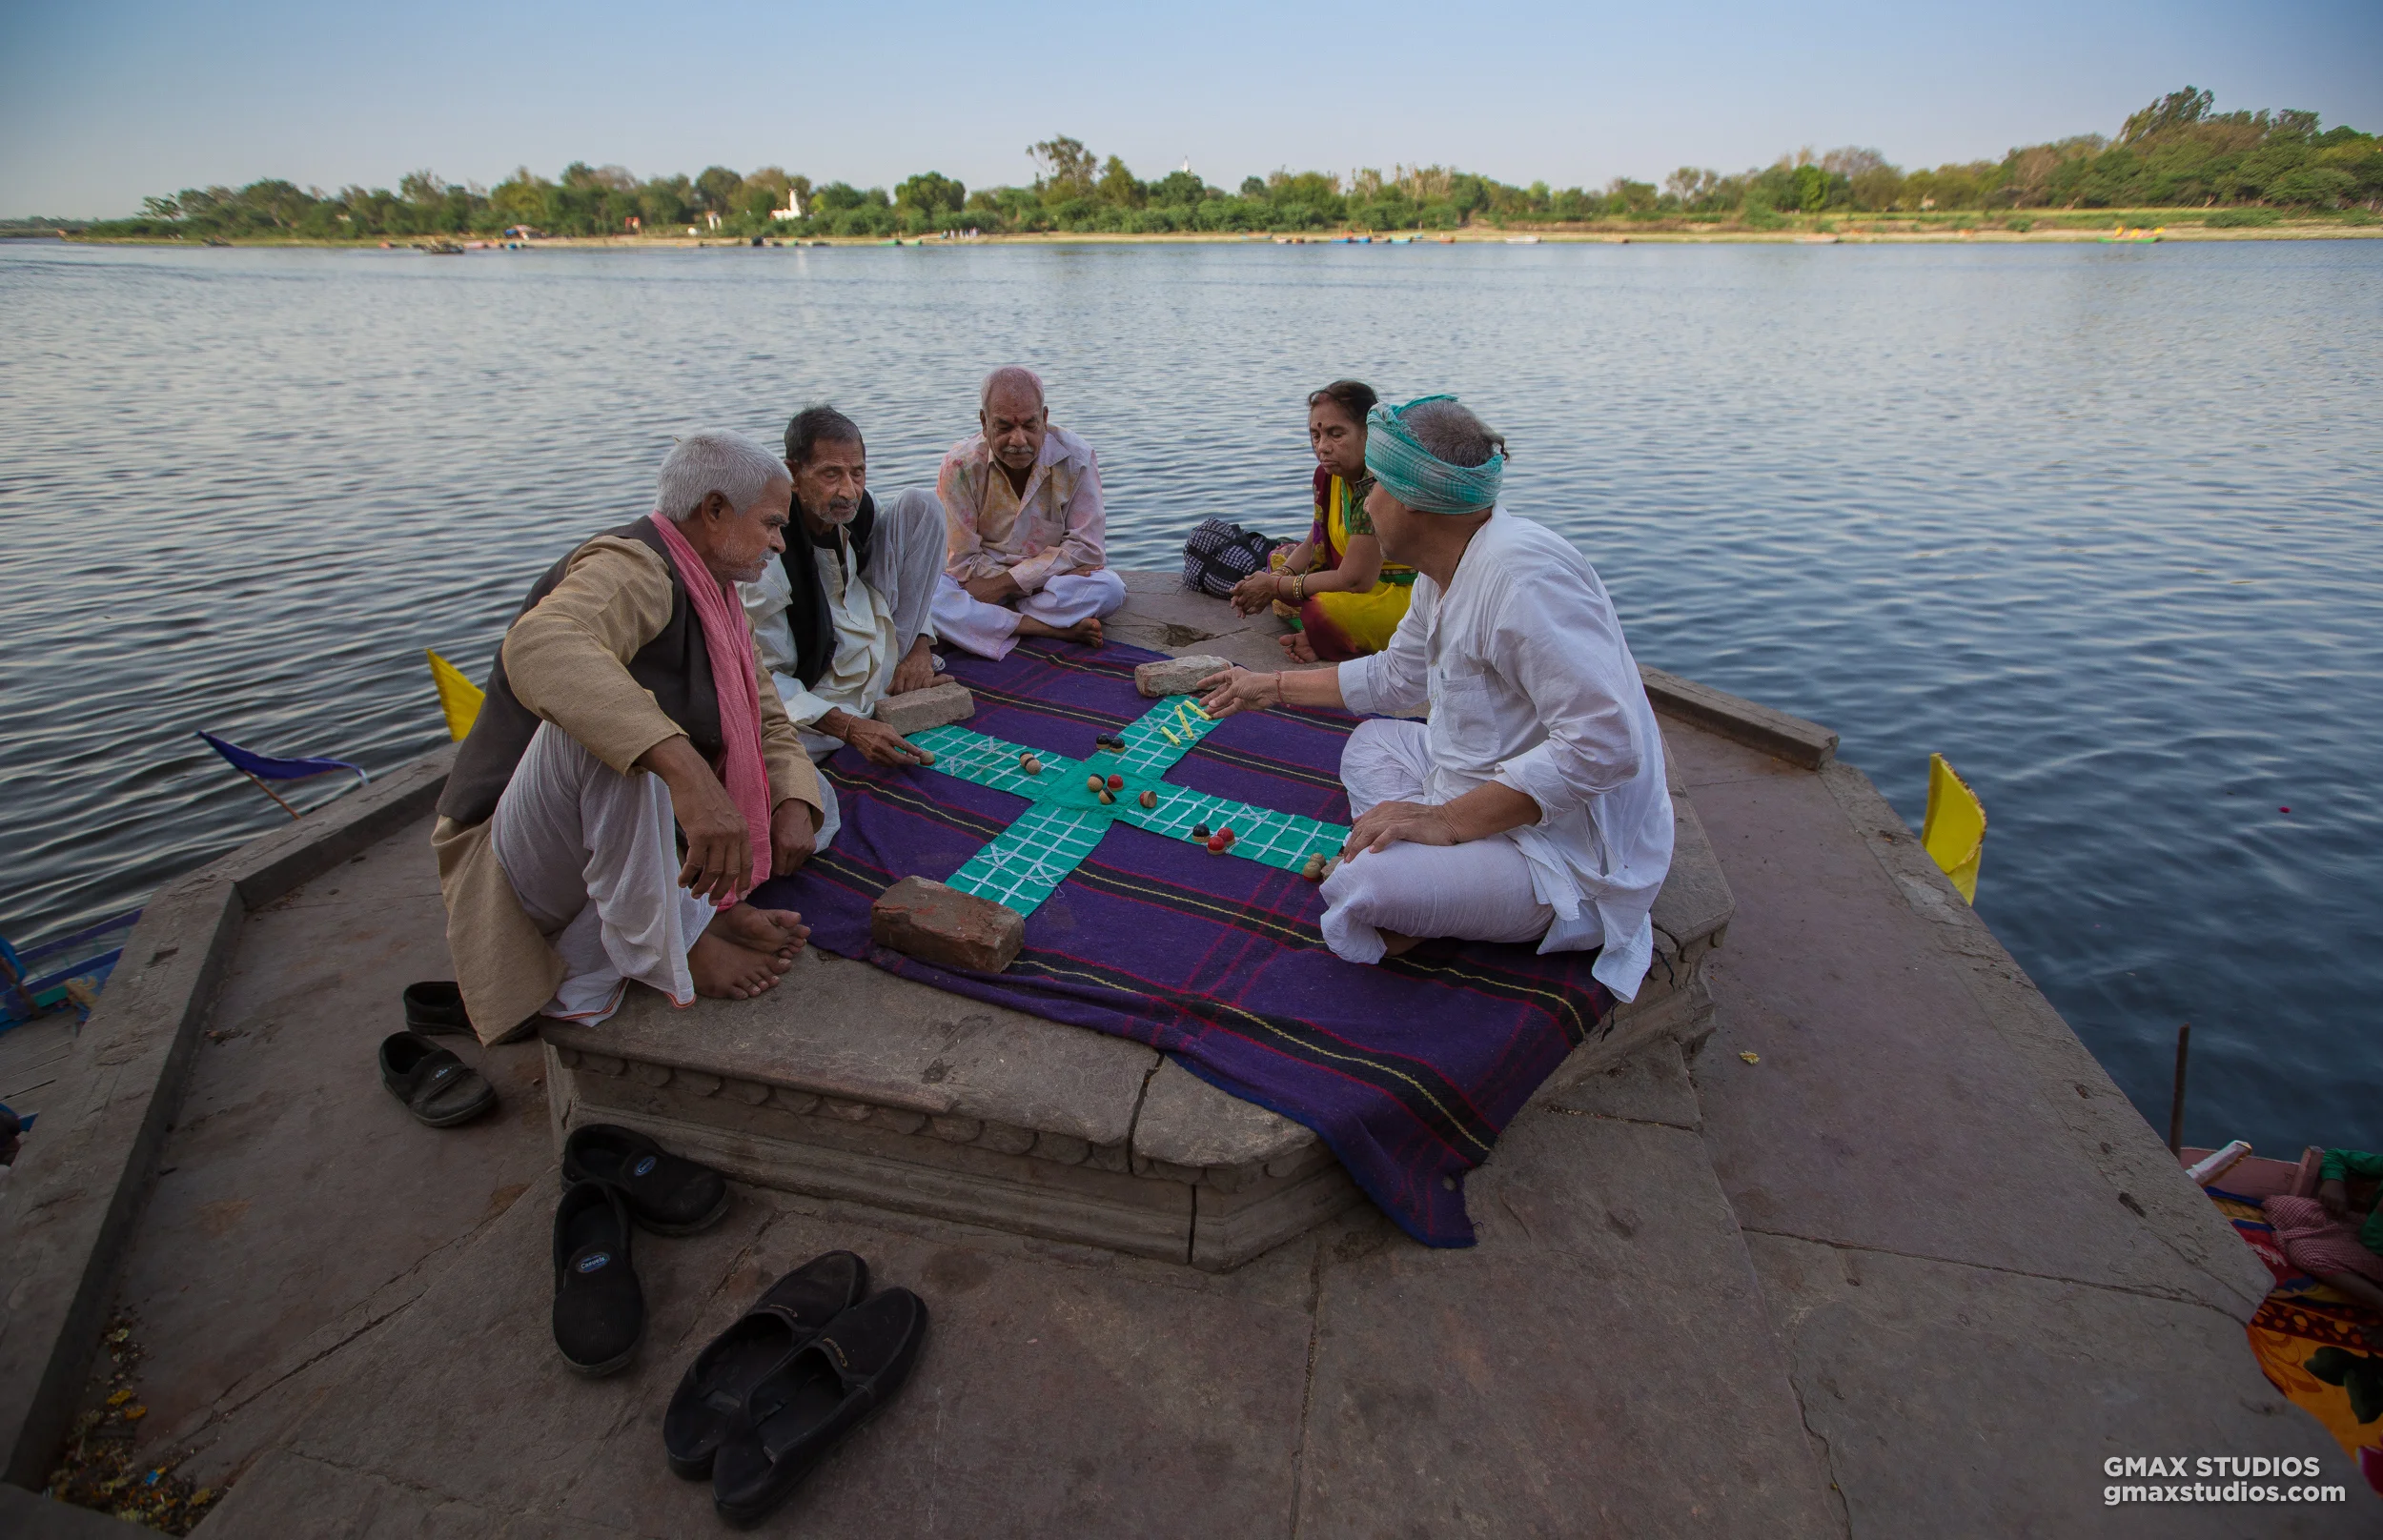
Chill unparalleled: Folks kickback and play a game of chausar.
On the way to Gopinath Temple, we witnessed absolute chaos. People were celebrating without a care in the world, sparing none and soaking just about anybody who happened to cross paths with them. We had a faint idea that something like this could happen, and so we wrapped our lenses in cling foil and also practiced changing lenses with the cling foil a few days in advance. This helped keep the water, color and dust out, and allowed us to get some decent photos of people celebrating in the streets.
Holi celebrations were in full flow in Nandgaon.
The scene at Gopinath Temple was nothing short of a riot. In the corridor, hymns and songs of celebration were being sung to the rhythm of mrdangas and kartals. The white saris of the widows were laden with color. Local priests and scholars, who in the past had kept up the practice of not interacting with the widows joined in on the fun. There was so much going on that the photographic possibilities were endless and making decisions was difficult.
It was like a scene from a film. The clothing, their refined choreography and their unique personalities was something we’d never come across. It seemed like a place free from the hassles of daily lives, where things like fear and anxiety don’t exist. That day, we learned a new way to live life. And that the widows have an endless supply of energy! The celebrations carried on from 10 in the morning to 3 in the afternoon.

“We’re happy that we can finally play Holi like everybody else, but even if it didn’t happen, we are still deeply moved by Krishna in our hearts” said an old widow to us, when we asked her if she’s excited about celebrating Holi with color.

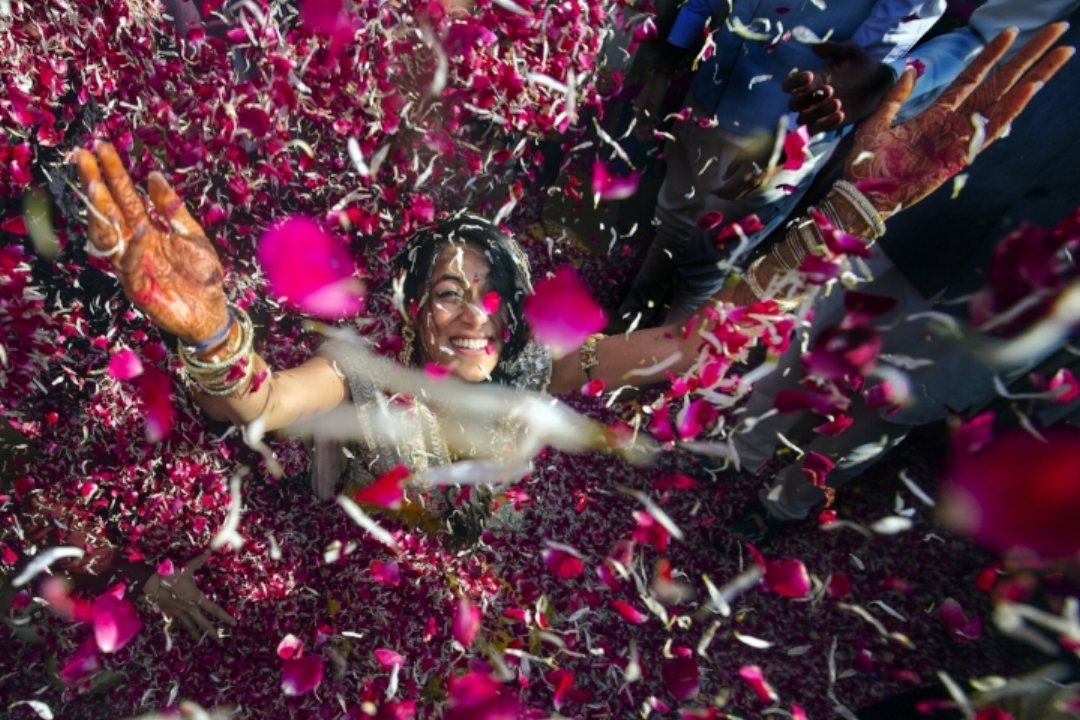
The widows don’t partake in the consumption of bhang or any other intoxicants. But clearly, the lady in the picture was having the time of her life.

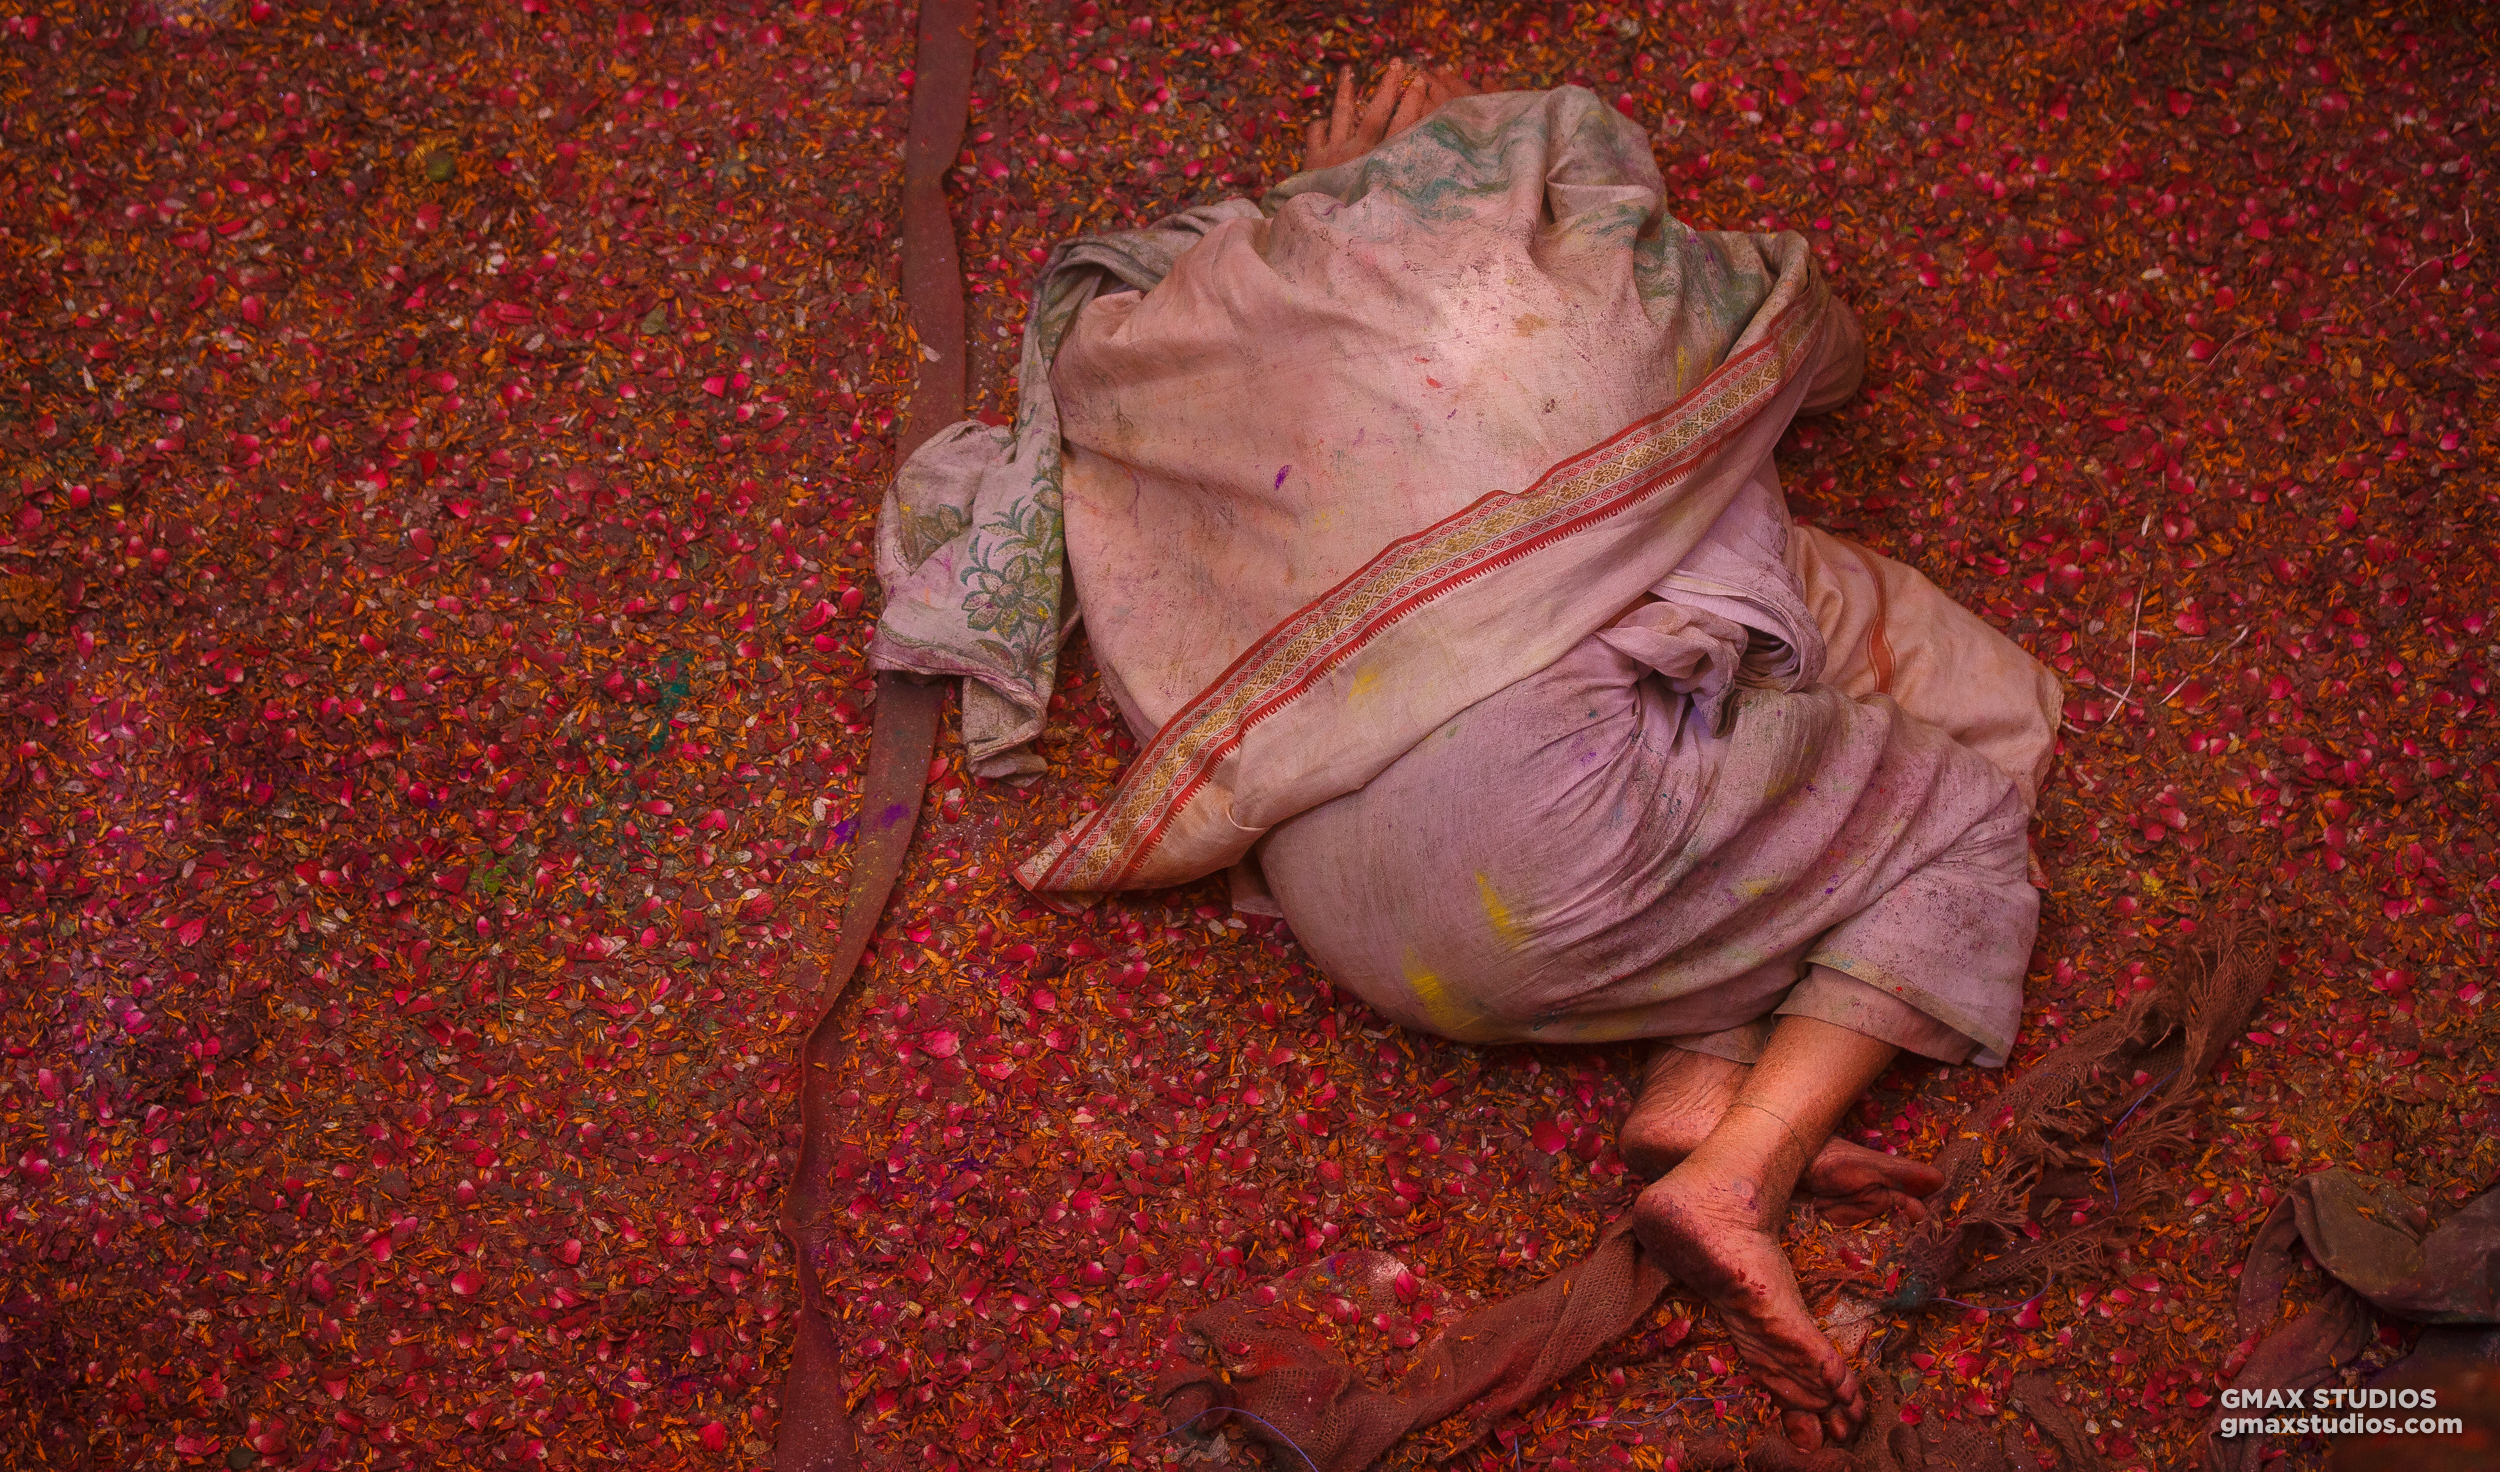
As a photographer, if you’re determined enough, the opportunities present themselves. The tarpaulin roof in the temple corridor had a hole in it, and a trail of light shone through - making the moment even more magical.

We had gone up an empty staircase to change lenses when we saw the lady in the picture surrounded by flower petals. Moments later, another widow came by and unloaded a bucket of green color on her.
Devotion that's heard of in folktales and myths was prominent in Vrindavan: a widow breaks down in servitude to Krishna
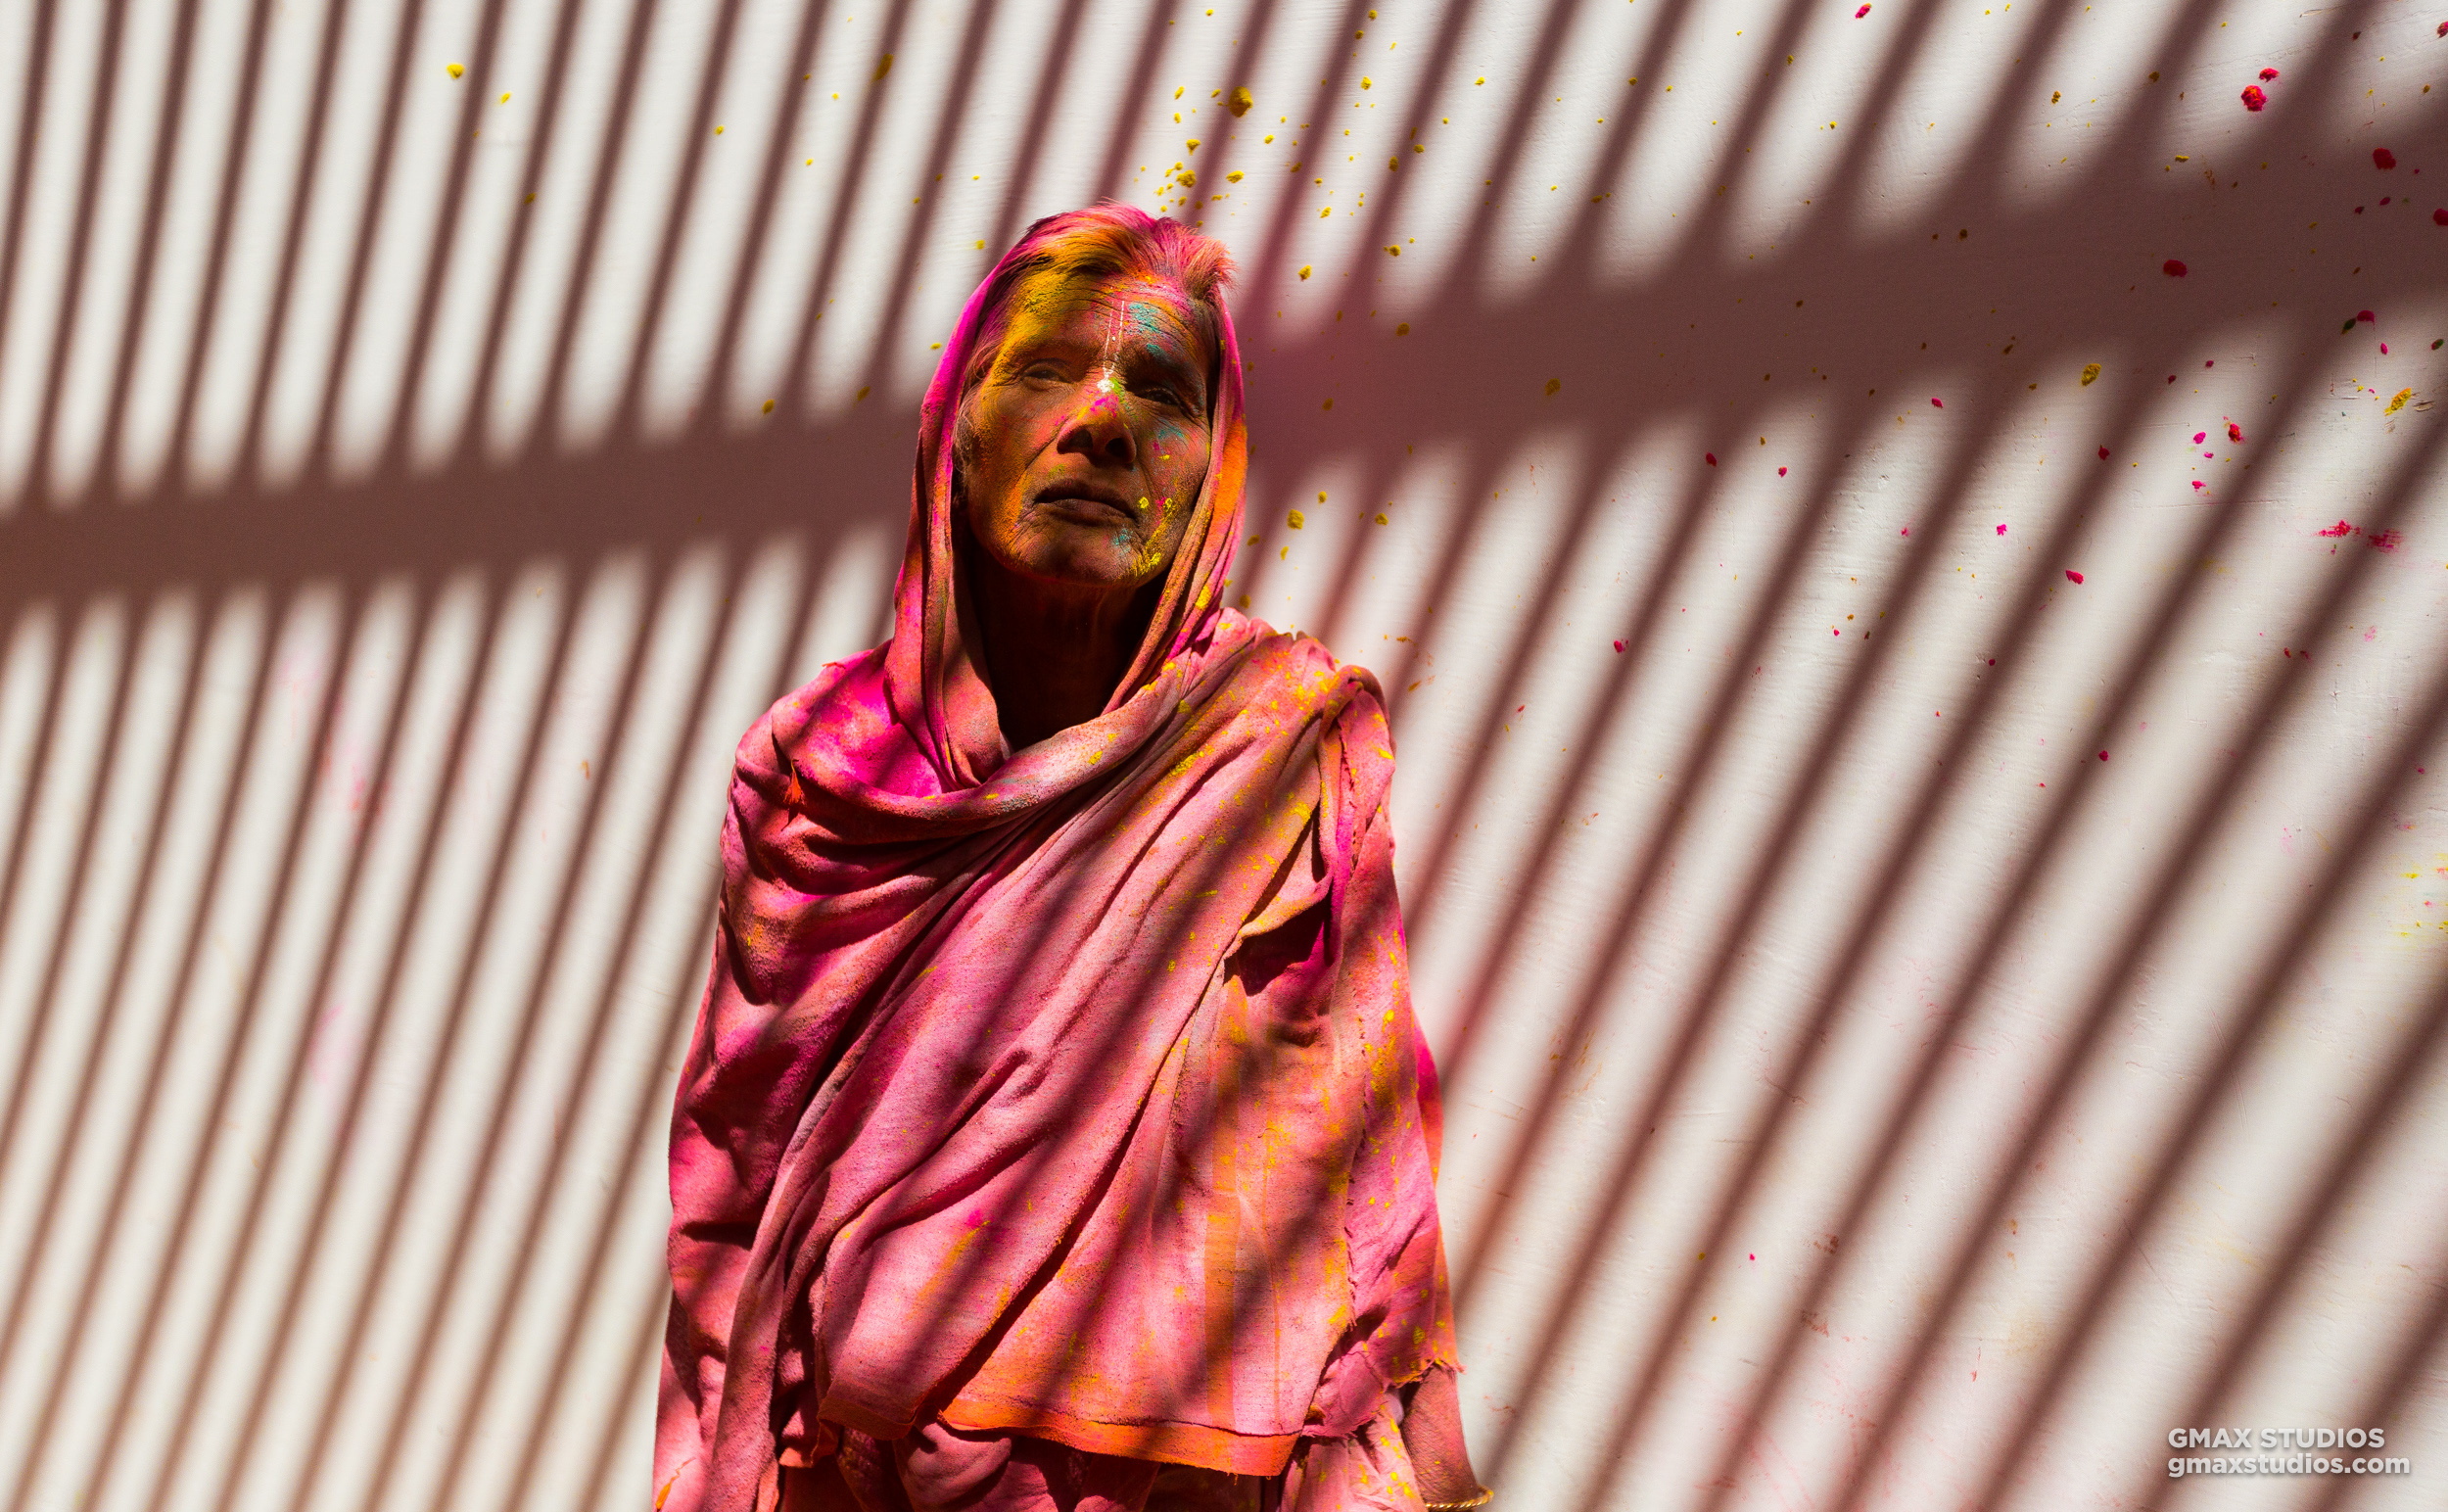
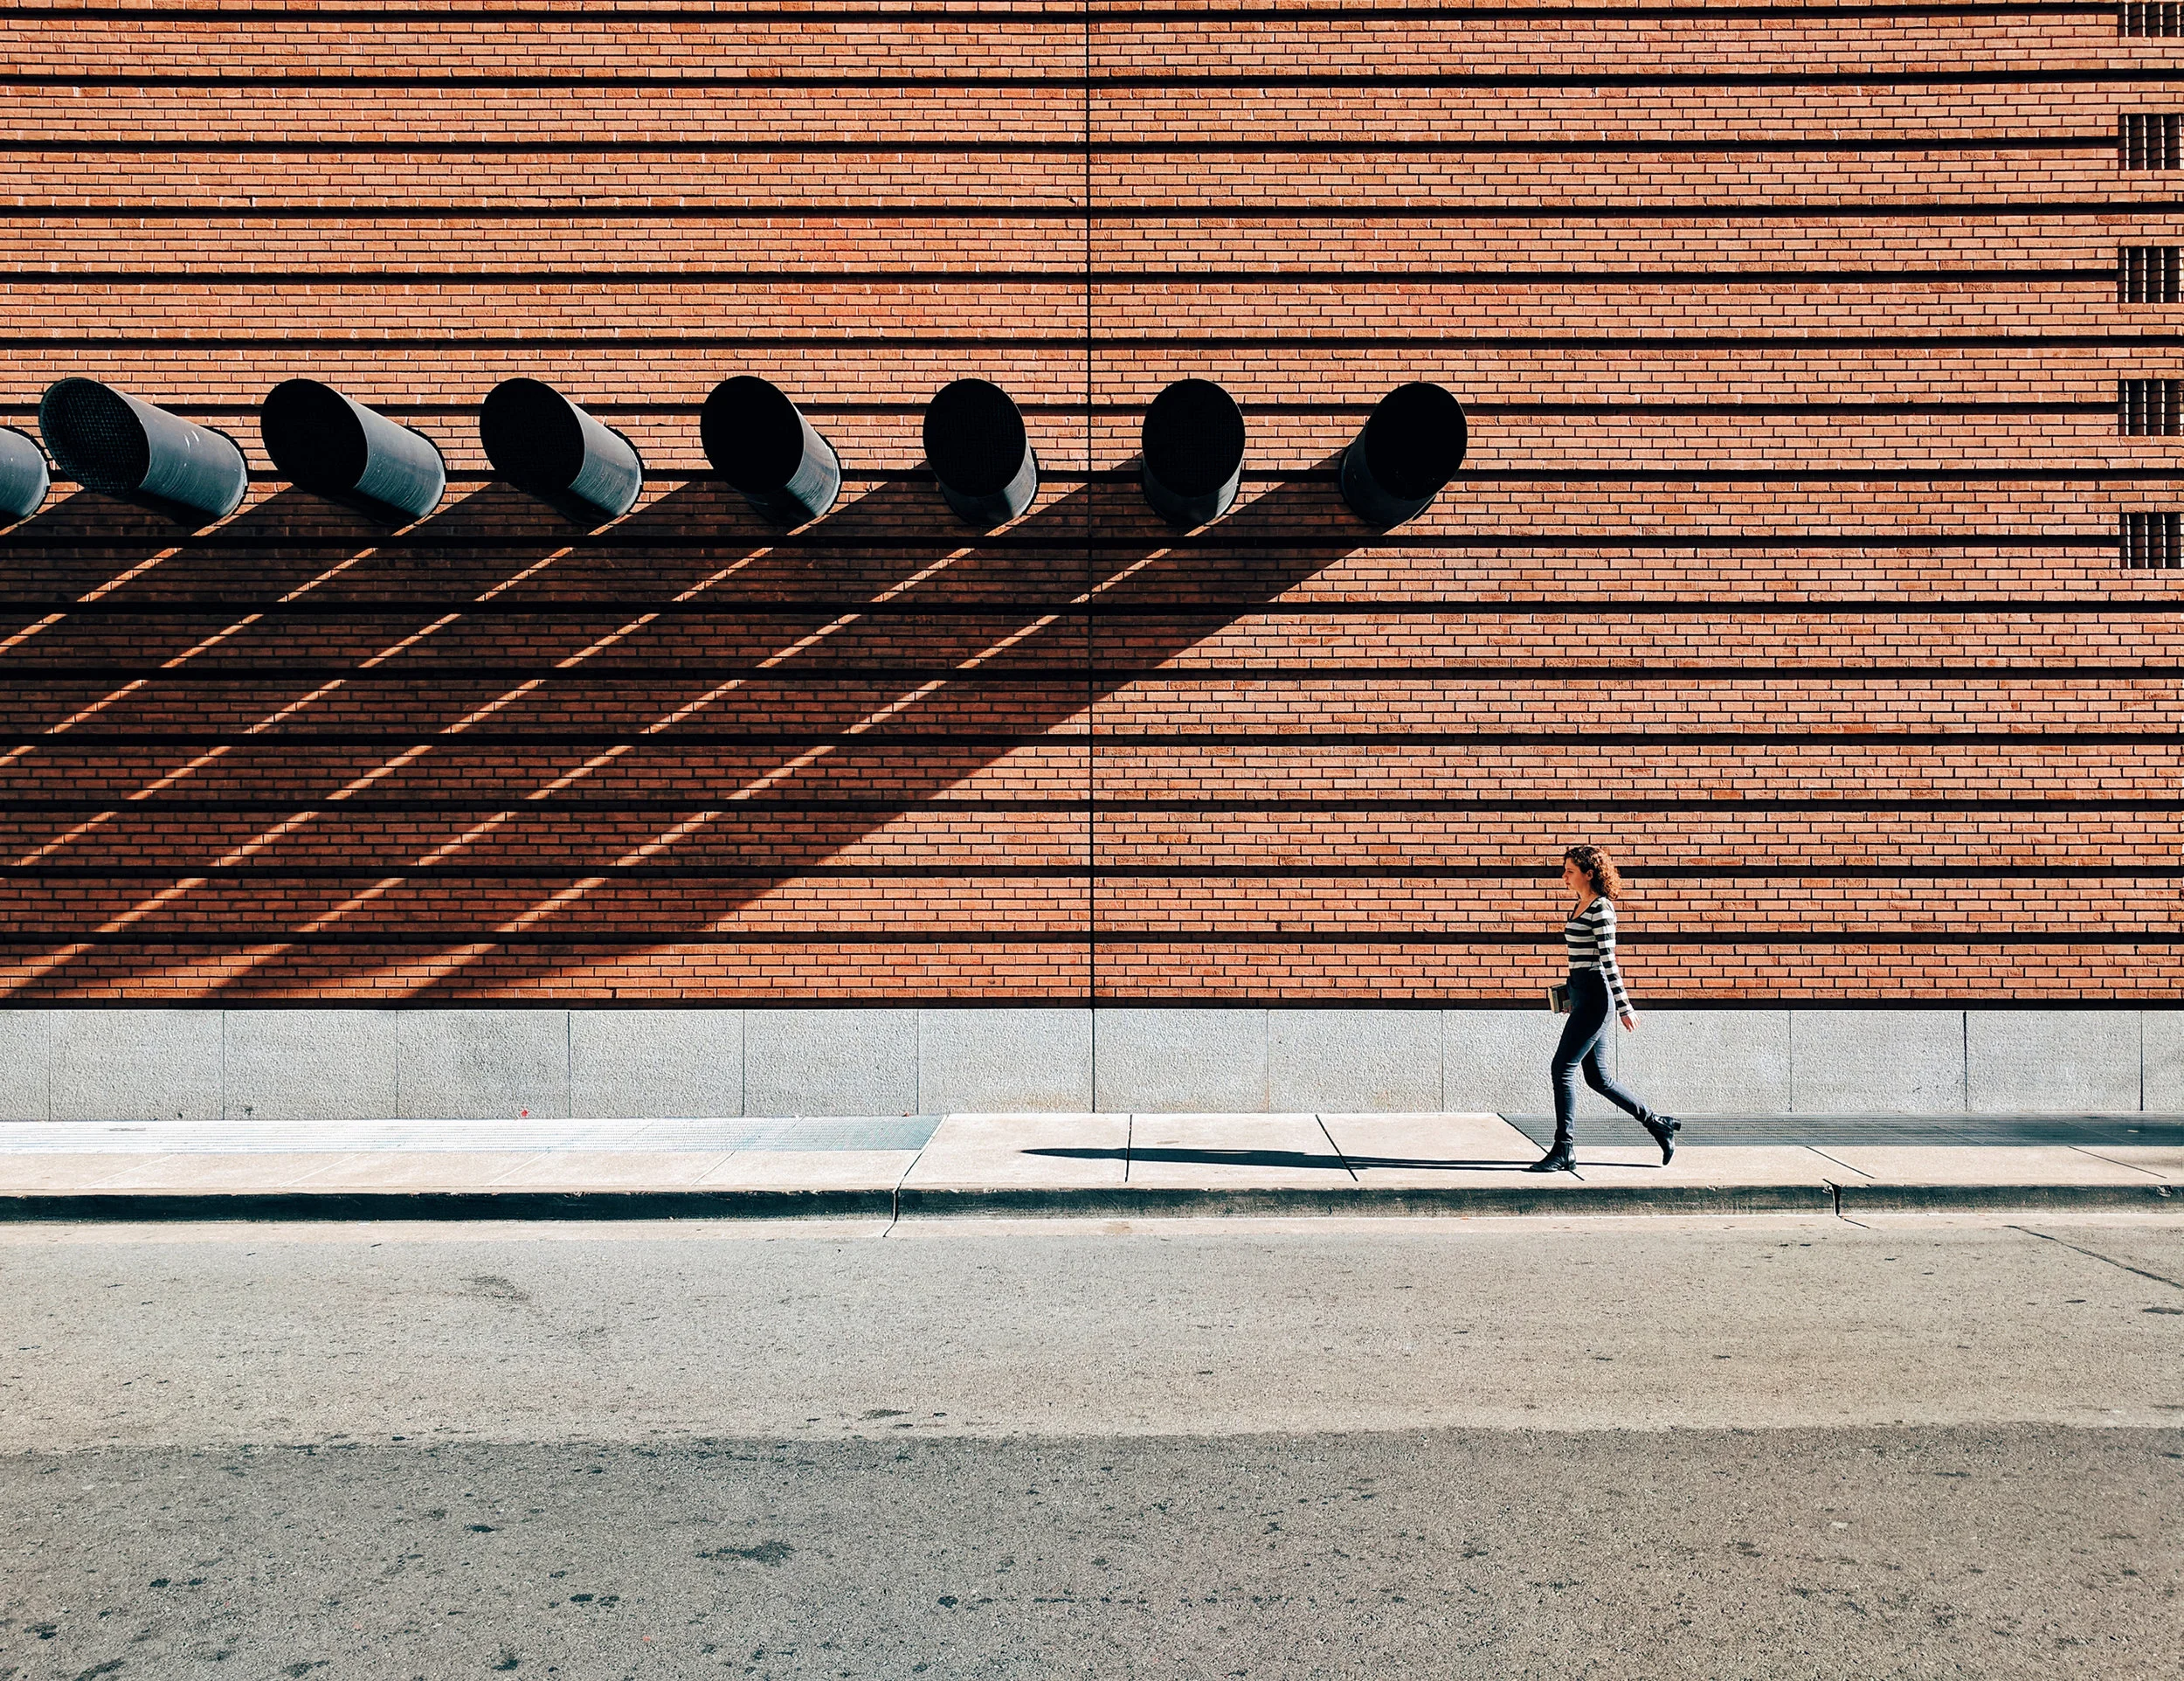
We asked the lady in the photograph if she would let us take a picture of her. She didn’t respond with a yes or no but simply stood still. The photograph is an indicator of the love Vrindavan widows have for humanity and what humanity has put them through.The striped pattern on the wall resembles a prison both literal and psychological, that the widows have inhabited for centuries.
After a few refreshments and a sip or two of Holi’s most cherished drink - bhang, we headed to Banke Bihari Ji Temple.
The temple houses Lord Krishna’s supreme avatar. Every year millions flock to see Krishna in His tri-bent, playful pose during Holi. He’s hidden behind a screen that is lifted only for five seconds during the festival.

One needs to have steely determination to photograph in a crowd like this because there wasn’t any room to even stand. The longest time we spent in one position was 3 seconds. And then the crowd would blow us away with the combined weight of at least fifty elephants.
There was another big task to overcome. The task of not getting other photographers in the frame because there were tons of photographers from various publications and agencies documenting the event.

But the most challenging shot was photographing the Holika Dehan.
The event would take place at 5 am in Phalen, approximately 50 kilometers away from Vrindavan, so we needed to head to the location early to prepare. We arrived at 4 the previous evening.
The Holi that burns in the city is a decent sized flame, but pales in comparison to what goes on in Vrindavan. It’s much longer, and consists of fast-burning bushes and twigs. Also, temperatures soar in comparison to the spontaneous assortment of logs that one can find in the city.

What piqued our interest even more is the fact that a priest by the name of Babulal runs barefoot across the entire length of the fire. The practice has been passed down generations in his family.
But one does not simply take a picture of a fire.
We grabbed a 70-200 zoom lens and sat atop a two floor building across from where action would take place. We carried refreshments, and began considering all possible angles to take the photograph from where we were standing. After that, it was a game of patience. One of us managed to speak to the priest beforehand, who told us about the entire process. He would wait for his sister to pour some water over the fire to appease the gods, and once she had done that, he’d come sprinting towards the fire.
It felt like we had prepared enough and would get the photograph easily. But we were pretty, pretty wrong.
It was around one in the morning when the people started gathering around the pit. Some people had begun to climb up the building we were on. Their arrival wasn’t favourable by any means. As the night grew, they started to lose patience, because they wanted to get as close as possible on the ledge where we were seated to view the action more clearly. So the rest of our time was spent waiting for the priest's run to start and hanging on for dear life.

The crowd was going so berserk that police officials had to use lathis to keep the public at bay.
At 5 am sharp, the priest’s sister poured the water over the fire. Without a second's delay, the priest came running in. There was barely any time to frame the shot. We followed him to the end of the flame and pressed the shutter button.

Mind over matter: year after year, the priest keeps this extremely dangerous ritual alive
We boarded a cab at dawn, contended with ourselves and the things we had photographed. The experience in Vrindavan brought us closer to photography, and people in general. It all came with us - the kindness we’d received, the people we’d met - and the faces that we’d seen. As Holi nears, we can't help but get nostalgic over the experience we had in Vrindavan. It was certainly difficult to say goodbye to.
Editor - Rishabh Udgata

Project 52 | Week 1 | 2nd March, 2017
Project 52 is based on the idea of taking one photograph a week for year.
The idea is to find things readily available around you or possibly buy something new - gear and lenses are not all that you should spend on.
The idea is also to look at the things surrounding you in a new light - observe what you have around you.
We announced a GMax Studios Project 52 a few days ago. So here goes the theme for Week 1.
Cosmetics and Perfumes

The idea is to find things readily available around you or possibly buy something new - gear and lenses are not all that you should spend on.
The idea is also to look at the things surrounding you in a new light - observe what you have around you.
Observe where the best light is and where you could place your subject and model. What time of the day or night is best to shoot it.
Here are some useful pointers:
- Select something that you like.
- Clean it up well.
- Put it in a setting you like OR get someone to use it - the photograph can definitely have a human element to it.
- Interpret the theme "Cosmetics and Perfumes" the way you like.
- Think about the theme.
- Plan your shot well.
- Be aware of the light - how light falls on your subject or object.
- Take the shot.
- Bottles look great if light is hitting them from the back. It helps bring out the colour.
- If you are planning to spray perfume and shoot it - the spray will be more visible if it is lit from the back. Also, remember to protect your camera
Upload the photograph to your Instagram account and hashtag it with #gmaxstudiosproject52 (double check the spellings of the hashtag) OR upload it to our Project 52 category in the Google+ community with the same hashtag.
Each photograph has to be accompanied with the settings used to take the photograph, so that it can help other members. This should include:
THEME – Week Number (which will be different every week) Camera modelLensISOShutter speed and aperture
You have a week. Think, plan and shoot. Re shoot if you don't like the shot or if you feel you can do better. Don't forget to have fun!
You can ask questions, if you have any, by going here.


Learn photography
The story behind GMax Studios.

Learn photography in an hour (Well... Almost!)
Sometime back I started, a YouTube channel for people who wanted to learn photography. The reason behind this was an extremely disappointing experience at a Nikon seminar. One of the top photographers in the country was a guest speaker there.
I am a NPS member and Nikon had been inviting me for a few of these regularly.
The guest speaker, of course, narrated his entire life story and experiences which were quite enthralling but then came the Question and Answers session.
The speaker just kept dodging all questions relating to his technique as if he was too afraid to give out his secrets. Now there were people of all age groups and all levels there who wanted to learn photography from this "master" but he was just not willing to answer the questions that mattered.
Now, I have done workshops with some of the best names in photography internationally like Joe Mcnally, Gregory Heisler and Joel Grimes and here is the thing about them - they are all so open with with what they know and go to great lengths to impart the knowledge they have.

I was quite angry about the secretive ways of the esteemed photographer. During the break, I walked over to one of the attendees and told him to look up learning photography lessons on the internet. He replied, "My English is not good!"
That is the exact moment I decided to start a YouTube channel which would help people learn photography. I also decided that it would be both in Hindi and English.
This was the beginning of GMAX STUDIOS.

learn photography
NOW WHAT? HOW DO I LEARN PHOTOGRAPHY IN AN HOUR?
So, over the years I have shot and uploaded photography tutorials to the YouTube channel. These will help you understand the basics of photography.
I have deliberately started at what I call Level Zero - which is photography for beginners. By beginners, I mean absolute beginners who have just bought their first camera. Over time, I hope, these will evolve to cater to advanced photography level as well. I also hope to cover videography and film making over time.
I sincerely believe that this is more than enough to get you started.I also believe that there is no need to spend money on expensive photography courses which teach you bugger all. Remember, it will not turn you into a photographer in an hour. For that, you have to practice what you have learnt and then practice some more. These tutorials are not camera brand specific (Nikon, Canon, Sony or Fuji) but broadly related to the basics of photography.
I have tried to organise my disorganised mind into giving some form of structured content. I have tried breaking it into sequential parts and named the videos Episode 1, Episode 2 etc.
If you are having trouble navigating the website, you can go to THE ULTIMATE BEGINNER'S GUIDE TO PHOTOGRAPHYwhere all the basics of photography are covered in a sequence, like you would expect from a book.
Here is the playlist from the YouTube channel if you are not interested in reading and watching photography tutorials is more of your thing. This playlist is about an hour long and hence the title of the post. So grab some coffee or wine and hit play.
We would also appreciate if you share this page or this playlist through social media with your photographer friends.
WHAT ABOUT HINDI PHOTOGRAPHY?
Despair not. I am trying to replicate all the articles on this website so that people interested in photography in Hindi can go there. The website for Hindi photography is: https://gmaxstudios.com/hindi-photography-lessons/ The website is both in phonetic Hindi and Devnagri script.
As with the English website, you can search for articles related to photography. You can read about learning photography in sequential form by going here.
If you are not keen to read you can watch the Hindi photography playlist on our YouTube channel here:
Please do share this playlist with your friends.

Subscribe to GMax Studios YouTube channel

Download GMax Studios apps for iPhone and Android

Now you can download GMax Studios apps for iPhone and Android.
While you have been looking to learn photography, we have been looking at ways to be in touch with all the wonderful photographers who are a part of our community and engaging with them while giving them easy access to our content.
So, we decided to launch apps for GMax Studios - both for the iPhone and Android operating systems.
With these apps, we hope that we can stay closely in touch as the apps will have the forum features, you will get notifications about important events like live chats, photo walks and workshops etc. The apps will also have content and articles exclusively available on the app.
GMAX STUDIOS APP FOR ANDROID
This app is for all Android phones like Samsung, HTC, Nexus etc. If you have a smartphone running Android OS you can download the app from the following link:
download link: http://gmxs.in/android
(null)(null)
GMAX STUDIOS APP FOR iPHONE
This of course is the app for the Iphone. You can click the link given below or click on the the screen shot.
Download link: http://gmxs.in/ios

We would really love it if you share this with all your friends and and family who are interested in photography.
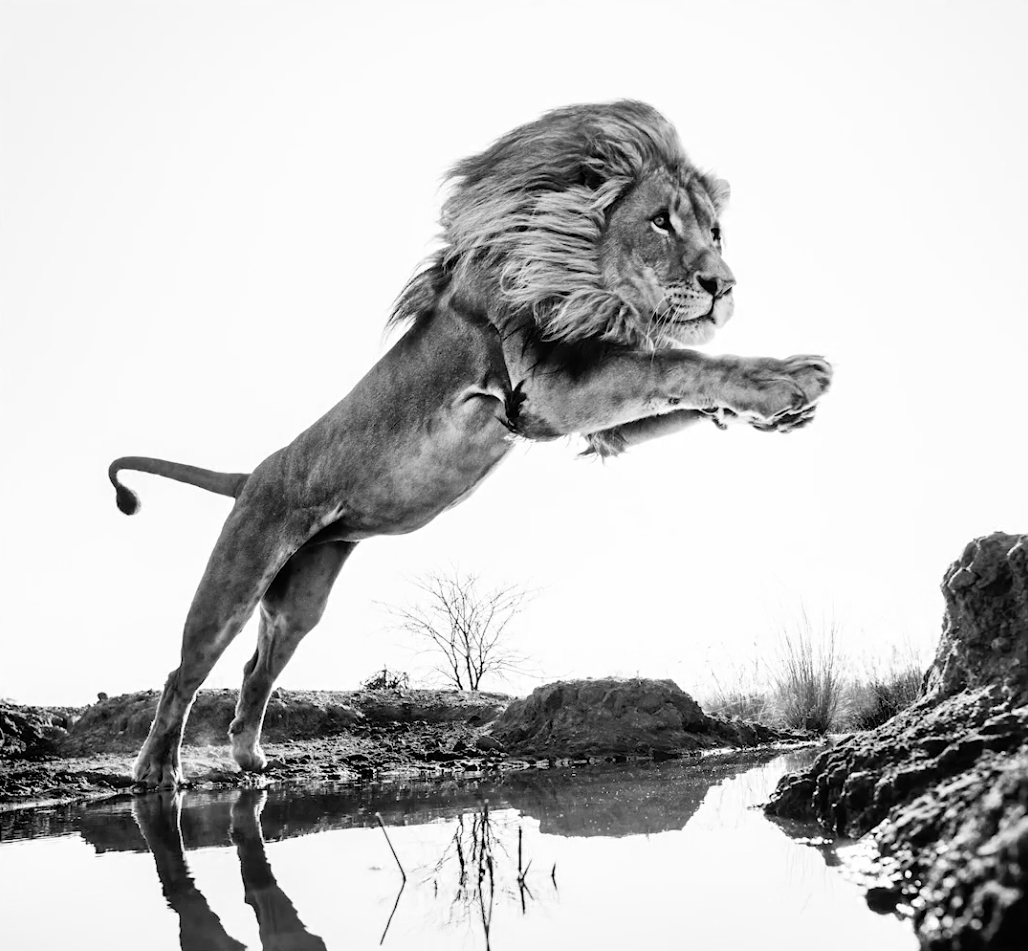
Wildlife photography with wildlife photographer David Yarrow

Wildlife photography as art
For most people making a living off photography is a dream and quite a few people keep chasing their dream and shooting all kinds of photographs without relooking at the philosophy behind their photographs.
Yes. Learning photography is just not enough - there is a philosophy that needs to shine through the pictures and only then will there be a value to them. This applies to any kind of photography - wildlife photography, portrait photography, wedding photography or any other.

Learn photography wildlife photography with David Yarrow
David Yarrow is a photographer whose photographs sell for as much as £ 14,000 (Source: The Daily Mail) How did he do this? By rethinking the way he took photographs! He thought of Robert Capa's quote "If your photographs aren't good enough, you are not close enough!" and changed his way of shooting. He says that if you are into wildlife photography and you are "looking down" on your subjects - then they are nothing but snapshots that you can show to your children.

Wildlife photography with GMax Studios
To turn his photographs into works of art that sell for astronomical amounts, he really gets up close and personal to his subjects. He takes photographs by placing his cameras really close and triggers them via remote.
Wildlife photography interview with wildlife photographer David Yarrow
In this interview given to YouPic, he talks about all this and much more that defines his photography. GMax Studios is proud to be associated with YouPic in bringing you this interview with David Yarrow. Watch it to truly get inspired. We guarantee it will inspire you - no matter what kind of photography you do.
Subscribe to GMax Studios YouTube channel
TRANSCRIPT OF THE VIDEO
[SOUND] [MUSIC] We bring together for you, the best photographers in the world. [MUSIC] >> Andy Warhol said, my favorite color is white and my favorite color is black. So use the whites, use the blacks, don't have fifty shades of grey. We'll have that as well, but use the blacks and use the whites.
[MUSIC] I got fascinated in sharks because I felt that sharks hadn't been photographed well. After about 30 hours dedicated in the water to this, I got the big shot of the shark and a seal. And I still think it's the strongest picture of shark predation that I know, and it's pin-sharp.
[MUSIC] And then someone said to me, do you see that picture in the Daily Telegraph, can I get a big one for my office? Because I want anyone that comes into my office to be very scared of me, and the best way of doing that is to have a big shark eating something behind my desk.
And he said, how much would it cost? I said, I don't know, but we'll put in a nice frame may be for 5,000 Pounds. And he said, okay, I'll have two. And that was when the penny dropped that the way to make money from my kind of photography was in fine art. Producing limited edition fine art prints that were aesthetically strong enough, or evocative enough that people would put them on their wall.
[MUSIC] I think the mistake a lot of photographers, wildlife photographers make is that they go on a trip without any specific idea of what kind of African animal they're gonna be shooting. And for me you go, you choose the animal, and then you know where you're gonna go to photograph the animal.
And by far and away, the best place in the world to photograph elephants is Amboseli. Wildlife photographers, many of them use telephotos far too much. If you're gonna be photographing a beautiful woman, you're never gonna shoot her with a 400 millimeter lens or even a 200 or a 300.
You'd shoot her with a standard lens or a wide angle, and it should be the same with animals. It's then just the logistical issues, how you get yourself in a position to do that whilst remaining safe. [MUSIC] The great beauty of elephants is there's no animal where their predicted path can be determined with greater clarity and assurance than an elephant, they tend to walk in straight lines.
So if you see a herd walking across a dry lake, you get 200 yards ahead of them, and you know probably where they're gonna, within a yard, where they're gonna come. You got the peak of Kilimanjaro peaking out over the top of the clouds, and the light's getting better every five minutes, these are probably not bad circumstances.
You can see the big guy with that big tusk over there on the left, sadly that's about 8 grand in the local market, and that's 60 grand in China. You put the remote down, and you prefocus and then you get the hell out of there, so that they're in no way detoured by you. And they probably don't see the camera until they're about a foot and a half away from it, which is perfect because that's what you want.
So you want proximity and a ground level perspective. Okay, so I'm gonna get out of the car, I'm gonna set up the remote. [MUSIC] I walked into a little bit of elephant manure. Okay, let's get out of here. [MUSIC] Okay, let's go and grab it. [NOISE] There's nothing I wanna do less than photograph with blue sky and sunshine.
I want moody, almost sort of impending doom in the skies, and you get that in Amboseli in October. It's the best canvas on which to paint with light, and take pictures of anywhere in the world I think. [MUSIC] The behavior of elephants has changed because of cattle. Because the Maasai brought their cattle in, in big numbers into the park, and that's resulted in more humans and more lions.
So the elephants don't behave in the way that they used to, and lake crossings are rarer. [MUSIC] I position scouts on the hills overlooking Amboseli dry lake, and as soon as they see the beginnings of a herd crossing the lake, we'll find out. And on this occasion it was the middle of the day, which doesn't tend to suit my style because the sun's too high, but gratifyingly there was quite a lot of cloud cover, and it was a big herd, it was 25 elephants, and I didn't even have my photographic clothing on.
I was just hanging around in swimming trunks and loafers, but we charged there to the lake, and must have been going goodness knows what speed. And this series is about 15 minutes, but there was one lovely moment where I was lying on the ground, and the elephants were about 60 yards away from me, and they just didn't know whether to go left or right of me.
They don't tend to charge there because there is no vegetation, so they're not surprised, they know the human is there. The time you gotta be careful of an elephant is when you surprise it, but in Amboseli you're quite safe, relatively. And they just huddled together, and I knew as soon as when I pressed the trigger, I thought this composition is coming together rather nicely.
And then when I got back, I knew I'd got a very big image. [SOUND] My approach is two-fold. Firstly, that you have to be close, and borrowing from Robert Capa, if the pictures, if they're not good enough, you're not close enough. Ansel Adams also said that the lens looks both ways.
It's truer and truer as the lens gets shorter and shorter. I don't think the lens necessarily looks both ways with a 400, it's more likely to look both ways with a 50 or a 35, just staring right back into your soul. I think also if you're photographing a dangerous animal, if your line of sight is higher than the eyes of the animal, that immediately hints at an artificial encounter.
It hints at the fact that you're higher than the animal. No more so than Polar bears, and I've wasted so much time photographing Polar bears. Because normally if a Polar bear comes up to a boat, and you photograph it from the deck looking down at the Polar bear looking up at you, that's just pulp.
There's nothing interesting in that photograph, other than for it to show your kids when you get home. So we did a lot of research as to the best place in the world to photograph Polar bears, and for me to get close and be safe. And we found a place where for about a week, there's very strange behavior in that the Polar bears seem to be in collaboration with the humans because the Inuits are whaling, and they bring whales in.
And the bears now know that the humans are their friends because they can feed off the whale carcasses, and for about two weeks you can get very close to the Polar bears. And there's one picture I've got which was printed in the Telegraph recently and sells very well, where I actually managed to take a selfie of myself in the Polar bear's eyes because I was a foot and a half away.
And I had an Inuit fisherman behind me saying, I think you're okay with this one, and it was almost the ultimate example of putting trust in someone else because the Polar bear was two feet from my lens. [MUSIC] I think with lions, again I want to photograph lions from the ground up.
But a remote control is very much the way that I like to photograph dangerous animals, I can't really see any other way to do it. You gotta be a bit careful because the cameras can be eaten. Or Nikon are fed up with me because whenever I bring it back, a damaged camera, normally you've got all these boxes to tick like dropped it, or it fell in the water, and I have to fill in new things like kicked by elephant.
[NOISE] Or eaten by a lion. So they find it quite, [LAUGH] Whenever I go down to see them in Richmond they go, which box are you gonna tick this time? But they quite enjoy it because I guess it's a different experience for them trying to mend a lion-eaten D4S, or whatever. The key to strong photography of the kind that I do, not doing a fashion shoot for Vogue, is access.
It is about putting in the spade-work logistically and research-wise to find yourself in the right position at the right time, to then use that conduit, and use your heart and your brain and your eye. But those things are all secondary to getting yourself in that position, whether it be with an individual, whether it be with a dangerous animal, whether it be in a scene.
And so I think the actual art of pressing the trigger is maybe 5% of the job, 95% of the job is finding yourself in the position where you want to then go and take the trigger. I'm just trying to get the silhouettes with the dust flying up, which is quite scary. [SOUND] Nearly, bloody nearly.
Not quite, I think nearly. And I also admire photographers who understand that if they come back from a trip with 200 good photographs, that's too many. I think plurality is the bane of many photographers. I think I've taken this year, this year, I think maybe 4 good pictures, and maybe 2 really, really strong pictures that will stand the test of time.
So that's 6, 6 in 12 months. I know people will look and say, [LAUGH] Well, that's not very good. [LAUGH] But the whole point is that's what you're looking to do. If it was that easy, then how on earth could you be selling a picture for a huge sum of money, if you can just leave Heathrow on Monday, and take a picture on Tuesday? You can't.
[MUSIC] [SOUND] Be inspired, be better, be great. [BLANK_AUDIO] [SOUND].

Photography Inspiration | The Decisive Moment Part 1
Getting the decisive moment is just a matter of practice.
The biggest difference between a learner and a photographer is - practice. Practice not just of the techniques of photography but also of the controls of your camera and most importantly - your eye. Learning to recognise "The Decisive Moment" is what separates the photographer from the learner. The more you practice, the better you get at it.
Henri Cartier-Bresson once said, "There is a creative fraction of a second when you are taking a picture. Your eye must see a composition or an expression that life itself offers you, and you must know with intuition when to click the camera. That is the moment the photographer is creative," he said. "Oops! The Moment! Once you miss it, it is gone forever."
The Decisive Moment

So, I saw this scene unfolding while waiting beside my car on the highway. A man sprinkling water, another man arriving with his bicycle and some light traffic on the highway. I could sense something potentially unfolding here. I had my Sony A7RII and Carl Zeiss 35mm 1.4 lens around my neck (like I mostly do!) and started to compose an image in my head. As you will notice from the shadows, the sun was behind the water and as I have said earlier, you need smoke and water to be lit from behind to be illuminated properly. This shot was going to be perfect!

I moved towards him, focusing when he sprayed the water first. He was not as enthusiastic as I wanted him to be and the spray of water looked kind of weak. I had also managed to cut off his feet and there were two strange looking objects (people) just behind his head. Also there was this motorbike right above his forearms. Clutter!!!
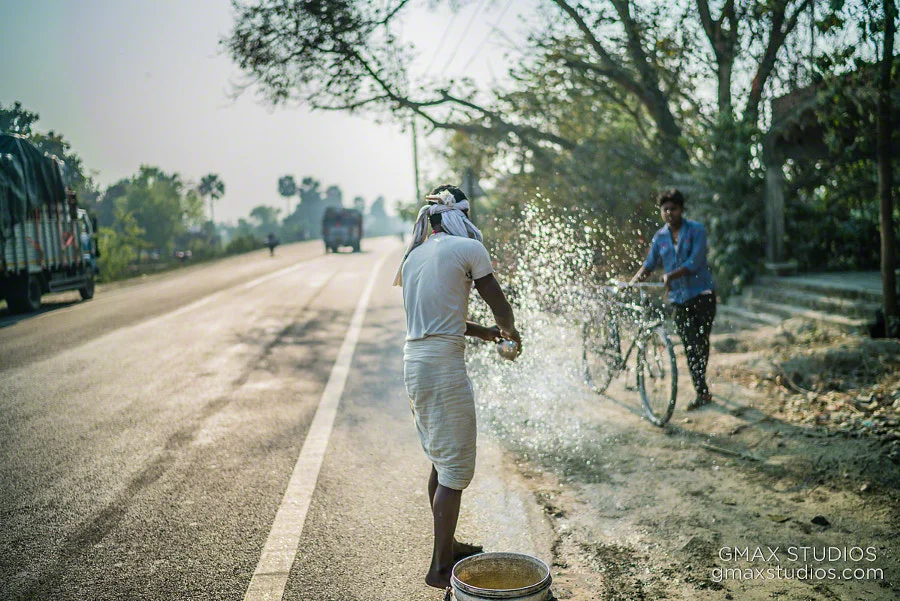
I took a couple of steps back and to my right to hide the motorbike and the people above his shoulder. His feet were all in frame and little bit of the bucket too - to give it context. Almost there!!! But the guy with the bicycle started to move away and the truck was coming fast towards me and I wanted it in the frame Panic!!!

I shot the frame above just as the truck was about to exit the frame. I think I was concentrating too much on the water and the truck and forgot to recheck the edges of the frame - which is very, very important! I managed to cut off his feet again. The man finished what he was doing, he picked up the now empty bucket and left. The Decisive Moment had passed - and I screwed it up.
The time taken between all the four shots - 22 seconds.
You will never get all the shots that you see. When you learn photography, failure is equally important. Learning to recognise failure is much more important. Once you do that, it is all about getting that rate of failure down. If you learn from your failures, that rate will go down pretty fast!
I would not recommend sharing your failures too much with the world - like I just did! :-)
Please share this article with your friends if you liked it.
Subscribe to GMax Studios YouTube channel


Mastering metering modes on Canon and Nikon
What are metering modes?
To get a proper exposure and to avoid underexposing or overexposing your photograph, the camera meters the amount of light hitting your subject and makes a quick calculation based on it to tell you the reading of a certain scene. It is pretty much like how we see with our eyes. The light hitting the subject is reflected into the lens and the camera makes a judgement based on it to tell us our exposure value. To evaluate this, the cameras usually have three or four metering modes built into them.
How is light measured?
The amount of light falling on the subject is called incident light and the light bouncing back off, after hitting the subject is called reflected light.

Reflected and Incident Light
Traditionally, light meters like the one shown below are used to measure the amount of light falling on a subject. So technically, they are often referred to as Incident Light Meters. Though some of them also have the capability of measuring reflected light.

Incident Light meter
Cameras on the other hand measure reflected light - the light bouncing off the subject and entering the lens.

What is Incident and Reflected Light
The problem with metering reflected light is that not all colours reflect back the same amount of light - though the amount of light falling on them might be the same.
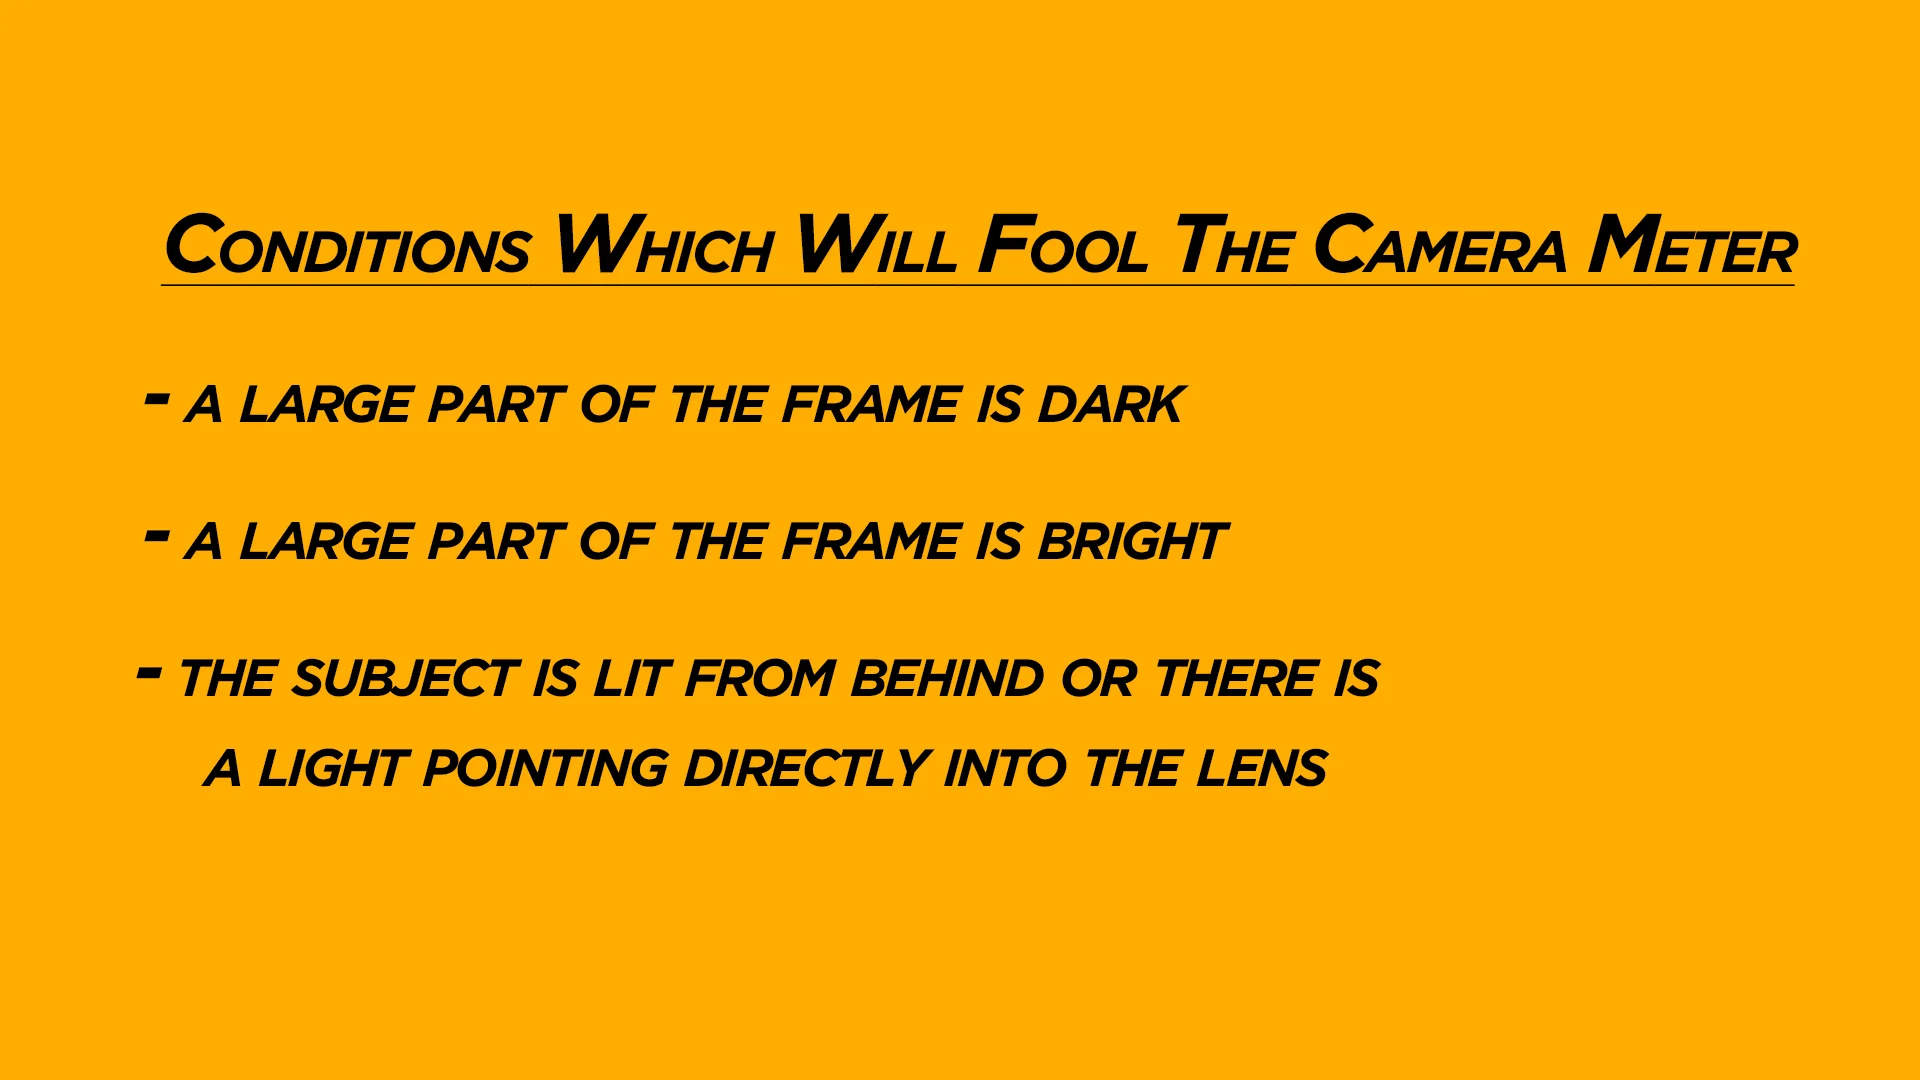
It is for this reason that most cameras have more than one metering mode. Though the camera meters are calibrated to compensate for reading reflected light, they are also calibrated to done one more thing, if they are left to their own - expose everything properly. Your camera will likely get fooled under these three conditions
Strong whites
Strong blacks
Backlight
What are the different metering modes?
Usually, every camera has three metering modes, whether it is a Canon, Nikon, Fuji or Sony. They just call it by different names to confuse us.

Mastering metering modes on Canon and Nikon Sony and Fuji
Matrix metering, Evaluative or Multi metering mode
As you can see from the chart below, different camera companies refer to this metering mode by different names. It is an extremely complex and advanced metering mode and is accurate 90% of the time.

Nikon Matrix Canon Evaluative metering
In this mode, the camera analyses the entire frame and then, based on very complex algorithms and calculations gives you what it thinks is the perfect exposure for that scene. The algorithms and calculations used by each company are different and are top secret because this is the metering mode that 90% of the camera users use 90% of the time. In other words, this metering mode actually decides the reputation of a camera in the minds of the common user. To give you an example, Nikon describes the Matrix Metering mode as follows:
Matrix metering evaluates multiple segments of a scene to determine the best exposure by essentially splitting the scene into sections, evaluating either 420-segments or 1,005 segments, depending on the Nikon D-SLR in use.
The 3D Color Matrix Meter II takes into account the scene's contrast and brightness, the subject's distance (via a D- or G-type NIKKOR lens), the color of the subject within the scene and RGB color values in every section of the scene. 3D Color Matrix Metering II also uses special exposure-evaluation algorithms, optimized for digital imaging, that detect highlight areas. The meter then accesses a database of over 30,000 actual images to determine the best exposure for the scene. Once the camera receives the scene data, its powerful microcomputer and the database work together to provide the finest automatic exposure control available.
30,000 images! Imagine that! I suspect that the other camera makers have similar complex technology working in their cameras as well - they just haven't shared it with me yet!
The image below shows a camera in Matrix, Evaluative or Multi metering mode where the yellow overlay represents the entire frame being covered and analysed.
Metering viewfinder matrix Nikon Canon Evaluative Sony Fuji
Centre weighted metering mode
In this metering mode, only the centre reading is taken as depicted by the yellow overlay in the photograph below. In some cameras, you can control the size of the centre which gives you more control over your photographs.

Metering viewfinder Centre
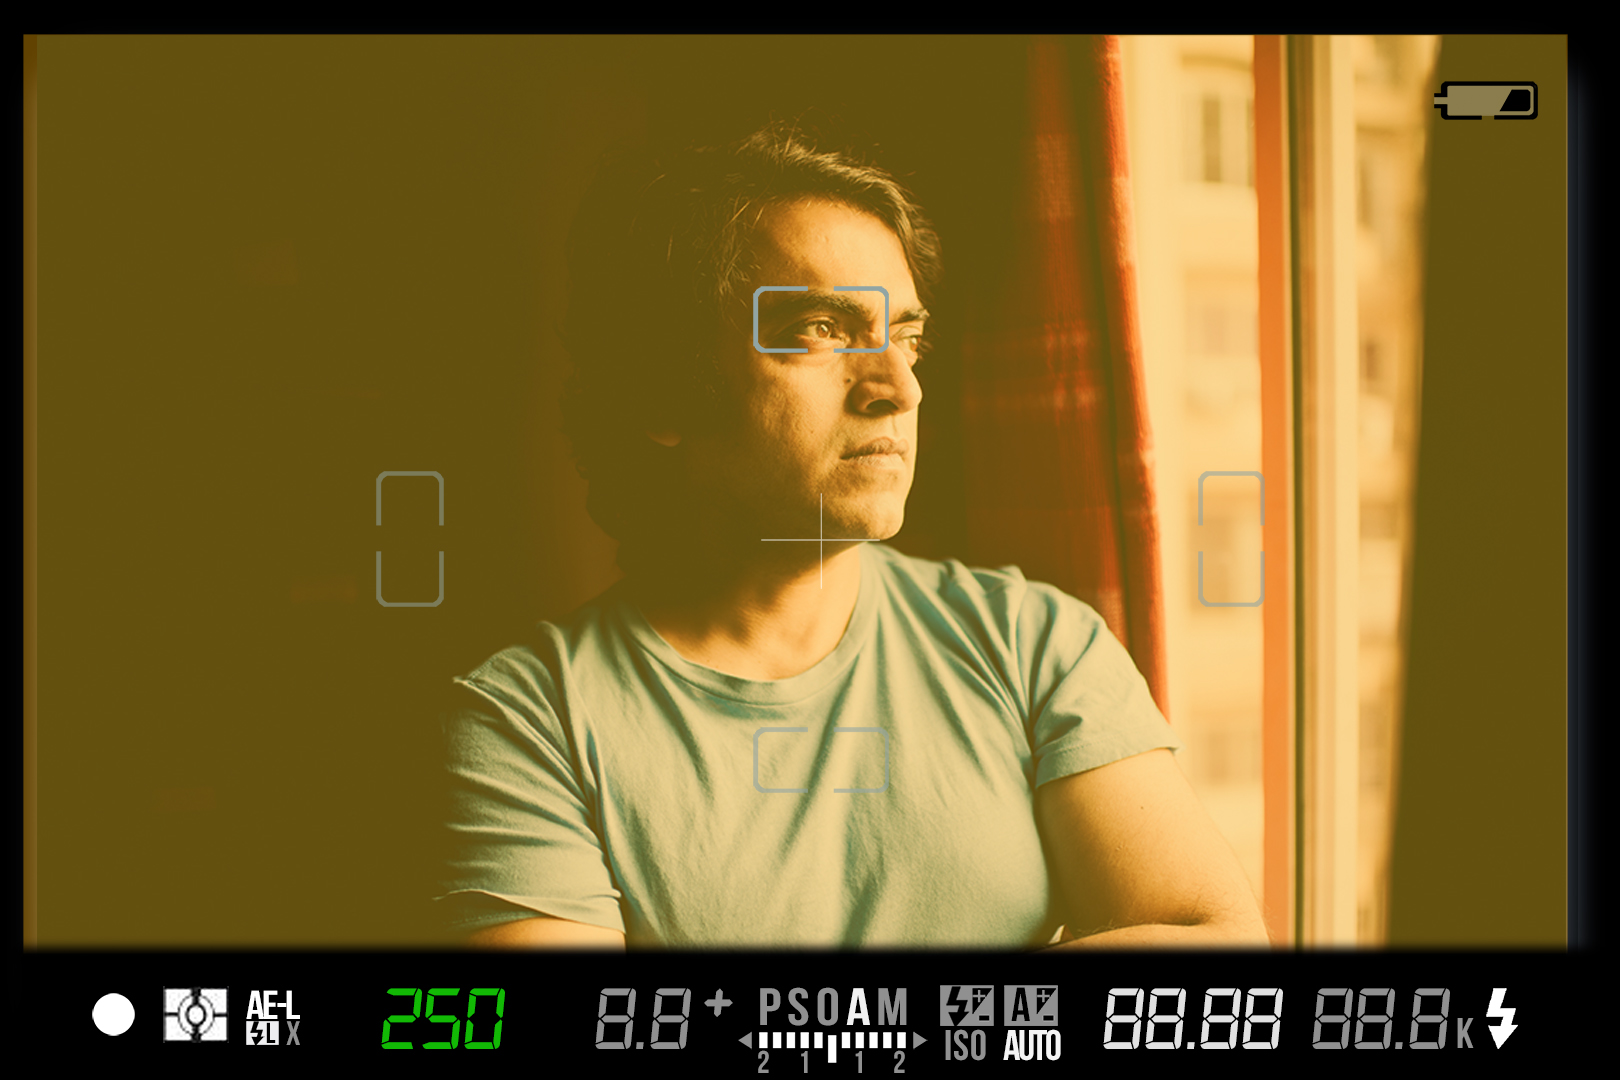
Spot metering mode
In this mode, the camera takes the reading only from the spot that you have selected and practically ignores the rest of the frame. Spot metering mode is an extremely precise mode and it can give some fantastic results under some conditions.

Spot metering
For example, in the photograph above, I was only worried about exposing the face of the actor correctly because it was meant to be a dark mysterious scene. So I switched the metering mode to spot metering. (Click on the file to be taken to the larger version or click here)
In addition to this, some cameras might have a partial evaluative or some other nonsensical metering mode which I don't bother with and I suggest you don't either. The reason I say this is, the more you stick to the basics of photography and master them and rely less on proprietary technology, the better photographer you will be. In addition to this to this, you will also be able to switch camera models, makes and brands at the drop of a hat. This eventually leads to great freedom - if as a photographer, you can be free of model or brands. You should definitely aim for that.
In conclusion, the right metering mode can help you translate the photograph that you have in your mind into reality. I recommend starting with the Matrix metering mode on the Nikon or the Evaluative mode on the can Canon and then slowly start experimenting with other modes to see which one you prefer under what circumstance.
To learn photography, we recommend you read The Ultimate Beginner's Guide to Photography
Watch the video on metering modes below to understand more about metering modes and please share this article with your friends if you liked it.
Subscribe to GMax Studios YouTube channel
Please subscribe to our YouTube channel to watch more videos like this by clicking the banner above. You can also register and join our forum to share photographs, ask questions or seek advice or critique from us or other fellow photographers.

Fieldwork - Shooting Swanand Kirkire

Fieldwork - Shooting Swanand Kirkire
It is not every day that you are woken up by a phone call from a two-time National Award Winner.
I picked up the phone. It was Swanand Kirkire who has got a cult following for his song Baawra Man. If you have not heard this song, please hit the link now!!! He has also won the National Award, twice - once for Lage Raho Munnabhai and the second time for 3 Idiots.

He was headed for an interview and needed a picture really quickly. 15-20 mins is all he had to stop by at my place.
"I don't want it to look like a photograph-photograph, you know... like it has been shot!" he said."Now, how on Earth could a photograph look as if it had not been shot," I wondered. Before I could muster a reply, he asked, "What clothes should I carry?" "Uh... A white shirt and a black shirt and maybe...." I barely managed to say before he said "See you!" and hung up.
The process
What aspect of a personality can you encompass in a photograph when he is a actor, director, writer and lyricist all rolled into one? I was still contemplating the "setting of the shot" but I was sure of one thing - I wanted to shoot him using just natural light. This was because he did not want the picture to look as if it had been shot.
We tried a few settings, like the one pictured above, sitting at a piano but we were not happy with it. He said it made him look "false" since he barely knew how to play the piano and I was not happy the way the warmer light was blending with the daylight. Both were different colour temperatures and they were not looking good. Though, I must add that there are no such hard and fast rules for mixing colour temperature or white balance.
Then I noticed he was wearing a red bracelet made of beads and that gave me an idea. I mustered up all the red coloured things in the house which could be at writer's table and made him sit on my dining table. I even got my goldfish bowl as a prop. There was natural light coming through the window (my favourite light source!) from the right side of the camera and I asked my driver (the only help available at that time!) to hold a small reflector from the left side of the camera.
Then I asked Swanand to write something, really write something and forget that I was there! He said, "How can I do that early in the morning?". I said, "The same way, I am shooting your photograph!" He smiled and set pen to paper and started writing something.

He got a phone call in the middle of the session and I asked him to take it, resulting in the above picture. He loved it but I knew that the magazine/newspaper would not.
The result
The final shot that satisfied us both is the one pictured below. Here, satisfaction is the key word. I don't know if I could have shot a better photograph that day (I would like to believe, I could have!) but he and I, both were satisfied with the outcome considering the amount of time, I had to plan the shot, take it and actually deliver it to him right then and there. Also, I made him adjust the time in his watch to make it look like it was some time later in the day. Somehow, it just felt better to me. I look at this photograph often, planning what all will I do if someone walks in my door under similar circumstances with a similar request. I have made quite an exhaustive list - but that is material for another post.
The first picture at the piano became the profile picture of the Swanand Kirkire authorised Facebook page.
The real bonus was that he actually wrote a beautiful poem on my goldfish while he was sitting there. That was really a wonderful surprise.
Have you shot any portraits using only natural light recently? Share them with us. Please feel free to ask questions in the comments.
UPDATE: If you really love his work, you might want to click here to see an informal video recording I shot where he is singing Baawra Mann with Shantanu Moitra

How to shoot in program mode
How to shoot in program mode? The question that is more likely be asked is - why shoot in program mode? What is the big deal? The P mode is for beginners, right? Well, nothing could be farther from the truth. The Program or P mode is a very powerful mode that can really make the difference between a good picture and bad - or not getting a photograph at all.
Well let's sort this out first - Nikon calls this the Programmed Auto mode while Canon calls it the Program Mode. So all of us Nikon users have been all saying it wrong all these years and now that we have admitted it - let us move on.
The program mode is denoted by the letter P and you have to press the mode button on a Nikon and turn the command dial until the P appears on the screen like in the photograph below.

Some cameras have a dial (like most of the Canon cameras) which are marked for different modes so it is just a matter of turning the dial to P as shown in the photograph below.

Now let's see what happens when we switch to the P Mode. According to the Canon website:
The camera takes a meter reading from the scene, assigns an exposure value, and then uses internal algorithms to select a suitable shutter speed and aperture.
In simple terms, the camera itself chooses the best setting for the scene, in terms of shutter speed, and aperture while you do nothing! Yes. That's true. You do nothing and that is why most people think that shooting in the Program Mode is just for beginners - which is just a polite way of saying "idiots"! But as we shall discover in a while, nothing can be farther from the truth.
In fact, the Program Mode, is a very powerful Mode in which the camera takes all the decisions related to aperture and shutter speed and you, as photographer, focus on the two most important things in photography. One which is
focus
and the other one which is your
composition
.
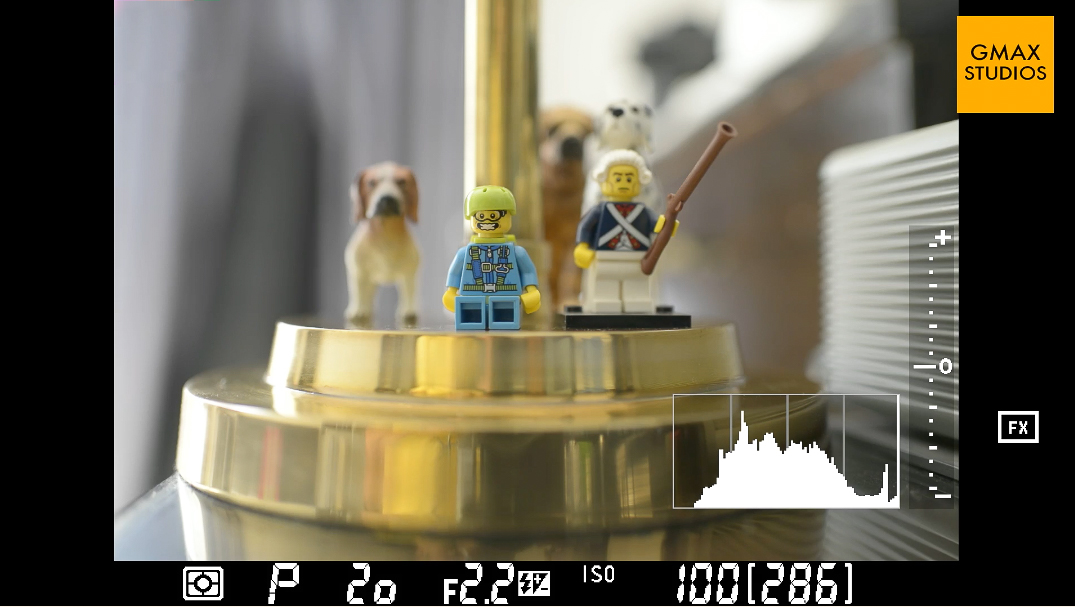
Now it might sound easy but to hand over the controls of the two most important settings, that is aperture and shutter speed to the camera is a very scary thought. Changing either one could have a big impact on the final photograph. Enter - The Flexible Program Mode! Tada!!!
What is the Flexible Program Mode?
The Program Mode also has an extremely powerful setting called the Flexible Program Mode. Canon calls it the Program Shift mode. Since I am a Nikon user and I do cherish my sanity and yours - I will continue to refer to this mode as the flexible program mode but the explanation will (hopefully) apply to both Nikon and Canon.
According to the Nikon website:
In mode P, the camera automatically adjusts shutter speed and aperture for optimal exposure. You can, however, choose other aperture and shutter speed combinations that will produce the same exposure: this is called "flexible program".
To get into the Flexible Program Mode all you have to do is turn the command dial while in the program Mode on a Nikon. On a Canon you have to turn the wheel at the back of your camera.
You will see a star sign * appear next to the P when you are in the Flexible Program mode.

What the Flexible Program Mode does that it locks the exposure value of the scene. This means that you are free to change your aperture or your shutter speed and your exposure value will not change. Now that is an extremely powerful thing to have at tip of your fingertips because you can decidein an instant, whether you want to shoot the scene at a wider aperture or at a faster shutter speed.
To change either the aperture or shutter speed you turn the respective dial either clockwise or counter clockwise.
Given below are the two extremes of shooting in flexible program mode.(See the * next to the P?) The first photograph is at f1.4, resulting in a shutter speed of 1/40 of a second.
The second photograph is at f11, resulting in a shutter speed of 1.3 seconds. As you will notice, the settings have changed drastically but the exposure is still correct. Both the photographs are neither underexposed nor overexposed.
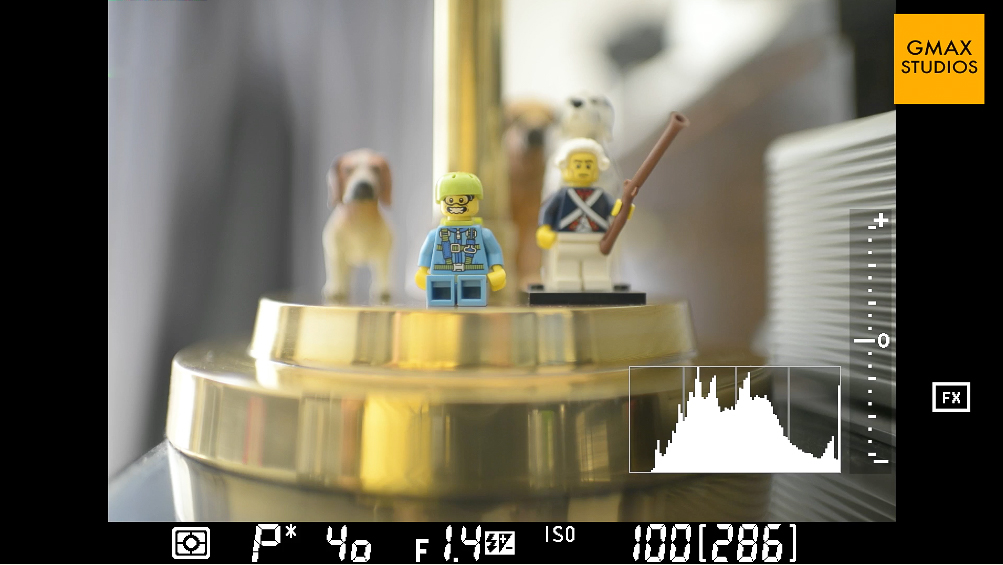

When to use the Program or Flexible Program Mode?
The Program Mode or Flexible Program Mode is usually used when we don't have time to mess around with the settings and to take decisions regarding whether to shoot in the Aperture Priority Mode or on Shutter Priority Mode.
For instance, I know a lot of wedding shooters who shoot in this mode because very often they want to decide in a second what they want to give priority to - the shutter or the aperture.
So that moment when the bride throws the bouquet of flowers in the air? You want a high shutter speed to freeze the action. Similarly, you don't want the father of the bride to be completely out of focus if he is standing slightly in the background. This time you will want to control your aperture.
Also read:
How aperture affects your photographs
and
How shutter speed affects your photographs
I even know some sports shooters who shoot from the sidelines, who are more comfortable in the Program Mode than in Shutter Priority, as you and I would like to think.
Tip
I usually don't shoot in situations that require me to shoot in the Program Mode, but what I do is when I keep my camera in the bag, I switch it to the Program Mode. I do this in case I need to take my camera out and shoot something at a moment's notice. It has never happened so far but it makes me feel like a cowboy with his gun cocked and ready to fire! Yeah baby!
If after all this reading, you have still not managed to understand the P Mode, here is a short video to help you out.
Please share this article with your friends if you found it useful. Also, please leave us a comment if you have a comment or just want to show your appreciation.

ISO shutter speed and aperture relationship explained
The Exposure Triangle - that is the relationship between ISO, shutter speed and aperture explained.
I remember the time when I had just picked up a camera with a serious intent to start shooting. It was all so confusing. "So many settings!" I used to keep thinking and then one day I realised that while photographing I could only control the aperture or the shutter speed. I was shooting film, so I had little control over ISO - once the film was inside the camera, it was pretty much fixed at what ISO I was shooting.
So now, while shooting digital, in spite of all the confusion there are just three things you need to control to create a good photograph - ISO shutter speed and aperture (Ok four, if you want to count in white balance too!)
What is the relationship between ISO, shutter speed and aperture?
The relationship between ISO, shutter speed and aperture is also known as the exposure triangle.

EXPOSURE TRIANGLE
These three settings define what the exposure value of a photograph. It means that the exposure value of any photograph can be expressed as a combination of these three settings or values. For example the photograph below was taken at an exposure value of f11, 1/250th at ISO 100 - where f11 is the aperture, 1/250th(of a second) is shutter speed and the ISO is 100.

iso shutter speed and aperture relationship
So now if I increase the amount of light entering the camera by opening the aperture by 1 stop to f8, the photograph becomes slightly overexposed as seen in the photograph below.

ISO shutter speed and aperture relationship - overexposed
In order to compensate for this, I will have to increase my shutter speed to 1/500 in order to get a properly exposed photograph again. This because I have used another setting (shutter speed) to decrease the amount of light by the same value that I increased the amount of light.
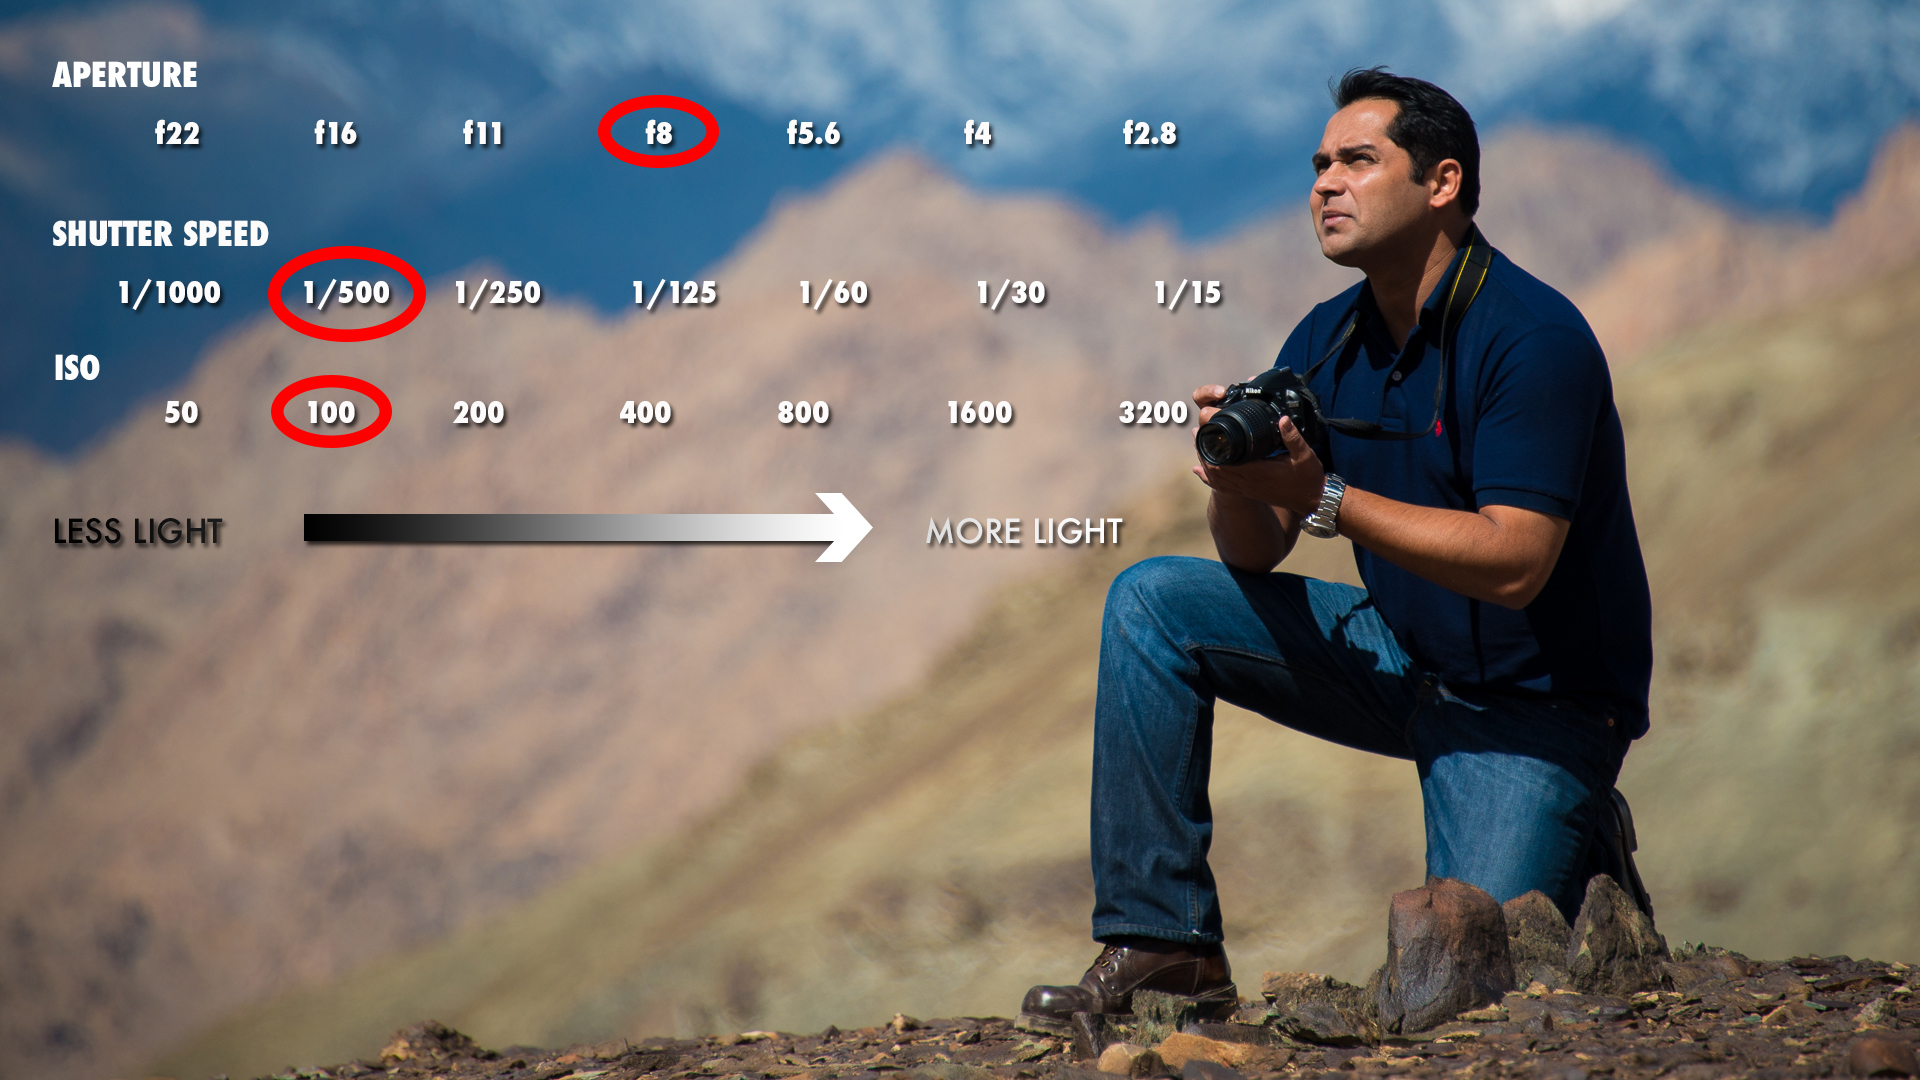
EV valueok500
So, what this relationship primarily boils down to is this:
If you you increase or decrease one of the values in the exposure triangle - you will have to increase or decrease another value BY THE SAME value in order to get the same Exposure Value.
Sounds confusing? Well it kind of does when you put it in words but the good news is that once you see the video below it will become perfectly clear. Please subscribe to our channel by clicking here if you like the video and would like to see more of these.
Subscribe to GMax Studios YouTube channel
Please share this video with your friends if you liked it. Ask your questions in the comments below and also let us know what other videos or articles you would like to see in the future.

How to set custom white balance on Canon cameras
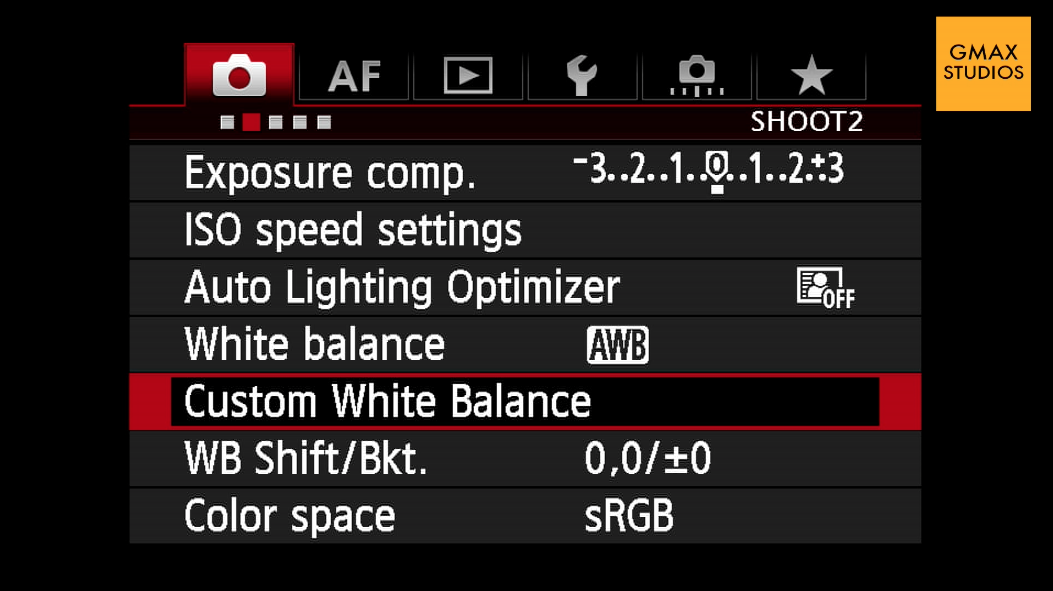
What is custom white balance?
Please read: What is white balance if you need to understand the concept of white balance in detail.
In this article, we will see how to set custom white balance on Canon cameras. If you need to see how to white balance Nikon cameras, please click here. balance Every camera has various settings to shoot photographs under different kinds of lighting conditions. If this was not the case, the colour of the light falling on the subject would influence the colour tones of the subject. You might have noticed a warm tone to some of your photographs like the one below.

Sometimes there appears to be a bluish or cold tone to the photographs that you take - like the one below. These two differences (warm and cold)are most evident when you shoot photographs indoors under lights of the bulbs or in the evening.

The bulb casts its's warm light on the subject making it warm and the evening light renders a blue tone on the subject due to its "cool" nature. In order to get absolutely neutral or true colours under any lighting situation we have to set custom white balance so everything appears neutral - neither warm, nor cool like the photograph shown below.

How to set custom white balance on Canon cameras?
When you set custom white balance on your camera, it means that you tell the camera what is white and the camera makes adjustments accordingly to all the colours, making them appear neutral - without any tone or cast. This is done by showing the camera a simple white sheet of paper under the same lighting conditions that you are taking your photograph and then you take a photograph of the white paper. The white paper should fill the frame fully. You then go to the menu and choose the custom white balance setting and press ok. The camera will show you the photograph that you have just taken and ask you whether it should use this photograph for the custom white balance setting. Confirm this by pressing ok again. Then go to the white balance setting and choose the custom white balance setting which is denoted by the symbol of two triangles and and a square. This symbol is shown in the photograph below.

You have just successfully set custom white balance for your camera and now when you take a photograph all the colour cast will be gone and your colours will appear true and neutral. This whole process is explained in this short video below. If you like it please do not forget to subscribe to our channel for more photography tips and techniques. You can subscribe to the channel by clicking here. Please feel free ask any questions in the comments below.
https://youtu.be/x6BgZFxZG6k
Important
- The white paper should fill the entire frame – it should be all that you can see in your viewfinder/monitor.
- If you are shooting a wide shot, zoom in to the white paper or move closer to the paper.
- Do not get the paper close to the camera as the light falling on the paper has to match the light falling on your subject. Get the camera closer to the paper instead.
- If the camera is having a problem focusing on the white paper, switch to manual focus. It does not matter even if the photograph is out of focus for taking a white balance reading.
- Sometimes the will NOT display the photograph of the paper that you have just taken which means that the photograph was not suitable for taking a white balance reading. Check if your exposure is correct and take another photograph of the white paper. Underexposure or over exposure might cause a bad reading.
Please leave a comment if there is a question that you would like to ask or would like us to make a video on a specific photography topic.

